Assign Node Labels
A critical application running on a slice can be configured to have its deployments on predefined nodes on a cluster without sharing the nodes with different applications. This is required to avoid security and cluster's multi-tenancy issues such as:
- The deployment that happen on application namespaces onboarded onto a slice are positioned on the cluster nodes arbitrarily. Sometimes, the same nodes on which the deployments happen are shared with other applications and become vulnerable to issues such as denial of service and resource evasion.
- This could also announce as a security issue where an application with the sensitive data is on the same node is shared with others, or the application cannot stay longer without accessing CPU.
- Setting limits and requests does not prevent utilization of common node resources such as network interfaces, SSD drives, and GPUs. These resources do not fit under the scope of the Kubernetes resource quota.
Benefits
- Assigning node labels creates node affinity that allows namespaces to be placed on a node or group of nodes with the same node label. Node affinity allows restricting the namespaces to only specific nodes with same labels.
- Node Affinity helps in effective management of common node resources such as network interfaces, SSD drives, and GPUs.
- It helps in eliminating security issues by isolating the labeled nodes with applications running on a slice from other nodes on the worker clusters.
Assign Node Labels to Slices and Namespaces
Go to Node Affinity on the left sidebar.
On the Node Affinity page, the slices with namespaces onboarded are listed.

(Optional) Check the cluster details for each slice by expanding its menu.

(Optional) Under NODE LABELS, click View all to see the assigned node labels for a given slice.
note
The View all link under NODE LABELS is visible only when node labels are assigned to a slice. When no node labels are assigned to a slice, No Labels Assigned is shown under NODE LABELS.
Select a slice for which you want to assign node labels.

Step 1 - Assign Labels to Slices
The first step is to assign node labels to a slice.
caution
Ensure that the nodes are correctly labeled on the worker clusters. If nodes matching the labels
configured under node affinity rules are not found, the Kubernetes scheduler places the application
pods in the Pending state.
On the Step 1 - Assign to Slice tab, under NODE LABELS, no labels are assigned to the slice.
To assign node labels to a slice:
On the Step 1 - Assign to Slice tab, under LABEL NAME, select the labels that you want to assign to the slice.
Use the Search by Label search box to look for a label. Pull down the same search box menu for Search by Cluster to look for labels by a worker cluster.

After labels are selected, they appear under SELECTED LABELS for all the worker clusters. You can choose to remove a label by clicking the
xfor a label or click CLEAR to remove labels for a worker cluster.Click Next to go to step 2.
Step 2 - Assign Labels to Namespaces
The second step is to assign node labels to namespaces.
caution
Ensure that the nodes are correctly labeled on the worker clusters. If nodes matching the labels
configured under node affinity rules are not found, the Kubernetes scheduler places the application
pods in the Pending state.
To assign node labels to namespaces:
On the Step 2 - Assign to Namespaces tab, select the namespace you want to assign namespaces to and click ASSIGN NODE LABELS.
Use the Search by Namespaces search box to look for namespaces. Pull down the same search box menu for Search by Cluster to look for namespaces in a worker cluster.
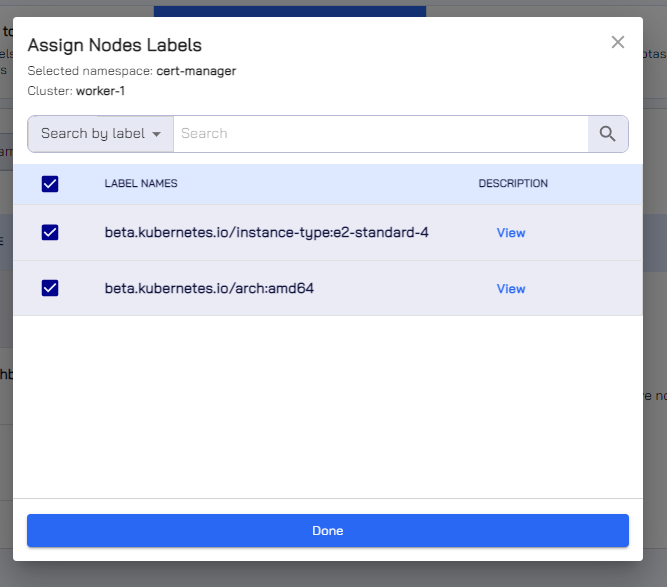
On the Assign Node Labels dialog, select the node labels that you want to assign and click Done.

On the Step 2 - Assign to Namespaces tab, the labels assigned are under ASSIGNED NODE LABELS.

(Optional) Alternatively, you can skip assigning node labels to namespaces.
Click Next to go to step 3 for applying the YAML file.
Step 3 - Apply YAML to Assign Node Labels
The third step is to apply YAML to save the assigned node labels.
To apply the YAML file:
On the Step 3 - Apply YAML tab, under Code Preview, you can preview the assigned node labels.

Click Apply YAML file to save the configuration.
Click Next to go to step 4.
Step 4 - Finalize
The fourth step is to preview the finalize the configuration.
To finalize the assigned node labels:
On the Step 4 - Finalize tab, click View all for the slice and namespaces to verify the node labels assigned to them.

Click Done after verifying the node labels. The slice with node labels assigned is on the Assign Node Labels page.

Under Node Labels, click View all to see the assigned node labels for that slice.
On the Assigned Node Labels dialog, the node labels assigned to that slice are listed.

On the Assigned Node Labels dialog, to see assignment details of a node label, click View under description of that label.
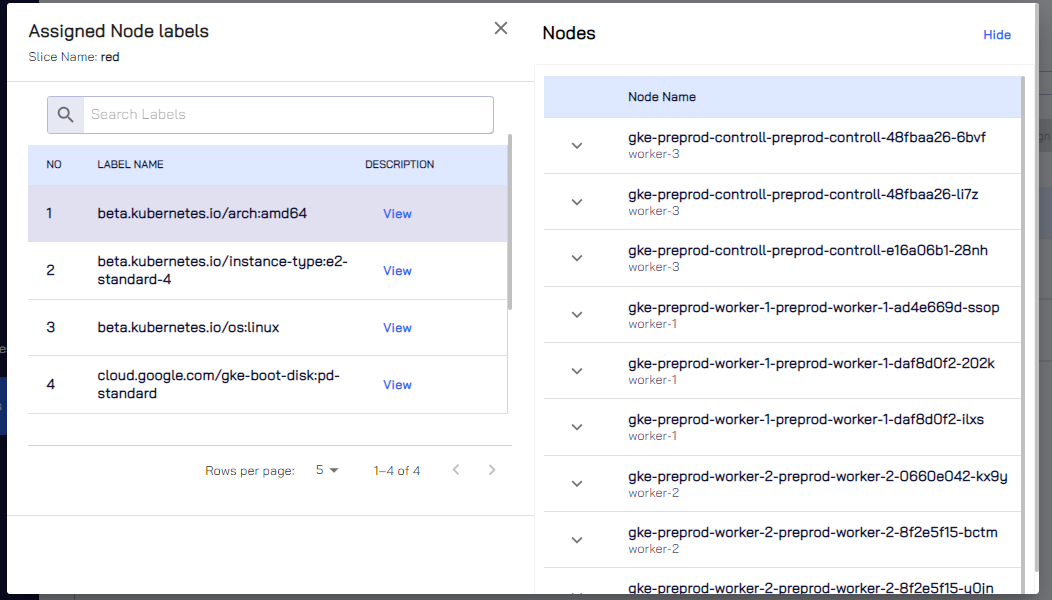
Click Hide to hide the details and close the dialog or just close the dialog.
Edit Node Labels of Slices and Namespaces
You can edit a slice that has existing node labels to add new labels to it or to the onboarded namespaces.
To edit the node labels of a slice:
Go to Node Affinity on the left sidebar.
On the Node Affinity page, select a slice for which you want to edit the node labels.

Step 1 - Edit Node Labels of a Slice
The first step is to edit the node labels for a slice.
caution
Ensure that the nodes are correctly labeled on the worker clusters. If nodes matching the labels
configured under node affinity rules are not found, the Kubernetes scheduler places the application
pods in the Pending state.
To edit labels of a slice:
On the Step 1 - Assign to Slice tab, add a new node label to worker clusters. You can also add a new label to only a specific worker cluster.

After editing the node labels, click Next to go to step 2.
Step 2 - Edit Node Labels of Namespaces
The second step is to edit the node labels for namespaces.
caution
Ensure that the nodes are correctly labeled on the worker clusters. If nodes matching the labels
configured under node affinity rules are not found, the Kubernetes scheduler places the application
pods in the Pending state.
To edit the node labels assigned to namespaces:
On the Step 2 - Assign to Namespaces tab, select the namespace for which you want to add or remove node labels.
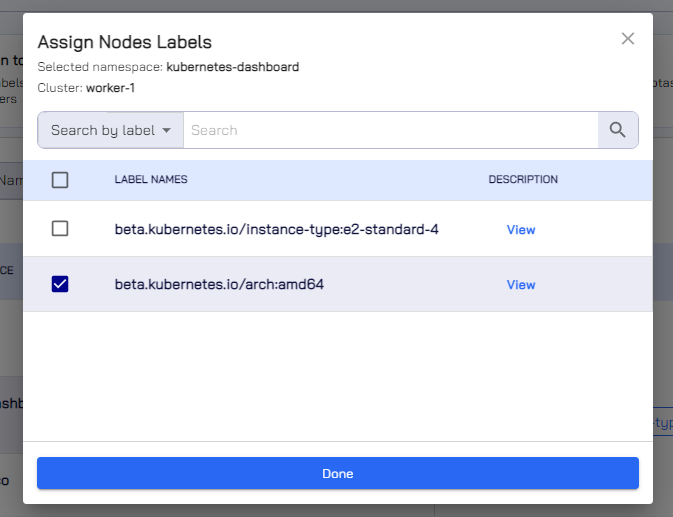
On the Assign Node Labels dialog, select a node label or unselect an assigned node label if you want to remove it.

Click Done.
On the Step 2 - Assign to Namespaces tab, the edits that you have done reflect under SELECTED LABELS.

Click Next to go to step 3.
Step 3 - Apply YAML to Assign Labels
The third step is to apply the YAML configuration.
To apply the YAML file:
On the Step 3 - Apply YAML, verify the configuration under Code Preview. You can also click View all under Node Labels for slice and namespaces to see the assigned node labels.
Click Apply YAML to save the configuration.
Click Next to go to step 4.
Step 4 - Finalize
The fourth step is to finalize the updated node label assignment.
To finalize the node labels assignment:
On the Step 4 - Finalize, click View all under Node Labels for slice and namespaces to verify and confirm.
Click Done to confirm the changes. On the Node Affinity page, under Node Labels, click View all to again verify the node labels.
Remove Assigned Node Labels from Namespaces
To remove the assigned node labels from namespaces:
Go to Node Affinity on the left sidebar.
On the Node Affinity page, select the slice that contains namespaces you want to remove remove assigned node labels from.
On the Step 1 - Assign to Slice tab, click Next to go to step 2.
On the Step 2 - Assign to Namespaces tab, select the namespace you want to remove assigned node labels from.
There are two ways to remove assigned node labels from namespaces:
Under SELECTED LABELS, remove the node label by clicking its
xmark.Click ASSIGN NODE LABELS, and on the Assign Node Labels dialog, unselect the node labels that you want to remove.
The namespaces that have the assigned node labels removed disappear under SELECTED LABELS.

Click Next to go to step 3.
Verify the new configuration under Code Preview.
Click Apply YAML to save the configuration.
Click Next to go to step 4.
On the Step 4 - Finalize tab, verify the assigned node labels that you have just removed from the namespace.
Click Done to confirm that you have removed the assigned node labels.
Remove Assigned Node Labels from a Slice
To remove the assigned node labels from a slice:
Go to Node Affinity on the left sidebar.
On the Node Affinity page, select the slice you want to remove assigned node labels from.
Click CLEAR ALL to remove all the assigned node labels.

The system warns you that all the assigned node labels will be removed. Confirm that you want to remove.
Confirming removal takes you to Step 3 - Apply YAML.
On the Step 3 - Apply YAML tab, verify the updated configuration under Code Preview.

Click Apply YAML to save the configuration.
Click Next to go to step 4.
On the Step 4 - Finalize page, verify that all the assigned node labels are removed from that slice.

Click Done. On the Node Affinity page, the slice does not have any node labels assigned to it.

info
Node labels can be assigned using the YAML configuration. For more information, see assign node labels using YAML.