Cluster Operations
This topic describes how to use the KubeSlice Manager to register clusters with the KubeSlice Controller. A cluster can be registered in two ways. You can register the cluster either automatically or manually. In automated mode, the Slice Operator is installed on the cluster automatically by KubeSlice. For the registration to be successful in manual mode, you must install the Slice Operator on the worker cluster using Helm.
KubeSlice uses Prometheus to collect events and metrics. To view metrics on the dashboard, you can enter the Prometheus URL during cluster registration if Prometheus is already installed on it. The Prometheus URL can also be updated after cluster registration by editing a cluster.
info
To install Prometheus and get the Prometheus URL, follow the instructions in the Install Prometheus section.
Worker Cluster Registration
To register a cluster:
Go to Clusters on the left sidebar.
On the Clusters page, click Add Cluster to register a cluster.

Automated Method
To register a new worker cluster with the controller in KubeSlice, follow these steps:
- Obtain the
kubeconfigfile of the worker cluster. - Use the
kubeconfigfile to register the worker cluster with the controller. - During the registration process, KubeSlice will automatically install the Slice Operator on the worker cluster.
- Keep in mind that each worker cluster can have only one Slice Operator installed on it.
note
If you are in an air-gapped scenario or if you need to install a custom helm repository or a
specific version of the worker chart, you can customize the config map for worker-chart-options.
For more detailed information, refer to Air-Gapped Installation.
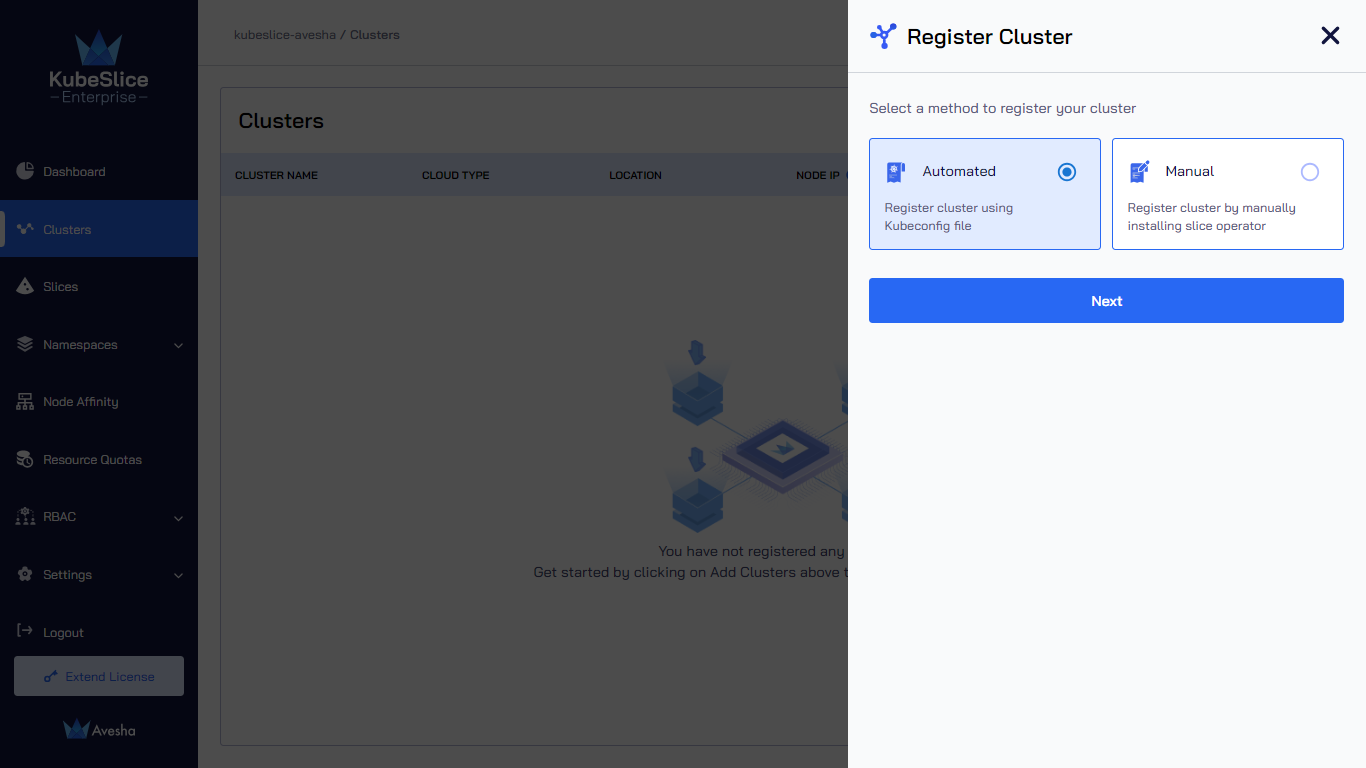
Under Register Cluster, select the Automated mode and click Next.
In the Add KubeConfig file section, enter the following information:
Enter the name of the cluster in the Name of the Cluster text box.
Drag and drop the kubeconfig file or Click here to upload the kubeconfile file.
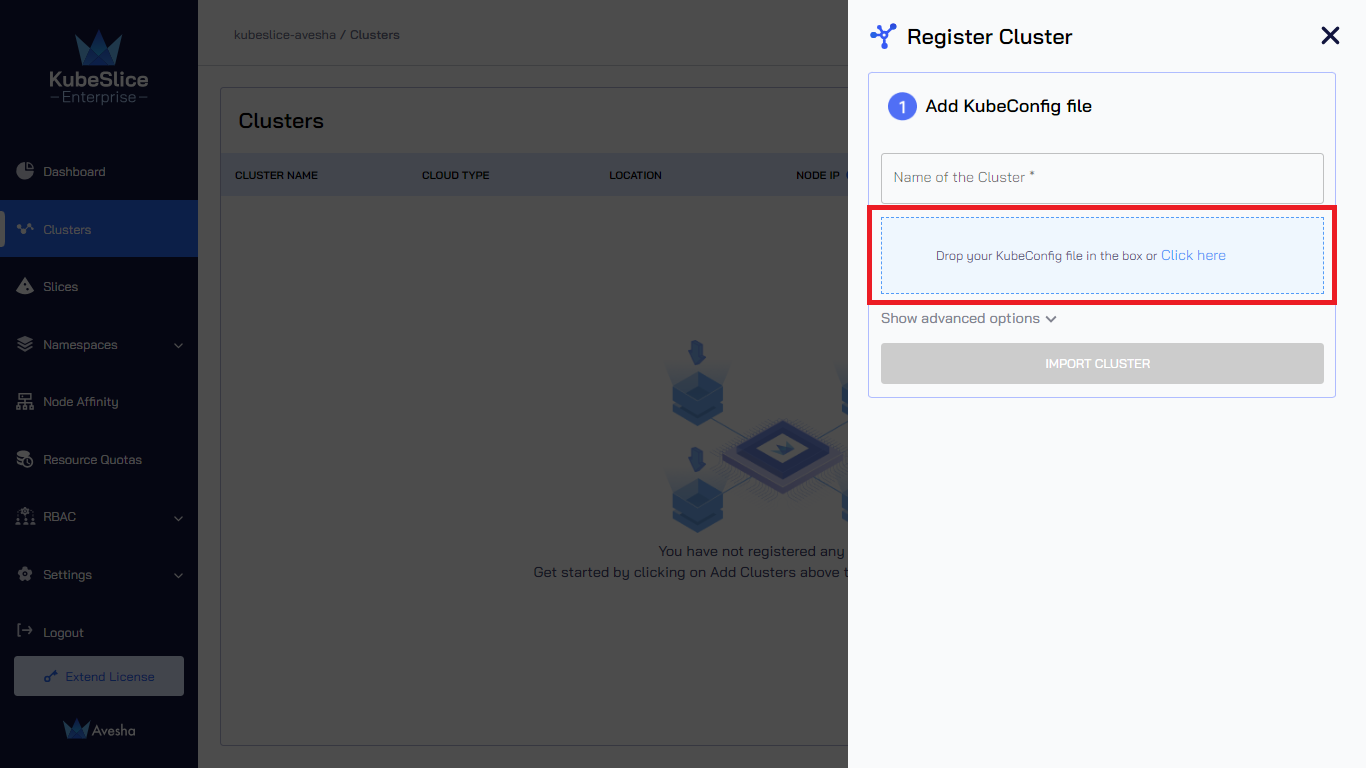
(Optional) Click Show advanced options and enter the following information:
KubeSlice detects the Node IP for nodes labeled
kubeslice.io/node-type=gateway. You can leave it blank. You can enter a specific Node IP during cluster registration, but make sure KubeSlice has access to it.note
We currently support IPv4 and IPv6 for node IP addresses.
Enter the URL of Prometheus that is installed on your cluster in the Prometheus URL text box.

Click the Import Cluster button to register a cluster.
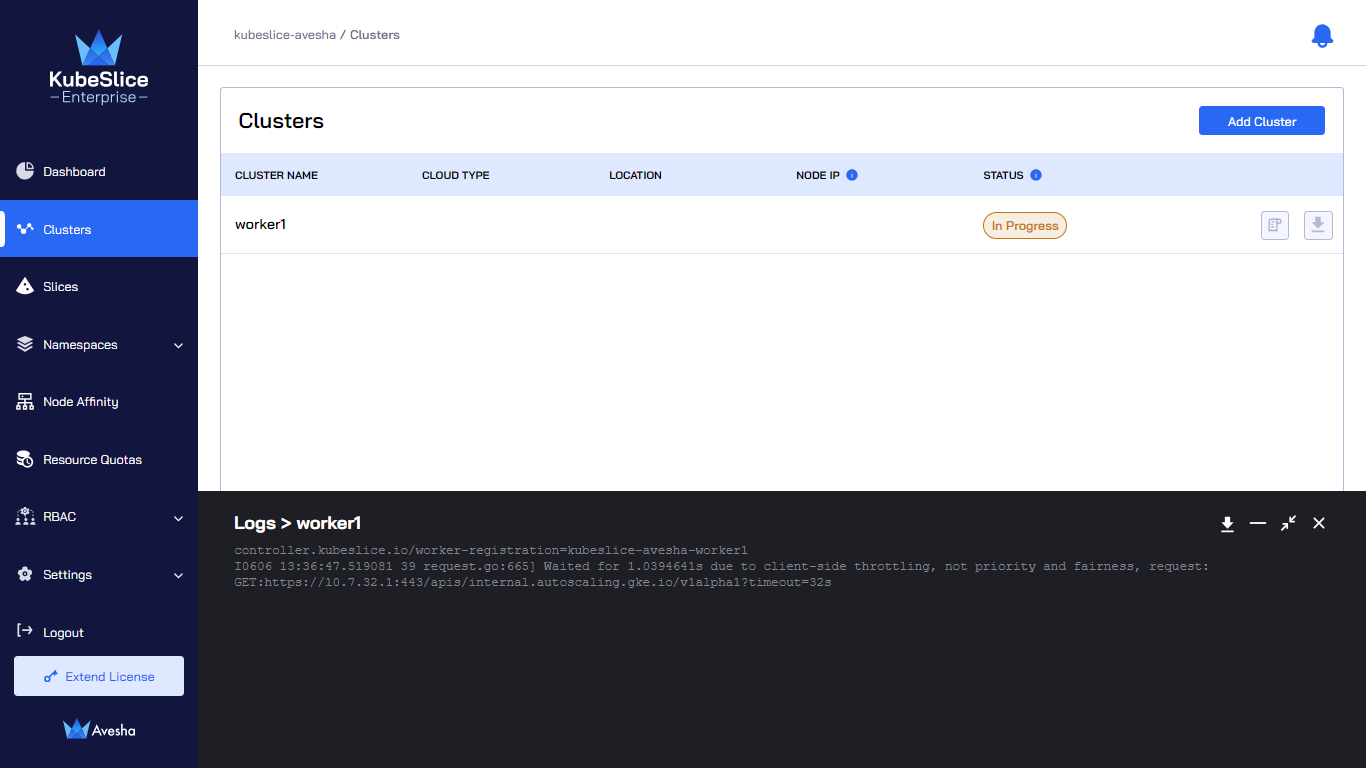
The following figure illustrates the cluster registration is In progress.
The following figure illustrates that cluster registration is pending. The Pending state signifies the installation process is successful and cluster is waiting for the Slice Operator components to be up and running.

The following figure illustrates that the cluster is registered with the controller. The status changes to Registered after all the Slice Operator components are up and running.

Air-Gapped Installation
You can edit or modify the worker-chart-options parameters in the ConfigMap file located in the kubeslice-controller namespace
in the controller cluster for a customized worker installation.
To edit a ConfigMap file:
Switch the context to controller cluster:
kubectx <controller cluster-name>Switch to the
kubeslice-controllernamespace.Edit the ConfigMap using the following command:
kubectl edit configmap worker-chart-optionsThe following are the customization options supported:
workerChartOptions:
metricsInsecure: # [Optional] Default is false. Set to true if required to disable TLS for metrics server.
repository: # [Optional] Helm repository URL for worker charts. Default is `https://kubeslice.aveshalabs.io/repository/kubeslice-helm-ent-prod/`
releaseName: # [Optional] Release name of kubeslice-worker. Default is `kubeslice-worker`
chartName: # [Optional] Name of the chart. Default is `kubeslice-worker`
chartVersion: # [Optional] Version of the chart. Default is the latest version
debug: # [Optional] Default is false. Set to true if required to enable debug logs for kubeslice-worker
helmCredentials:
  username: # [Optional]
  password: # [Optional]
imagePullSecrets:
  repository: # [Optional]
  username: # [Optional]
  password: # [Optional]
  email: # [Optional]
Manual Method
Register a new worker cluster with the KubeSlice Controller by entering the cluster name, the cloud name, and the cluster Kube API endpoint parameters during cluster registration. The Node IP and the Prometheus URL are optional parameters.
| Registration Inputs |
|---|
| Cluster Name |
| Cloud Name |
| Cluster Kube API Endpoint |
| (Optional) Enter the Node IP |
| (Optional) Enter the Prometheus URL |
To register a cluster:
Under Register Clusters, select the Manual mode.

Click Next to add the cluster details.
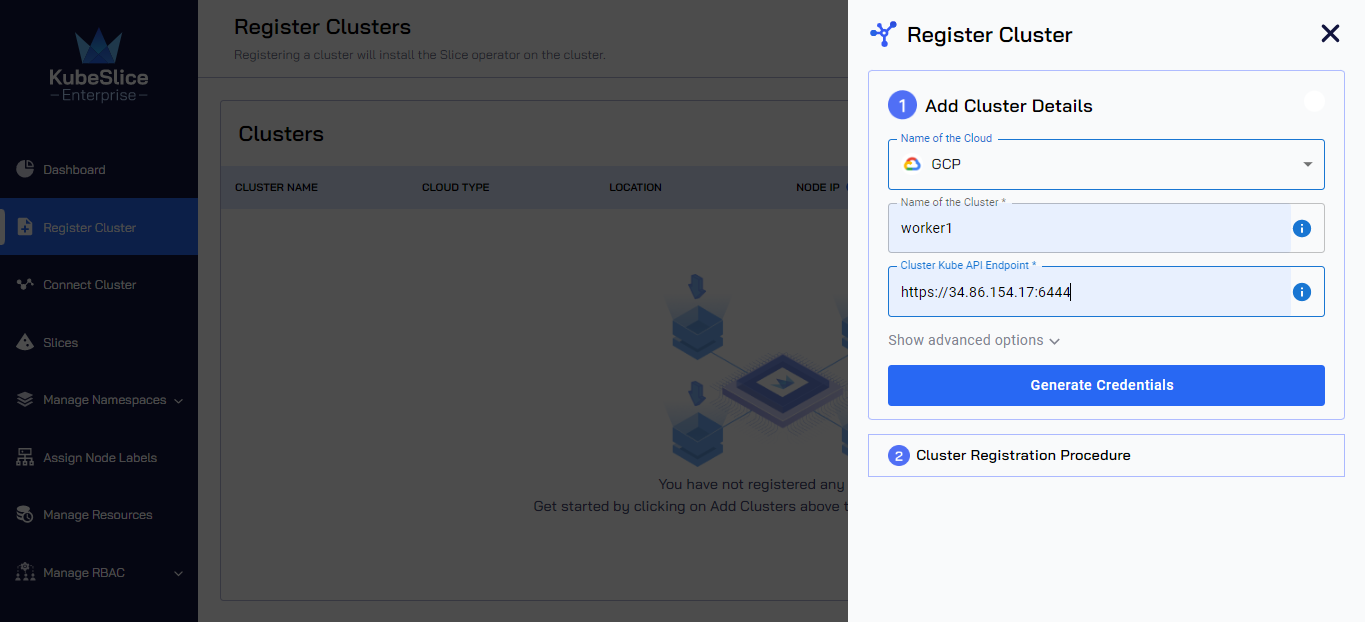
In the Add Cluster Details section, enter the following information:
Select the cloud from the Name of the Cloud drop-down list. The saved value is immutable.
Enter a name for the worker cluster in the Name of the cluster text box. The saved value is immutable.
Enter the control plane's
kube-apiserverendpoint of the cluster in the Cluster Kube API Endpoint text box. Run this command on the cluster to get the endpoint:kubectl cluster-info.
info
You can skip Step 6 and proceed to Step 7 to generate the values file.
(Optional) Click Show advanced options and enter the following information:
KubeSlice detects the Node IP for nodes labeled
kubeslice.io/node-type=gateway. You can leave it blank. You can enter a specific Node IP during cluster registration, but make sure KubeSlice has access to it.note
We currently support IPv4 and IPv6 for node IP addresses.
Enter the URL of Prometheus that is installed on your cluster in the Prometheus URL text box.

Download Slice Operator Values File
Click Generate Credentials to generate the values file. The values file is downloaded automatically. Save the file for later use.
note
The values file contains the worker secrets from the controller cluster, and the file is created with the cluster name that you entered in step 5.

(Optional) In the Cluster Registration Procedure section, click the download link if the values file does not download automatically.
Copy Helm Command
- Copy the Helm command to install the Slice Operator and Click Done.
Registration Status
The worker cluster's status on the Register Clusters page will be Awaiting User Action until the Slice Operator is
installed on it. The status changes to Registered after you install the Slice Operator
on the worker cluster, which shows that the cluster has been successfully registered.

Install the Slice Operator
Install the Slice Operator on the cluster you are registering using the values or secrets file that you downloaded in step 7 of Register a Worker Cluster.
info
- You need cluster administrative privileges to install the Slice Operator.
- To know more about the Slice Operator and its functions, see KubeSlice Components.
To install the Slice Operator:
Switch the context to the worker cluster using the following command:
kubectx <cluster name>Run the command you copied in step 9 of Register a Worker Cluster.
Example
helm upgrade -i kubeslice-worker kubeslice/kubeslice-worker --namespace kubeslice-system --create-namespace -f mars-secret.yaml
Validate the Installation
To validate the Slice Operator installation on a cluster, check the status of the pods that belong to the kubeslice-system namespace.
Use the following command to check if the pods are running:
kubectl get pods -n kubeslice-system
Example Output
NAME                                         READY   STATUS      RESTARTS   AGE
forwarder-kernel-94c8q                       1/1     Running     0          8h
kubeslice-dns-679966fd4c-4ppdb               1/1     Running     0          8h
kubeslice-netop-plz52                        1/1     Running     0          8h
kubeslice-operator-77fc84cb54-9j2jm          2/2     Running     0          4h36m
nsm-admission-webhook-k8s-864c87f5d4-cqlxn   1/1     Running     0          8h
nsm-install-crds-lbvrx                       0/1     Completed   0          2m35s
nsmgr-zqzzg                                  2/2     Running     0          8h
registry-k8s-84f468f675-g9hzg                1/1     Running     0          8h
spire-install-clusterid-cr-488p6             0/1     Completed   0          2m21s
spire-install-crds-dcm75                     0/1     Completed   0          2m28s
The following figure illustrates that the cluster is registered with the controller. The status changes to Registered after all the Slice Operator components are up and running.
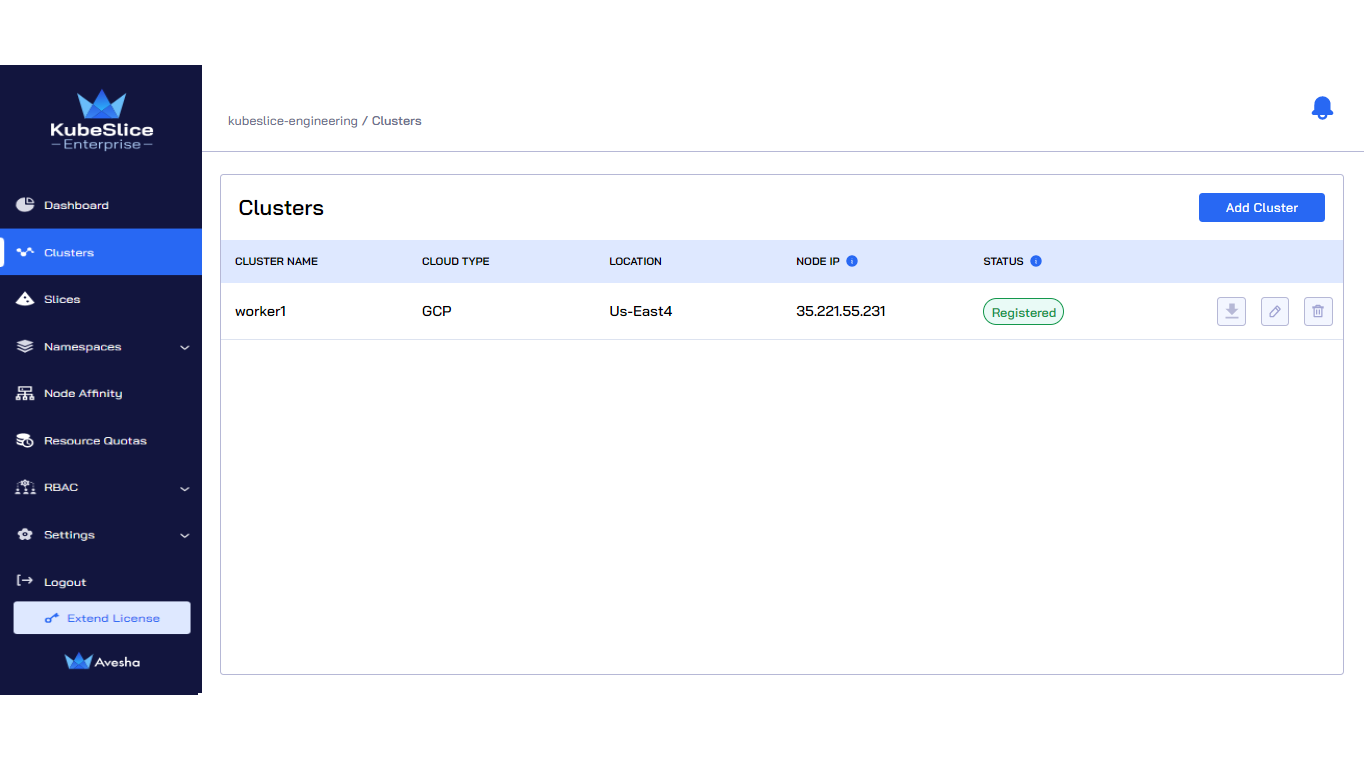
After you register a cluster with the KubeSlice Controller, the Node IP detected for that cluster appears on the
Register Clusters page. The following figure illustrates that KubeSlice has detected the Node IP 35.221.55.231
for the cluster worker1.
If the Node IP is not detected during cluster registration, the Register Clusters page displays an error icon for that cluster. The following figure illustrates that Kubeslice could not detect a Node IP for the cluster jupiter. You can update the correct a Node IP by editing a cluster.

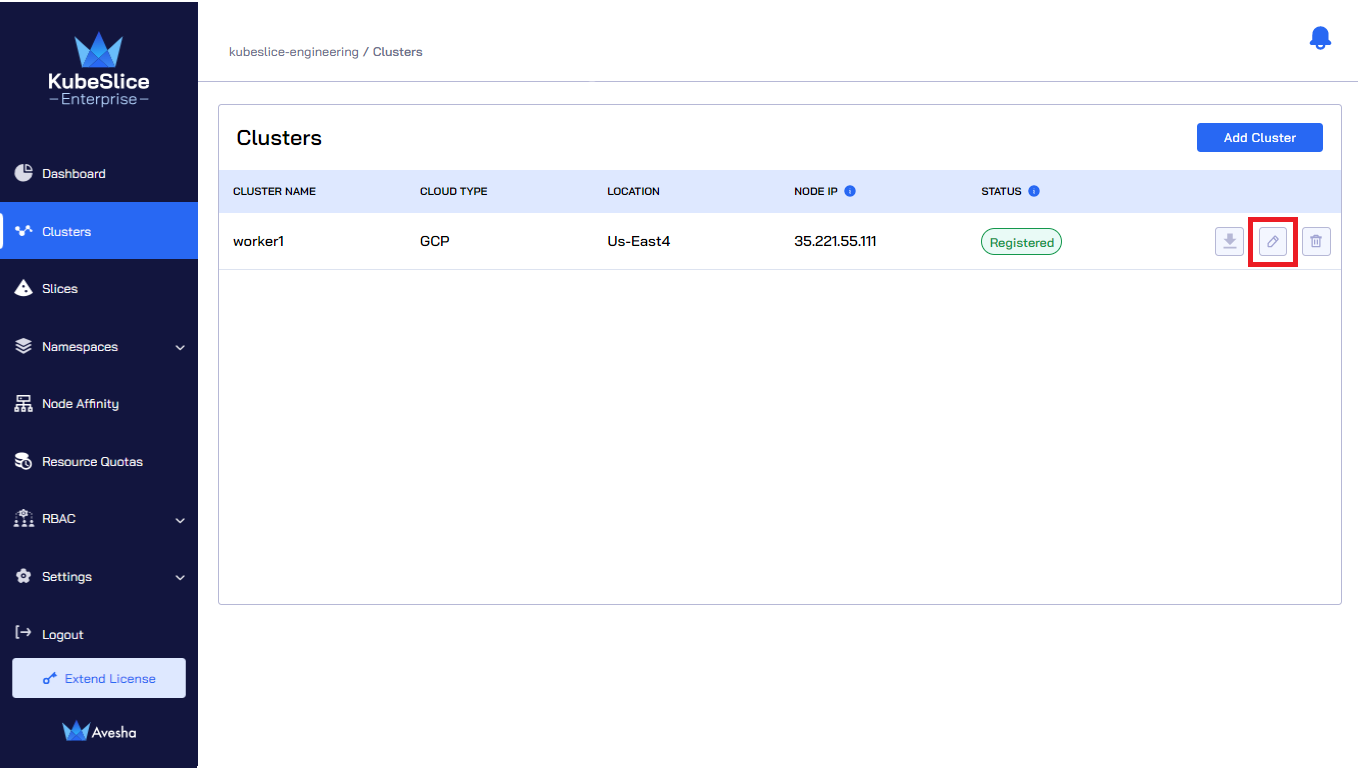
Edit a Cluster
To edit a cluster:
Go to Register Cluster on the left sidebar.
On the Register Clusters page, click the edit icon for the cluster to change any configuration.
info
The names of the cluster and the cloud are immutable.
Update the values. You can only edit the Cluster Kube API Endpoint, the Node IP, and the Prometheus URL values.
info
If you enter the specific Node IP, it takes precedence over any Node IP that KubeSlice detects.
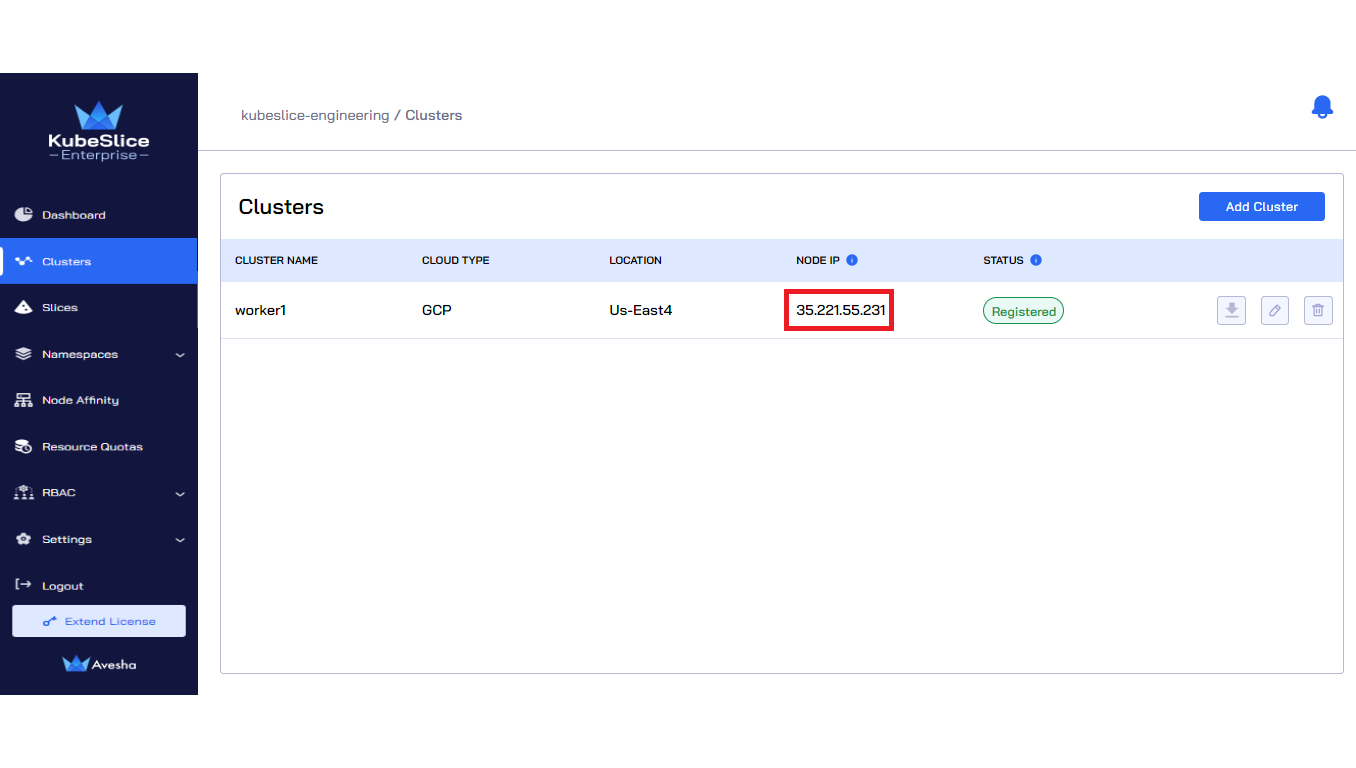
The following figure illustrates that KubeSlice has detected the Node IP
35.221.55.231for the cluster worker1.
If the value of the Node IP is empty, you see the error
KubeSlice could not detect a Node IP. You must enter one..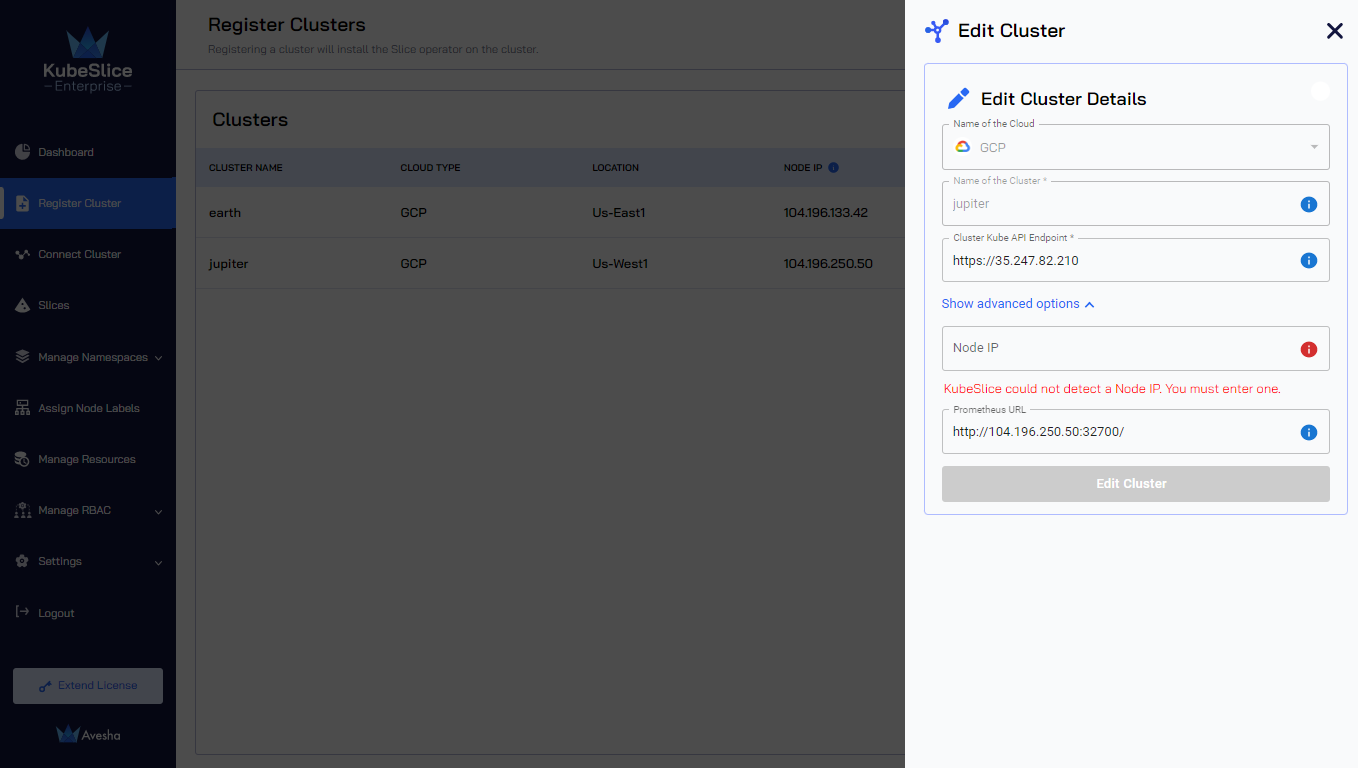
Click Edit Cluster to save the settings.
Detach a Worker Cluster
A cluster can only be deregistered from KubeSlice when it is not a part of any slice. If you try to deregister a cluster that is part of any slice, you get the following message:

To detach a worker cluster from a slice:
Go to Slices on the left sidebar.
Click the > icon at the right for the slice from which you want to detach a cluster.

Click the edit icon at the right.

Click the Edit Slice button.

In the Connect Clusters tab, Under Slice Clusters, click the minus icon for a cluster you want to detach. For example, detach a
backendcluster from aiperf-sliceslice.
Enter the text DETACH to confirm, and then click the Detach Cluster button.

The following figure illustrates that the Cluster Detach process is in progress. Detaching cluster from a slice might take some time depending on the underlying resources.

The following figure illustrates that the
backendcluster is detached from aiperf-sliceslice.
The following figure illustrates that in the Clusters tab, the cluster is removed from the list.

The event notifications are issued in the Notifications page, you can check out the events that have been received across clusters, slices, and their components.
To view the event notification for a cluster:
Click on the bell icon on the top right corner.

On the Notifications page, in the Events section, select the cluster from the drop-down list.

The following figure illustrates the Events Details for the
worker1cluster.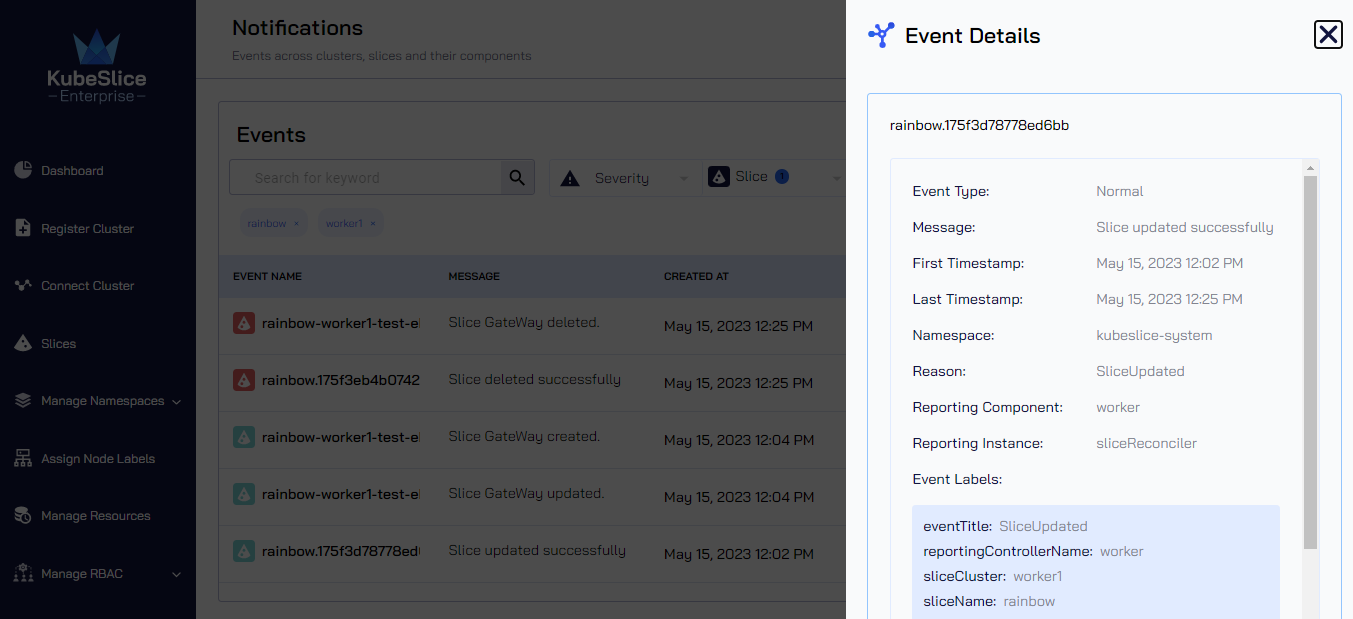
Deregister a Worker Cluster
Automated Method
To deregister a worker cluster from the controller:
Go to Register Cluster on the left sidebar.
On the Register Clusters page, click the delete icon for the cluster that you want to delete.

Enter the text DELETE to confirm, and then click the Delete Cluster button.

The following figure illustrates that the cluster being deregistered from the controller.

After you deregister the cluster from the controller, the cluster is removed from the Register Clusters page. For example,
worker1is removed from the list of registered clusters.
Manual Method
To deregister a worker cluster, you must uninstall the Slice Operator from it.
Uninstall the Slice Operator
Switch the context to the worker cluster using the following command:
kubectx <cluster name>Uninstall the Slice Operator using the following command:
helm uninstall [RELEASE_NAME] -n kubeslice-system
Delete CRDs
Delete the CRDs of the Slice Operator using the following commands:
kubectl delete crd serviceexports.networking.kubeslice.io
kubectl delete crd serviceimports.networking.kubeslice.io
kubectl delete crd slices.networking.kubeslice.io
kubectl delete crd slicegateways.networking.kubeslice.io
kubectl delete crd sliceresourcequotas.networking.kubeslice.io
kubectl delete crd slicerolebindings.networking.kubeslice.io
kubectl delete crd slicenodeaffinities.networking.kubeslice.io
Delete the
kubeslice-systemnamespace using the following command:kubectl delete ns kubeslice-system
After you uninstall the Slice Operator, deregister a worker cluster from the controller by deleting it from the Register Clusters page.
Delete Cluster
To deregister a worker cluster:
Go to Register Cluster on the left sidebar.
On the Register Clusters page, click the delete icon for the cluster that you want to delete.

Enter the text DELETE to confirm, and then click the Delete Cluster button.
