Manage RBAC
RBAC is a method to manage users' access to resources based on their roles in a company.
KubeSlice is shipped with two role templates, reader-role-template and deployment-role-template.
You can use them directly, create your own roles from the templates or even create K8s roles
to provide access to users or groups.
KubeSlice supports creating roles to suit your requirements and assigning those roles to users/groups and manage accessibility of onboarded namespaces in a slice. The KubeSlice Manager's RBAC tab file lets you manage RBAC for a slice and namespaces. This tab contains a submenu to roles.
To manage RBAC roles in Kubeslice Manager, you need to integrate a supported identity provider.
Supported Authentication Strategies
For RBAC to be implemented for a user/group, Kubernetes supports the following authentication strategies:
- X509 Client Certs
- OpenID Connect Tokens
- Webhook Token Authentication
- Authenticating Proxy
- User impersonation
You can implement one or more strategies for your worker clusters and allow users to access the clusters. For more information, see Kubernetes authentication strategies.
To know more on OpenID Connect (OIDC), see OIDC Token-based authentication with popular identity providers.
Prerequisites
Before you begin, ensure that the following requirements are met:
- The slice to which you want to assign roles is created and namespaces are onboarded on it.
- One of the supported authentication strategies is set up on the worker clusters, and users/groups have access to the clusters.
- The cluster admin has access to the controller cluster and KubeSlice Manager.
- (Optional) The cluster admin has access to the worker clusters for validating role assignments.
- (Optional) IdP is configured for KubeSlice. To know more, see integrating IdP with KubeSlice.
View Roles
To see the roles:
Expand the RBAC on the left sidebar.
Go to the Roles submenu.

The default roles are reader-role-template and deployment-role-template. You can also see the roles created through the YAML configuration.
Add a Role
The benefits of adding a role under Roles over a native Kubernetes role are:
- You can edit or delete a role created in this tab or using the YAML slice role template.
- Deleting this role automatically removes it from the slice it is assigned to.
warning
You cannot use this role in any other namespace, except for the project namespace.
To add a role:
Expand the RBAC in the left sidebar.
Go to Roles.
On the Roles page, you can add roles by using the existing roles as a template.
Choose a role that you want to use as a template and click the vertical ellipsis icon and select Use as Template.

Alternatively, expand the role menu and click Copy to copy the role definition. Later, paste this definition in the Terminal parameter of the Add Role dialog.

Click Add Roles.
On the Add Roles dialog, for name, add a name to the role. The name of the role can contain hyphens between two words in lower case but it does not accept empty spaces. The role name is immutable.
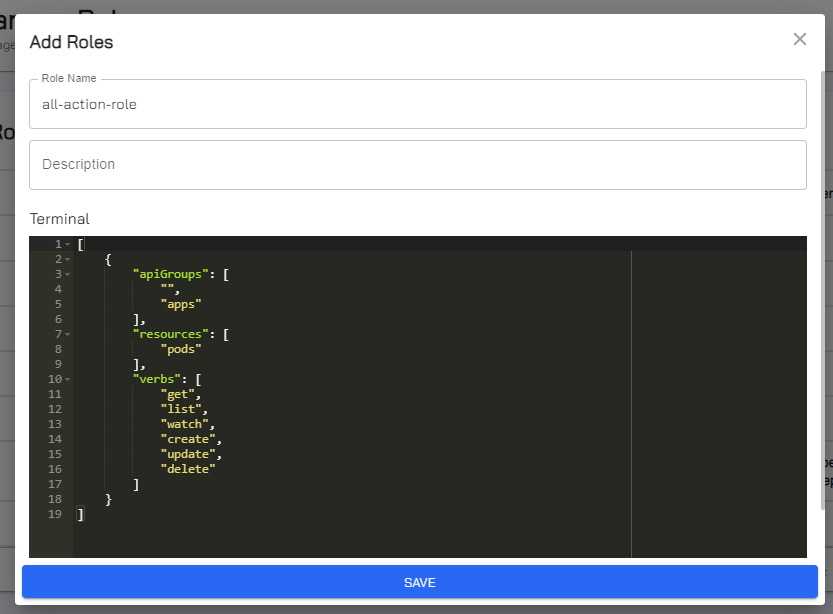
(Optional) For Description, explain the role in terms of its purpose or significance to identify it later.
For Rules, paste the template that you have copied earlier and edit the permissions as required.
info
An empty apiGroup represents the core API group.
warning
You must not add an asterisk
*to represent all API groups for the apiGroups parameter.Click Save to add this role.
Edit a Role
You can edit the role definitions of an existing role. To edit a role:
Expand the RBAC in the left sidebar.
Go to the Roles submenu.
On the Roles page, expand the menu of a role that you want to edit.

Click Edit.
On the Edit Role dialog, the name is immutable.
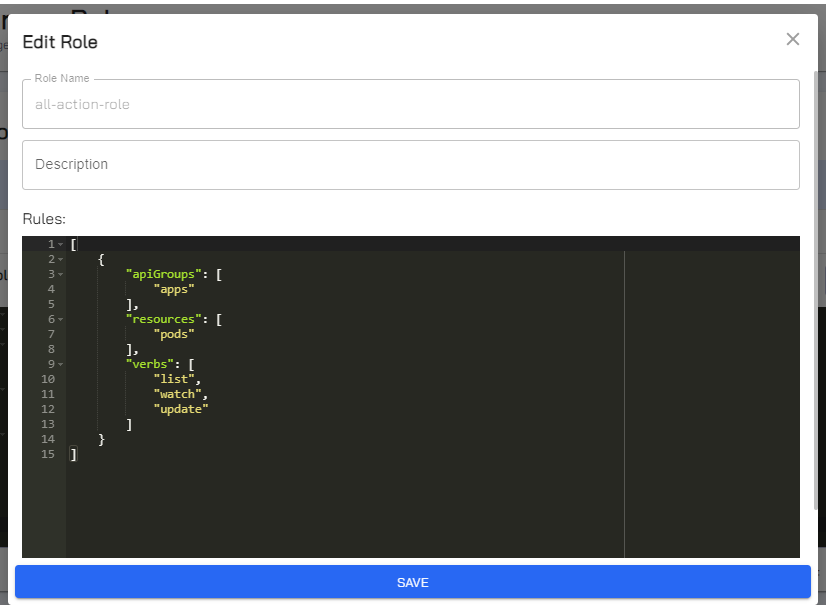
For Description, add a new description or edit the existing description.
For Rules, edit the role definition as required.
Click Save to update the changes.
Assign Roles
You can assign roles to users or groups to grant them with the micro-level access to a slice.
To assign a role:
Go to RBAC on the left sidebar.
info
When a namespace is deleted, an error stating that the namespace is not found is shown on the RBAC page.

(Optional) Check the cluster details for each slice by expanding its menu.

Select a slice for which you want to assign roles.

Click Assign Roles. Assigning roles is further divided into four steps as described below.
Step 1 - Assign Roles to the Slice
The first step is to assign roles to users and groups for accessing the slice.
To assign a role to users/groups to accessing the slice:
On the Step 1 - Assign roles to Slices tab, you can select roles or assign imported Kubernetes (K8s) roles.

Under SELECT ROLES, for User/Group, select user or group from the drop-down list.

For Name, enter the name of the user or group for which you want to assign the role.
For Roles, select roles from the drop-down list to assign them to the user or the group.
Add another user or group to assign roles (if required) by clicking the
+(plus) icon.
Import Roles
Alternatively, you can go to IMPORT K8S ROLES to add the details of a native Kubernetes (K8s) role.
info
Ensure that the native K8s role is in the project namespace before adding its details. To know how to import roles into the project namespace, see importing an existing K8s role.

Under IMPORT K8S ROLES, select user or group from the drop-down list.
For User/Group's Name, enter the name of the user or group that you have selected.
For API Version, enter the API version of the K8s role. The value must be
rbac.authorization.k8s.io/v1.For Kind, enter the name of the K8s role object schema. The value must be
Role.For Name, enter the name of the K8s role.
(Optional) To import another K8s role, click the
+(plus) sign and repeat steps 8 through 11.After assigning roles to the slice, click Next to assign roles to namespaces.
Step 2 - Assign Roles to Namespaces
The second step is to assign roles to namespaces onboarded on the slice. To assign roles to namespaces:
On the Step 2 - Assign to Namespaces tab, you can see that the role in question is not assigned to namespaces.
Under Roles, select the role that you want to assign and click Assign Namespaces.

There is a search box in which you can search by Roles, Users, or User Groups. All these three options are in the search box's drop-down list.
On the Assign Namespaces to Roles dialog, select the namespace that you want to assign this role or select the CHOOSE NAMESPACES checkbox (that is above all the namespaces) if you want to assign the role to all the namespaces.

Similarly, on the Step 2 - Assign to Namespaces tab if you want to assign the imported K8s role, then go to Imported Roles and repeat steps 2 and 3.
info
The imported Kubernetes roles are listed if you have imported them in the Step 1 - Assign roles to Slices tab under IMPORT K8S ROLES.
Click Save to assign the role to namespaces.
On the Step 2 - Assign to Namespaces tab, verify the list of namespaces assigned with a role by clicking View all for that specific role.

Click Next to apply the YAML file.
Step 3 - Apply YAML
The third step is to apply the YAML file that is autogenerated. To apply the YAML file:
On the Step 3 - Apply YAML tab, under the Code Preview, verify the configuration.
Click Apply YAML to apply the configuration.

Click Next to finalize all the configuration.
Step 4 - Finalize the Role Assignment
The fourth step is the final step to verify the role assignment.
To verify the role assignment:
On the Step 4 - Finalize tab, verify the role assigned to namespaces.

Click Done. On the RBAC, the roles assigned to a slice page are shown.

info
To check a role assignment to worker clusters, see validating role assignments on worker clusters.
Edit Assigned Roles
There can be new namespaces that are onboarded to which you want to assign roles. There can be new roles introduced that you want to apply to namespaces. In such cases, you can edit the slice that is already assigned with role(s).
To edit a slice assigned with roles:
Go to RBAC on the left sidebar.
On the RBAC page, select a slice for which you want to edit roles.

Click Edit Roles.
Step 1 - Edit Roles Assigned to the Slice
The first step is to edit roles assigned to users/groups for accessing the slice.
To edit roles assigned for accessing the slice:
On the Step 1 - Assign roles to Slices tab, under SELECT ROLES, select a new role to assign it to the existing user.

To assign role to another user or group (if required) by clicking the
+(plus) icon.For User/Group, select user or group.
For Name, enter the name of the user or the group.
For Roles, select the roles from the drop-down list to assign them to the user or group.
(Optional) Go to the IMPORT K8S ROLES tab, if you want to import new K8s roles or edit the existing K8s roles.
info
Ensure that the native K8s role is in the project namespace before adding its details. To know how to import roles into the project namespace, see importing an existing K8s role.
After you are done with your changes, click Next to edit the roles assigned to namespaces.
Step 2 - Edit Roles Assigned to Namespaces
The second step is to edit roles assigned to namespaces.
To edit the roles assigned to namespaces:
On the Step 2 - Assign to Namespaces tab, under CHOOSE ROLES, select the role for which you want to edit the role assignment.

On the Assign Namespaces to Roles dialog, under CHOOSE NAMESPACES, select or unselect the namespace that you want.

Click Save to update the changes.
Verify the list of namespaces by clicking View all for the role that you have edited.
Click Next to apply the YAML file.
Step 3 - Applying YAML
The third step is to apply the new autogenerated YAML file.
To apply the YAML file:
On the Step 3 - Apply YAML file, verify the changes under Code Preview.

Click Apply YAML to apply the edited configuration.
Click Next to finalize the edited role assignment.
Step 4 - Finalize the Role Assignment
The fourth step is to verify the edited role assignment.
To verify the edited role assignment:
On the Step 4 - Finalize tab, verify the roles assigned to the namespaces.

Click Done to verify the changes. On the Manage RBAC page, you can see the changes in the roles for that slice.

Remove Roles from Namespaces
You can remove roles from namespaces.
warning
You cannot remove all roles from all the namespaces on a slice. At a given point in time, there should be at least a namespace assigned with a role on the slice on which roles are assigned.
To remove roles from namespaces:
Go to RBAC on the left sidebar.
On the RBAC page, select a slice for which you want to remove roles from the namespaces.
Click Edit Roles.
On the Step 1 - Assign roles to Slices tab, click Next as you only want to remove roles from namespaces.
On the Step 2 - Assign to Namespaces tab, select the role that you want to remove from namespaces.
On the Assign Namespaces to Roles dialog, unselect the namespace checkbox from which you want to remove the role.
warning
You cannot remove all roles from all the namespaces on a slice. At a given point in time, there should be at least a namespace assigned with a role on the slice on which roles are assigned.

Click Save to save the changes.
Click Next to apply the YAML file.
On the Step 3 - Apply YAML, under Code Preview, verify the namespaces from which you have removed the roles.

Click Apply YAML to apply the configuration.
On the Step 4 - Finalize tab, verify that the role is removed from namespaces by clicking View all for that role.

Click Done.
Remove All the Roles from a Slice
You can remove all the roles from a slice.
To remove all the roles from a slice:
Go to RBAC on the left sidebar.
On the RBAC page, select a slice for which you want to remove roles.
Click Edit Roles.
On the Step 1 - Assign roles to Slices tab, click CLEAR ALL.

Confirm that you want to remove the roles. On the RBAC page, the slice does not have any role assigned.

Delete a Role
Delete a role that is not required or used anymore.
info
Deleting a role automatically removes it from the slice it is assigned to thus removing access from all users/groups using that role.
To delete a role:
Expand the RBAC dropdown menu in the left sidebar.
Go to Roles from the menu.
On the Roles page, click the vertical ellipsis icon for the role that you want to delete.

Click Delete from the menu.
Confirm that you want to delete that role.
info
RBAC can be configured through the YAML file also. For more information on this feature and its YAML configuration, see Managing RBAC for a Slice.