Bring Your Own Model
EGS Serverless is a cloud-based service where you can deploy your AI or ML model without managing any infrastructure. It lets you focus on your model, while the service handles all operational overhead. You simply deploy the model and start sending inference requests through a ready-to-use endpoint.
This feature is currently in beta , and its
performance, and behavior may change without prior notice.
Prerequisites
-
To deploy a model, a valid payment method is required. For more information, see Add a Payment Method.
infoYou will be prompted to add a payment method when you are enter your model details if no payment method is added.
Deploy a Model from the Library
To deploy a model, a valid payment method is required. For more information, see Add a Payment Method.
-
Go to EGS Serverless on the left sidebar and click Bring Your Own Model.
-
On the Bring Your Own Model page, choose a model from the library.
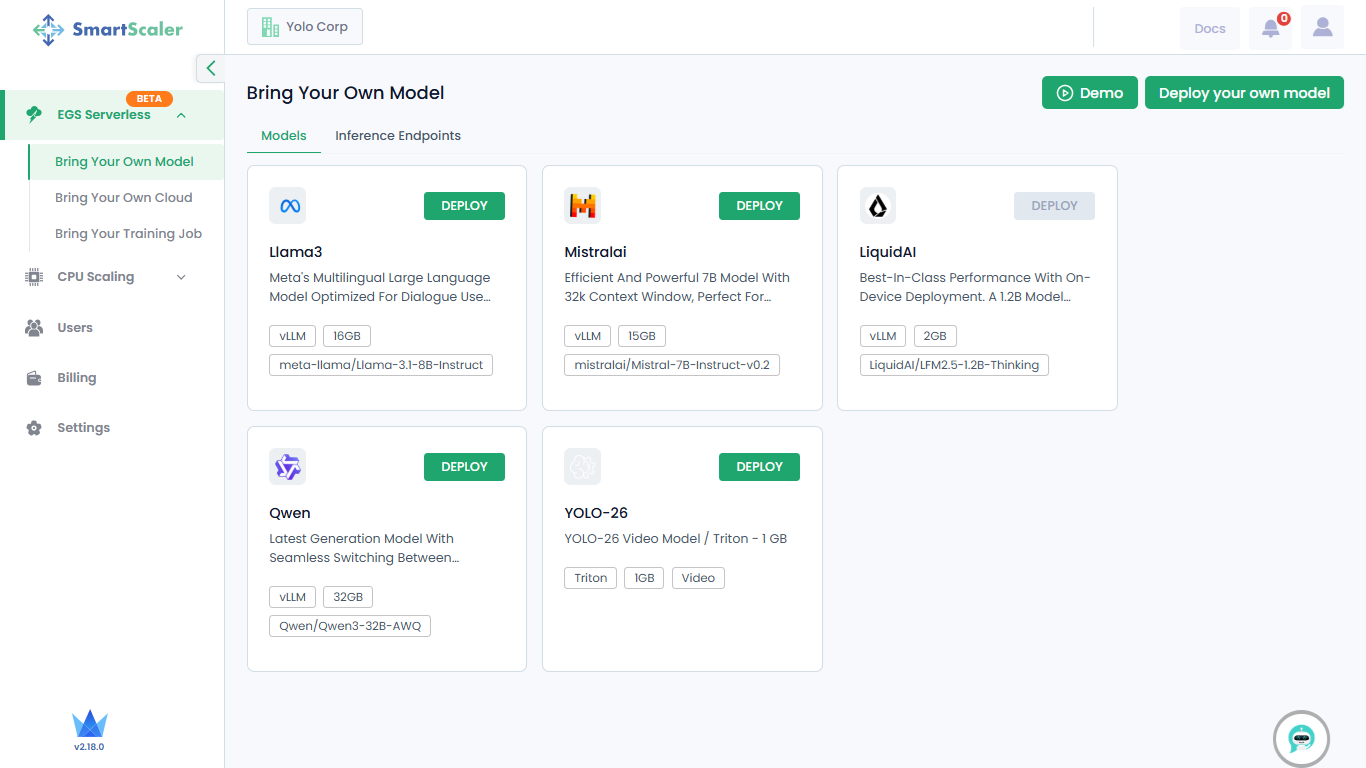
The library provides the following models:
- Llama3
- MistralAI
- Qwen
- YOLO-26
-
On the chosen model tile, click Deploy.
-
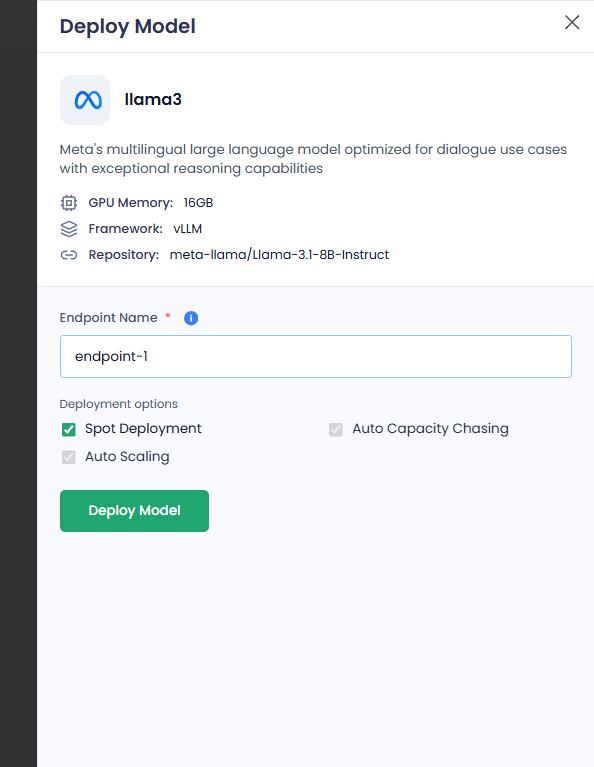
On the Deploy Model pane:
-
Enter an endpoint in the Endpoint Name text box.
-
Under Deployment Options, all the options are enabled by default. You can only disable/reactivate Spot Deployment.
The deployment options are:
- Spot Deployment: Uses discounted but interruptible compute for cost-effective model hosting. The spot deployment is shared among users.
- Auto Capacity Chasing: Automatically selects the best available compute (GPU/CPU) across instance types or zones to maximize availability and minimize cost.
- Auto Scaling: Dynamically adjusts the number of model replicas based on traffic demand.
-
Click Deploy Model.
cautionIf you see Add payment method instead of Deploy Model, you must add a payment method.
To deploy a model, a valid payment method is required. For more information, see Add a Payment Method.
-
On the left side of the Bring Your Own Model page, go to Inference Endpoints.
-
On the Inference Points tab, under Inference Models, confirm the newly created inference endpoint for the model you just deployed.
-
Deploy Your Own Model
To deploy a model, a valid payment method is required. For more information, see Add a Payment Method.
-
Go to EGS Serverless on the left sidebar and click Bring Your Own Model.
-
On the Bring Your Own Model page, click Deploy your own model on the top-right side of the page.
-
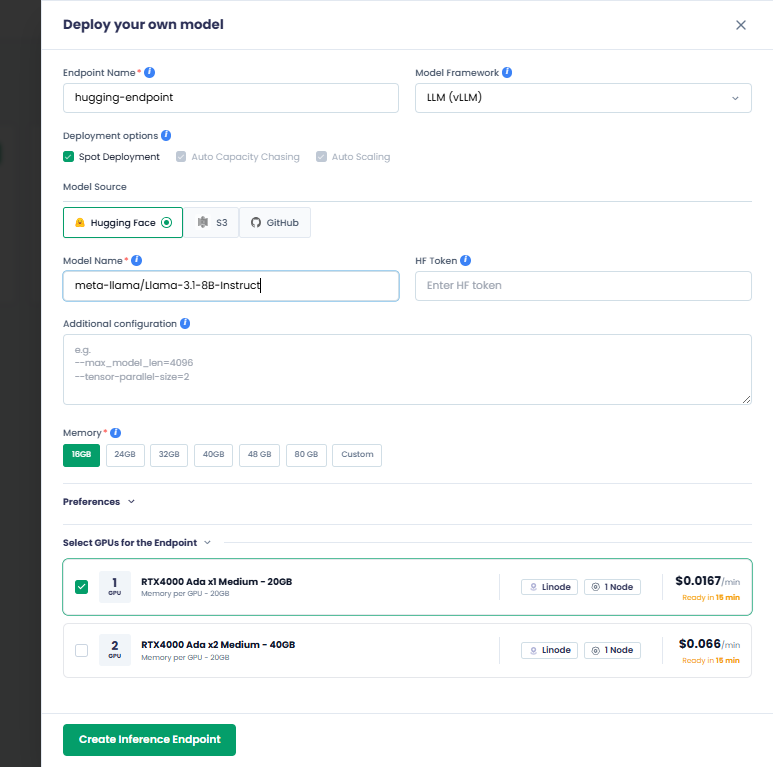
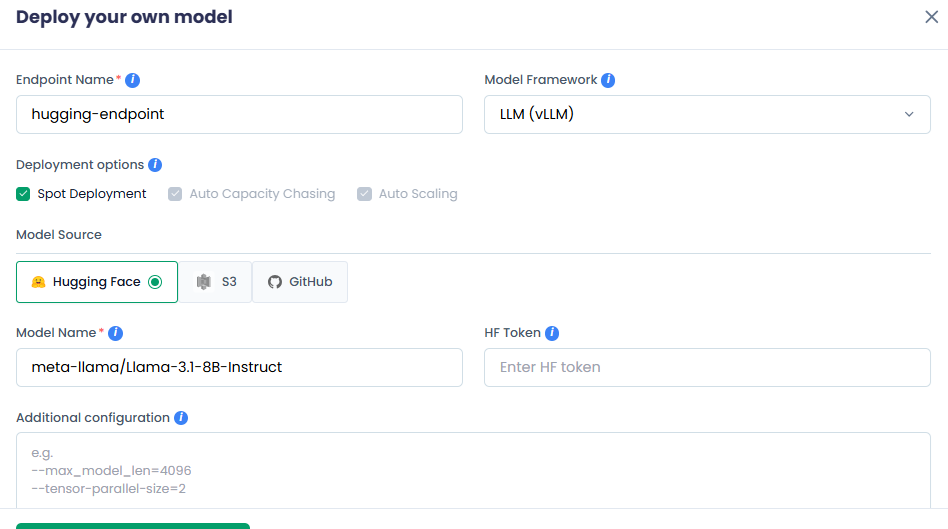
On the Deploy your own model pane:
-
Enter your endpoint name in the Endpoint Name text box.
-
Choose your model framework from the Model Framework drop-down list. The available options are:
- LLM (vLLM)
- Video (Triton)
- Custom Model
-
Under Deployment Options, all the options are enabled by default. You can only disable/reactivate Spot Deployment.
The deployment options are:
- Spot Deployment: Uses discounted but interruptible compute for cost-effective model hosting. The spot deployment is shared among users.
- Auto Capacity Chasing: Automatically selects the best available compute (GPU/CPU) across instance types or zones to maximize availability and minimize cost.
- Auto Scaling: Dynamically adjusts the number of model replicas based on traffic demand.
-
Select a model source from the Model Source drop-down list. The supported model sources are:
- Hugging Face (default)
- S3
- GitHub
-
Based on your model source, the next few steps vary:
For Hugging Face
-
Enter your AI model name in the Model Name text box.
-
[Optional] Enter the access token used to download the model from Hugging Face in the HF Token text box. For private models, HF token is mandatory. It is only optional for public models.
For S3
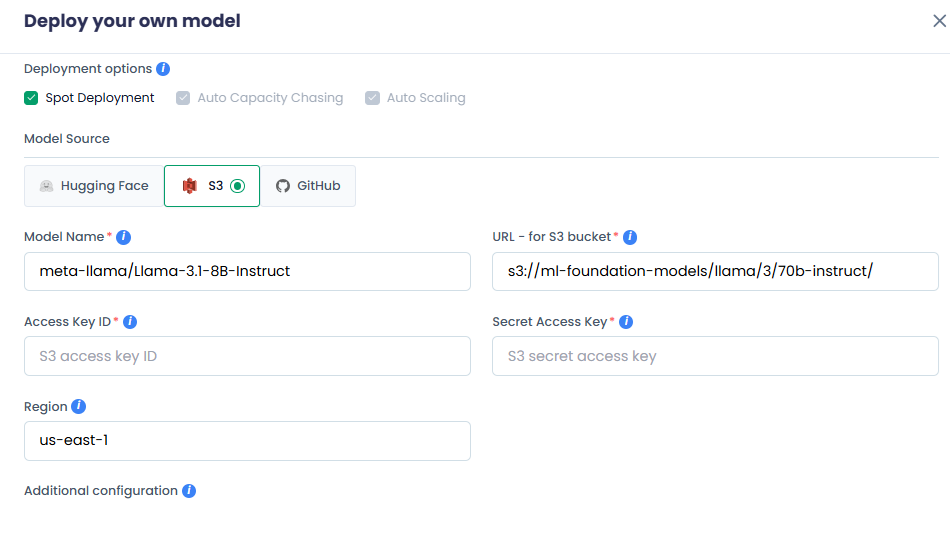
- Enter your AI model name in the Model Name text box.
- Enter the S3 bucket location of your AI Model in the URL - for S3 bucket text box.
- Enter the AWS access key ID for S3 bucket authentication in the Access Key text box.
- Enter the AWS secret access key for S3 bucket authentication in the Secret Access text box.
- Enter the AWS region for your S3 bucket in the Region text box.
For GitHub
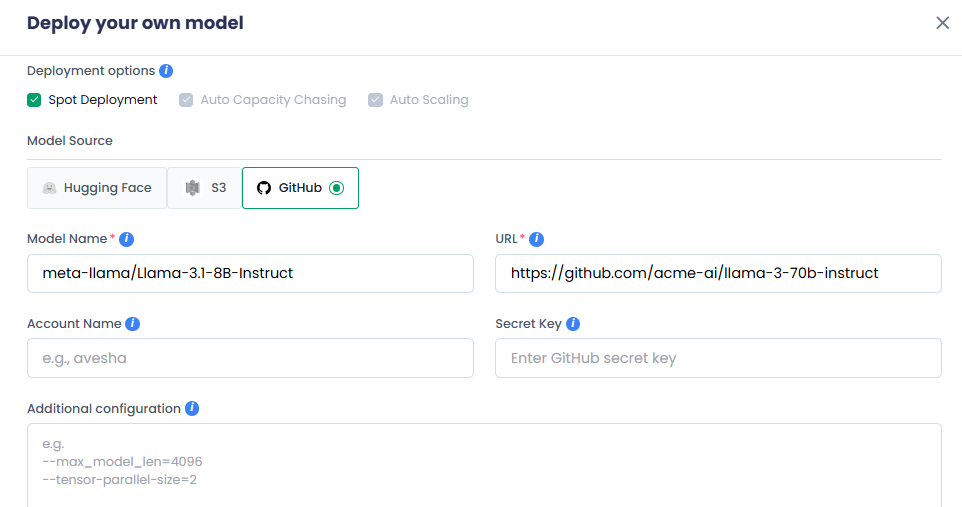
- Enter your AI model name in the Model Name text box.
- Enter the GitHub URL location of your model in the URL text box.
- Enter the GitHub account or organization that owns the repository in the Account Name text box.
- Enter the personal access token or secret for GitHub access in the Secret Key text box.
-
-
In the Additional Configuration text box, enter one argument per line.
-
Under Memory, based on your model size, choose a GPU memory. You can also click Custom to set a custom GPU memory per instance.
-
Under Select GPUs for the Endpoint, one GPU is selected by default. The compute cost and availability for that GPU are also shown.
If you need two GPUs, then select it. The compute cost and availability for two GPUs are also shown.
-
Click Create Inference Endpoint to deploy your model.
cautionIf you only see Add payment method instead of Create Inference Endpoint, you must add a payment method.
To deploy a model, a valid payment method is required. For more information, see Add a Payment Method.
-
On the left side of the Bring Your Own Model page, go to Inference Endpoints.
-
On the Inference Points tab, under Inference Models, confirm the newly created inference endpoint for the model you just deployed.
-
Manage Inference Endpoints
After you deploy your an AI model, an inference endpoint is created.
To learn how you are billed for GPU-minutes consumed by inference endpoints, see Billing Cycle.
To manage inference endpoints:
-
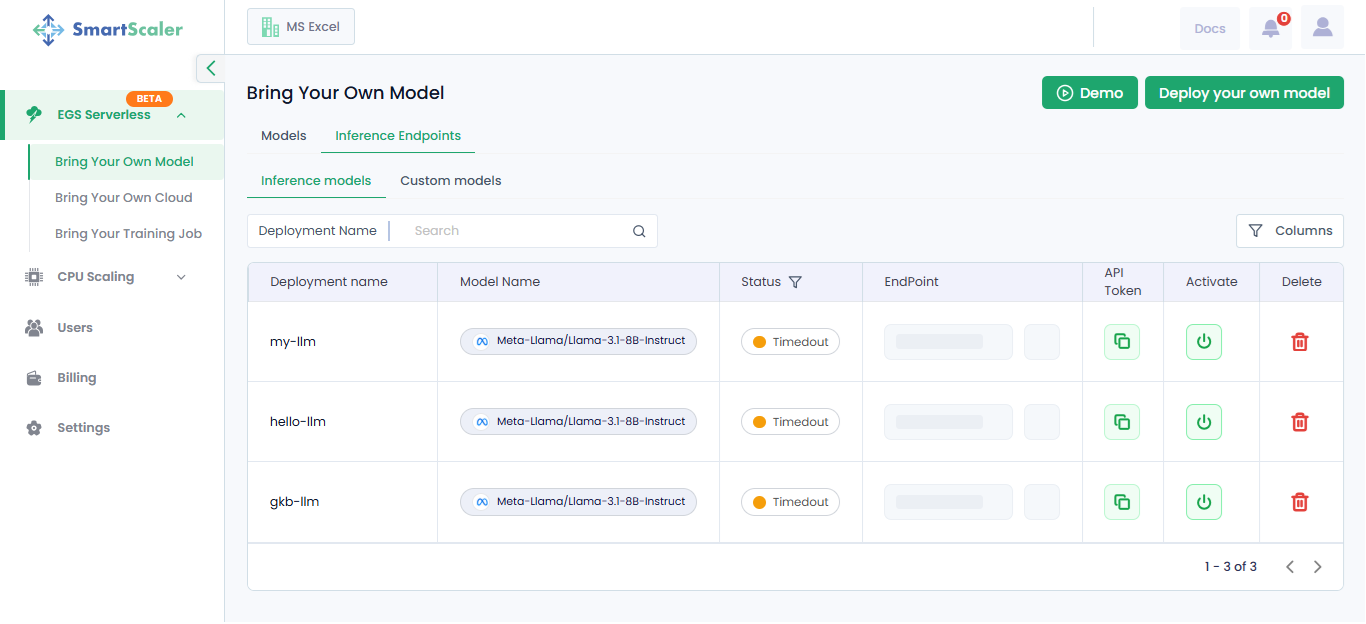
On the Bring Your Own Model page, go to Inference Endpoints.
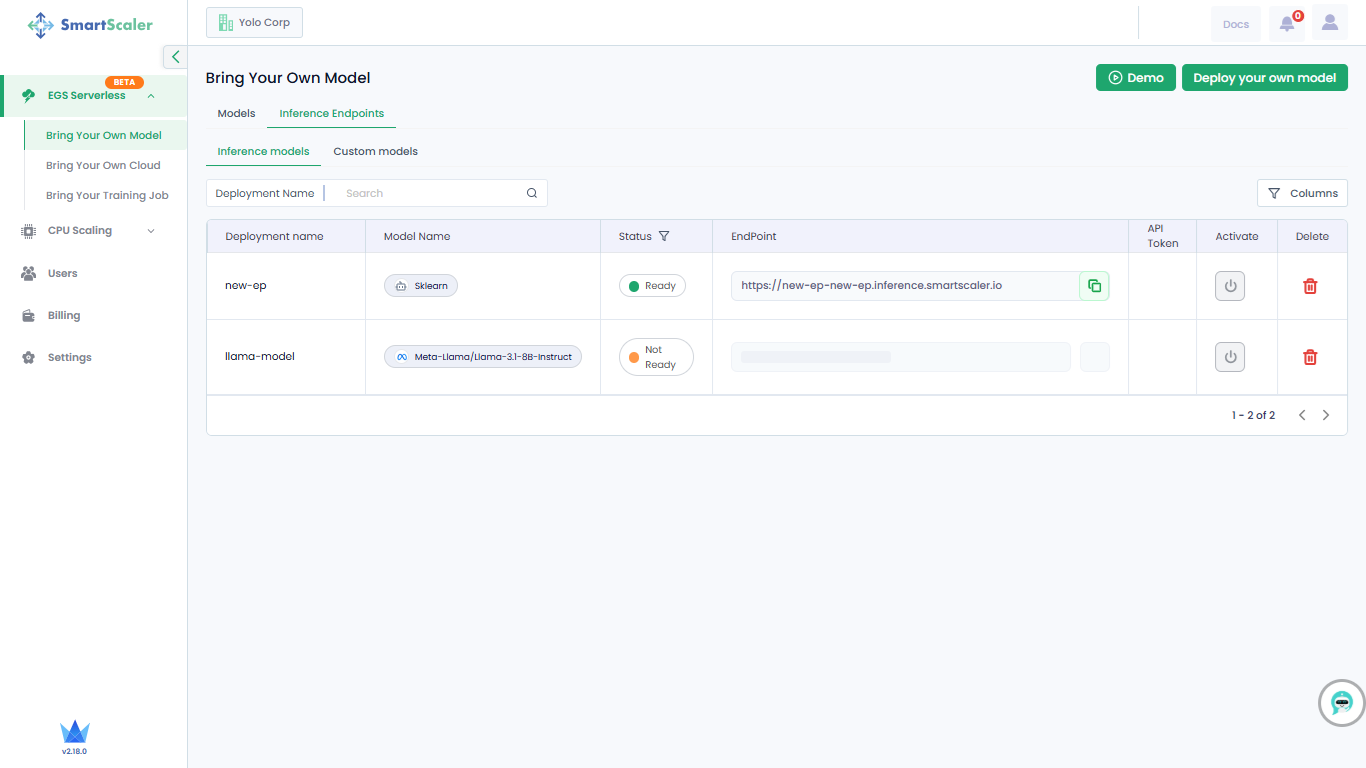
-
On the Inference Endpoints tab, under Inference Models, the created inference endpoints along with their details are provided in a table.
-
The table provides each inference model's deployment name, model name, its status, endpoint, and API token. In the top-left of the table, use the Deployment Name search field to look for a specific deployment.
In the top-right of the table, click Columns to select or clear the columns you want to view.
-
To activate a timed-out inference endpoint, click the Activate icon in the corresponding column.
-
You can use an inference endpoint for inference. For more information, see Perform Inference Through Managed Endpoints.
-
To copy an endpoint, click the copy icon next to it in the EndPoint column.
-
To delete an endpoint, click the delete icon next to it in the Delete column. After you click the delete icon:
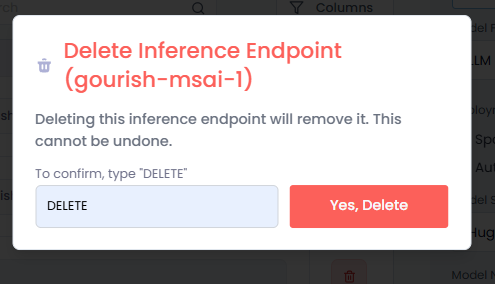
- On the Delete Inference Endpoint dialog, enter DELETE in the text box.
- Click Yes, Delete to confirm.
Perform Inference Through Managed Endpoints
-
On the Bring Your Own Model page, go to Inference Endpoints.
-
Under Inference Endpoints, click an inference endpoint (anywhere on that row) that you want to use.
infoYou can use an inference endpoint only when its status is Ready.
-
On the Endpoint Details pane, in the Inference Try Command text box, click copy command to copy, and then run it in a terminal to view the output.
infoAn inference endpoint contains its own API token.
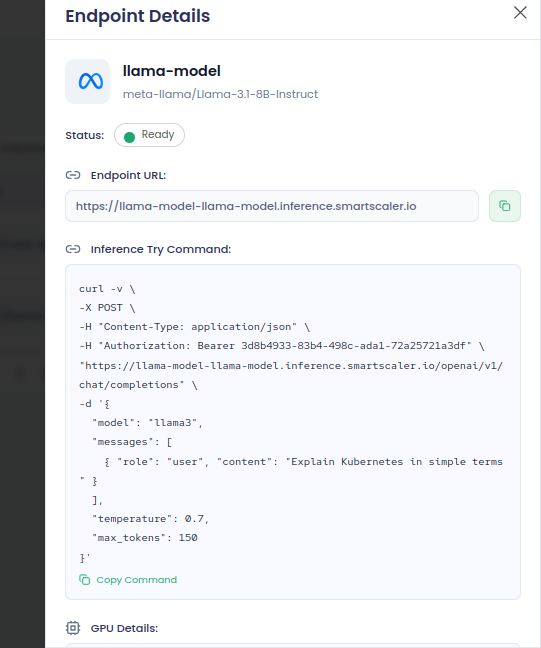
This is an example command:
infoAn inference endpoint contains its own API token.
curl -v \
-X POST \
-H "Content-Type: application/json" \
-H "Authorization: Bearer 3d8b4933-83b4-498c-ada1-72a25721a3df" \
   "https://llama-model-llama-model.inference.smartscaler.io/openai/v1/chat/completions" \
   -d '{
         "model": "llama3",
         "messages": [
         { "role": "user", "content": "Explain Kubernetes in simple terms" }
         ],
         "temperature": 0.7,
         "max_tokens": 150
}' -
To use a different query, change the
contentvalue undermessagesin the command and run it.