Manage GPU Requests
This topic describes how to view, create, and manage GPU Requests (GPRs) in a project. GPU Requests are used to request GPU nodes in a project. The GPU nodes are provisioned based on the GPRs created by the workspace users or admins. The GPRs are queued and processed based on the priority of the request.
Create a GPU Request
You can create GPU Requests (GPRs) as a workspace user or an admin.
To create a GPU Request:
-
Go to Workspace on the left sidebar.
-
Under All Workspaces, select the workspace you want to manage.
-
In the menu of the selected workspace, click the GPU Requests submenu.
-
On the GPU Requests page, click the Create GPU Request button on the top-right corner.
-
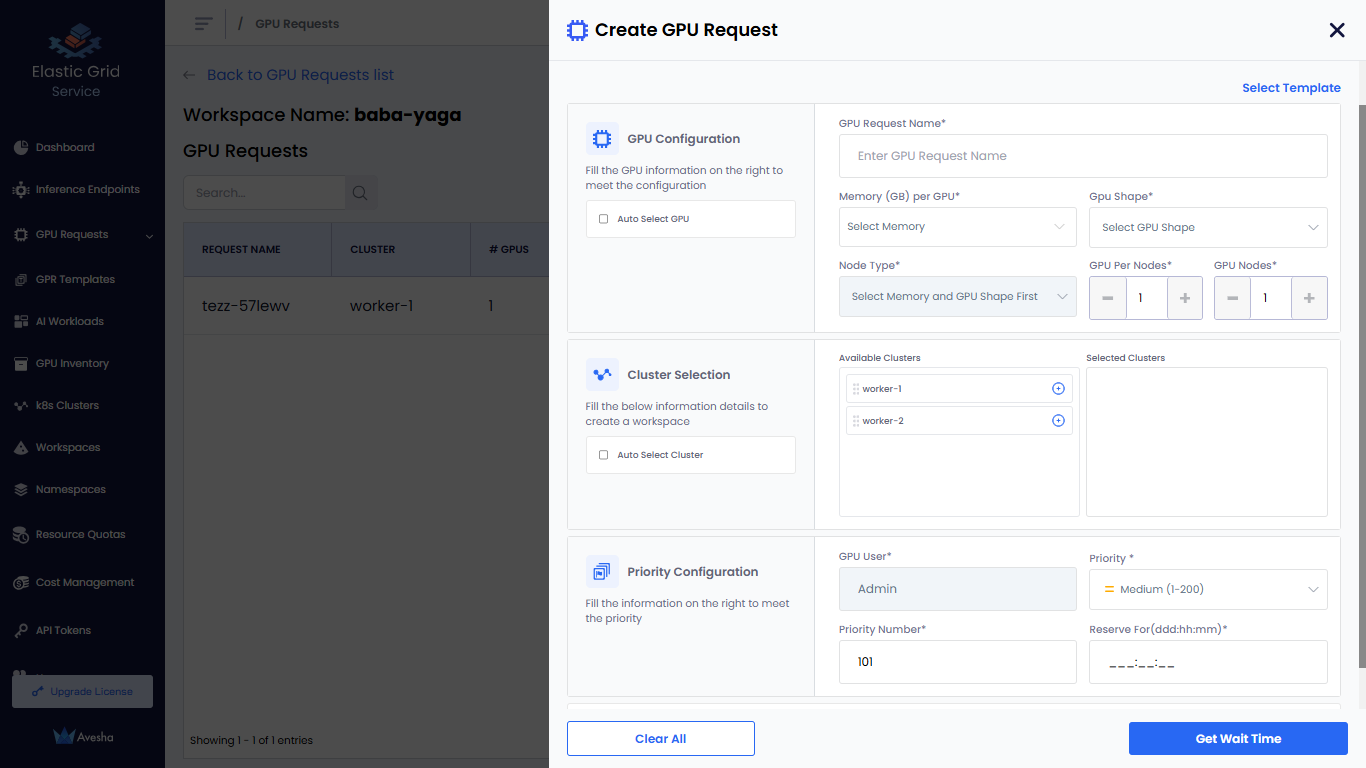
On the Create GPU Request pane, enter the following information to configure GPU request:
-
For GPU Configuration:
-
Enter a request name in the GPU Request Name text box.
-
Choose how GPU Shape and Node Type are selected:
- Manual Selection:
- Leave the Auto Select GPU checkbox unselected.
- Select a memory value from the Memory (GB) per GPU drop-down list. The list displays the available memory (GB) per cluster.
- Select a GPU shape from the GPU Shape drop-down list.
- Select a node type from the Node Type drop-down list.
- Auto Selection:
- Select the Auto Select GPU checkbox. The GPU shape and node type values are automatically selected based on the memory specified.
- If you manually enter GPU memory in the Memory (GB) per GPU text box, the Auto Select GPU checkbox is selected automatically. The minimum memory value is 1 GB, and the maximum value is the highest allocated memory available for any worker cluster in the workspace.
- Manual Selection:
-
Set the GPUs Per Node if you want to change its default value, 1.
-
Set the GPU Nodes if you want to change its default value, 1.
-
-
For Cluster Selection:
- Select a cluster from the Available Clusters list to create a workspace.
- To include all available clusters automatically in the workspace, select the Auto Select Cluster checkbox. By default, this option is unselected.
-
For Priority Configuration:
-
The default value for GPU User is the user name. The user name is the name of the workspace user.
-
Set Priority. The default value is Medium (1-200).
You can change the priority of a GPR in the queue. You can change the priority number (low: 1-100, medium: 1-200, high: 1-300) to move a GPR in the queue. When a GPR is moved to the top of the queue, it is provisioned when the resources are available to provision the GPR.
-
Set Priority Number. The default value is 101.
-
Specify Reserve For duration in Days (ddd), Hours (hh), and Minutes (mm).
-
-
(Optional) Expand Advanced Configuration and:

-
Select Enforce Idle Timeout to allow the GPU nodes to be used after the configured length of the time that it can be idle. This allows other GPRs to use the unused provisioned GPU nodes. By default, this checkbox is unselected.
-
The Requeue on Failure check box is selected by default to queue the GPR in case it fails. When a GPR fails, EGS re-queues that GPR to attempt provisioning it again.
-
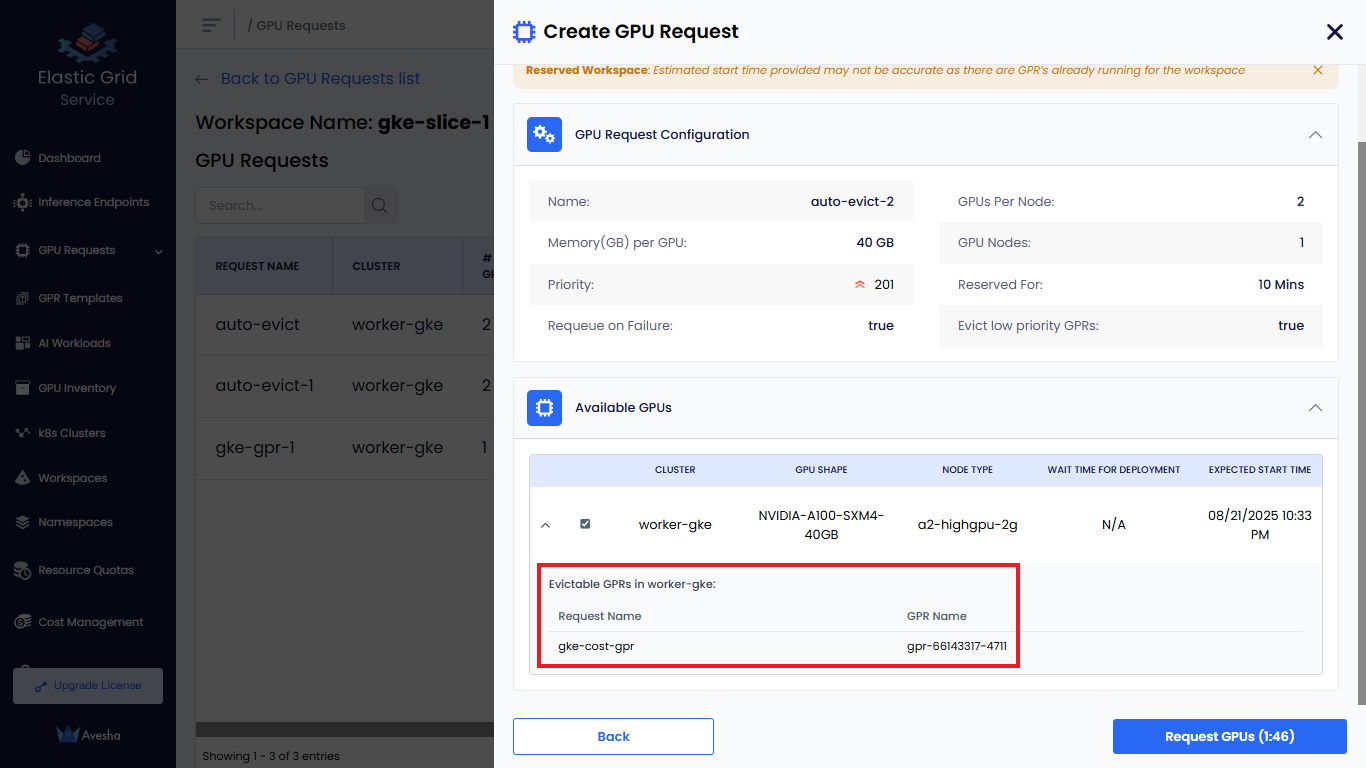
The Evict low priority GPRs checkbox is selected by default that configures auto eviction of a low-priority GPR. When there is a high-priority GPR in the queue and insufficient resources to provision it, EGS evicts the low-priority GPR to free up resources for the high-priority GPR. You can unselect Evict low priority GPRs if you do not want auto-eviction.
-
Select Run Precheck to run a precheck before creating a GPR from a template. The precheck validates whether sufficient resources are available in the selected cluster to provision the GPR. By default, this checkbox is unselected. If the pre-check fails, the GPR creation is blocked, and an error message is displayed indicating the reason for the failure.
 info
infoIf the admin configures auto eviction of low priority GPRs at the cluster level, then it is automatically selected in the Create GPU Request pane.
-
Select Enable Time Slicing to allow multiple GPRs to share the same GPU resources by rotating access across time slots. Use time slicing when GPU resources are limited and multiple low-priority workloads need access at different times. By default, this checkbox is unselected. Time slicing is useful when different users need GPU resources at different times.
infoCurrently, you can enable time slicing only for only low priority GPRs.
-
-
-
Click the Get Wait Time button. The Get Wait Time button is enabled only after you fill in the required fields. Clicking Get Wait Time shows the estimated wait time for the GPU nodes provisioning.
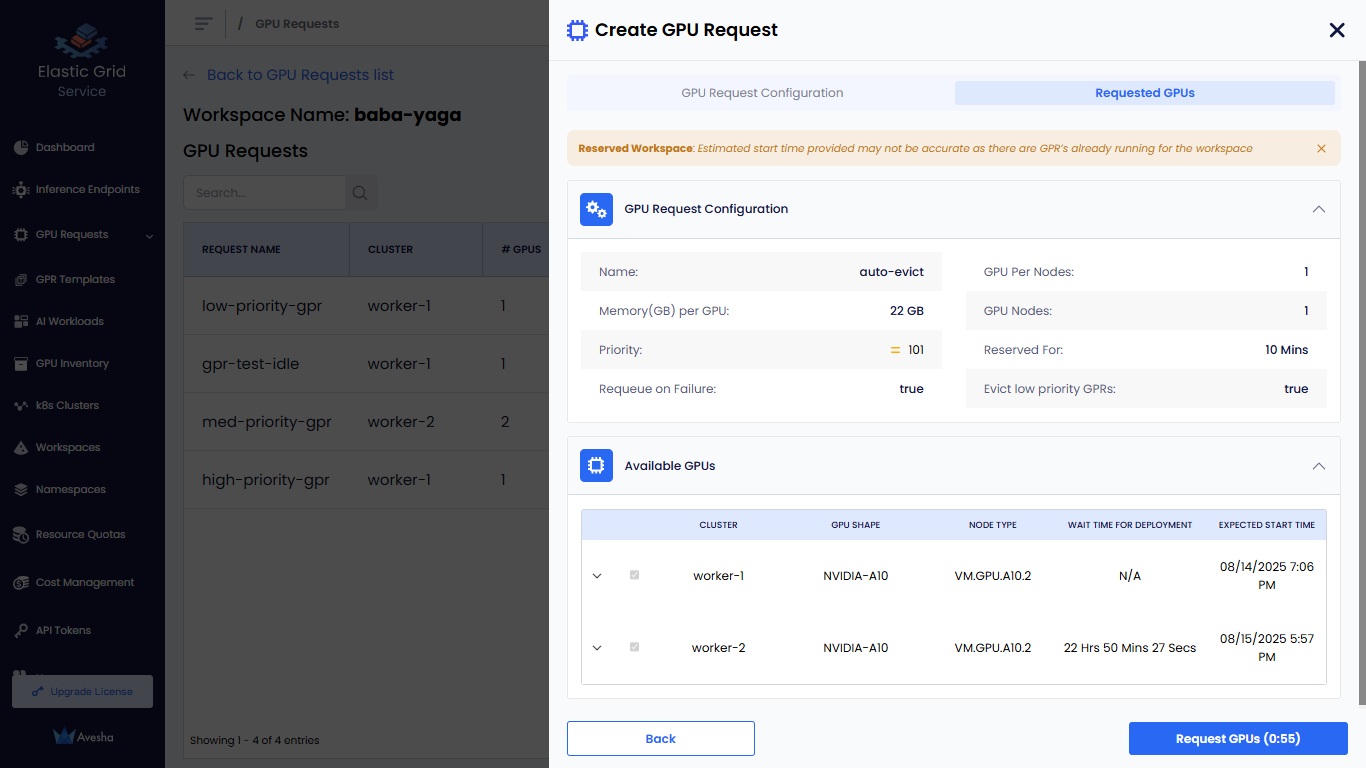
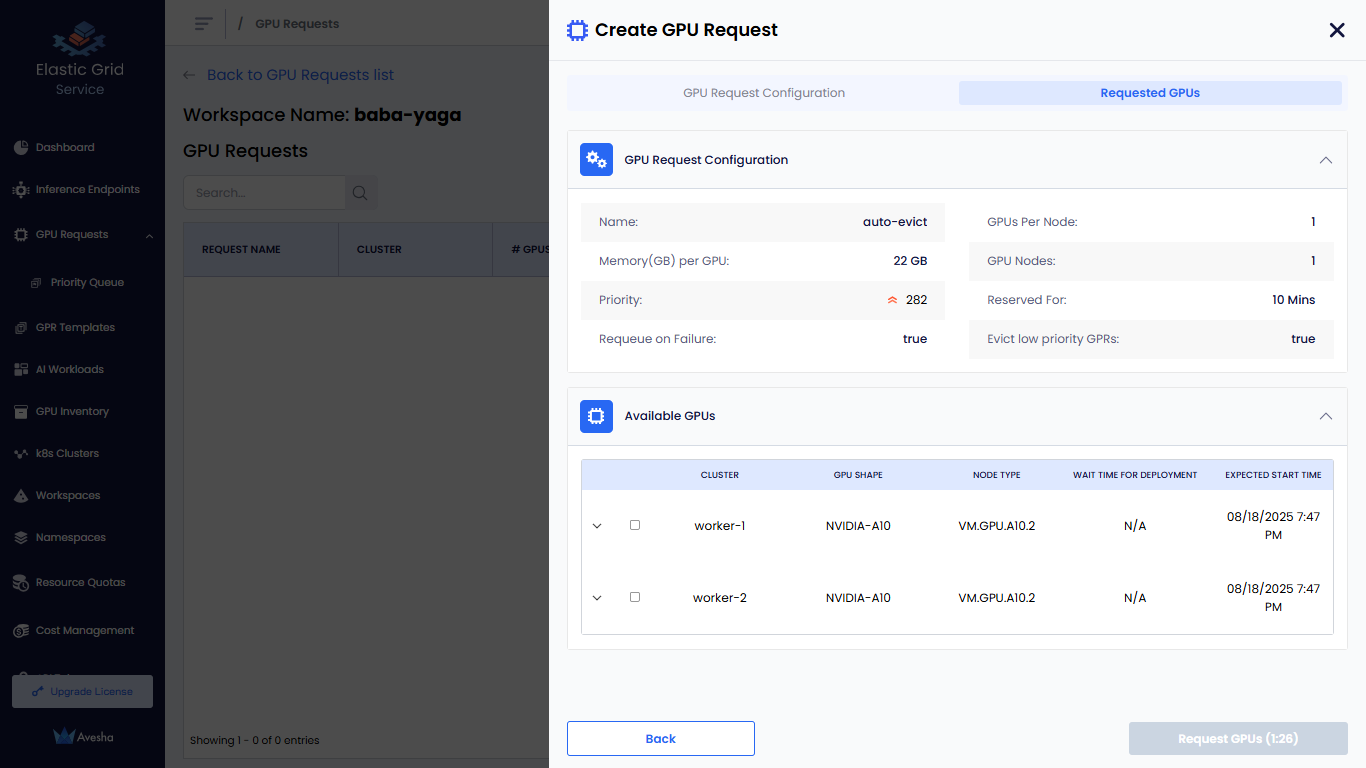
On the Requested GPUs section, under Available GPUs, you can manually select the clusters for GPR.
-
Click the Request GPUs button. The GPR is created and queued for provisioning. The GPR is processed based on the priority of the request and the availability of GPU nodes in the cluster.
- The status of the GPR request changes to Queued if the GPU node allocation is in queue.
- The status of the GPR request changes to Running if the GPU in queue is provisioned successfully.
- The status of the GPR request changes to Released Early if the GPR is released early then the scheduled time.
- The status of the GPR request changes to Completed if the GPR Request completes is scheduled time.
View GPU Request Details
After you create a GPR, it is queued for provisioning. The GPR is processed based on the priority of the request and the availability of GPU nodes in the cluster. On the GPU Requests page, you can view all the GPRs created in the selected workspace.
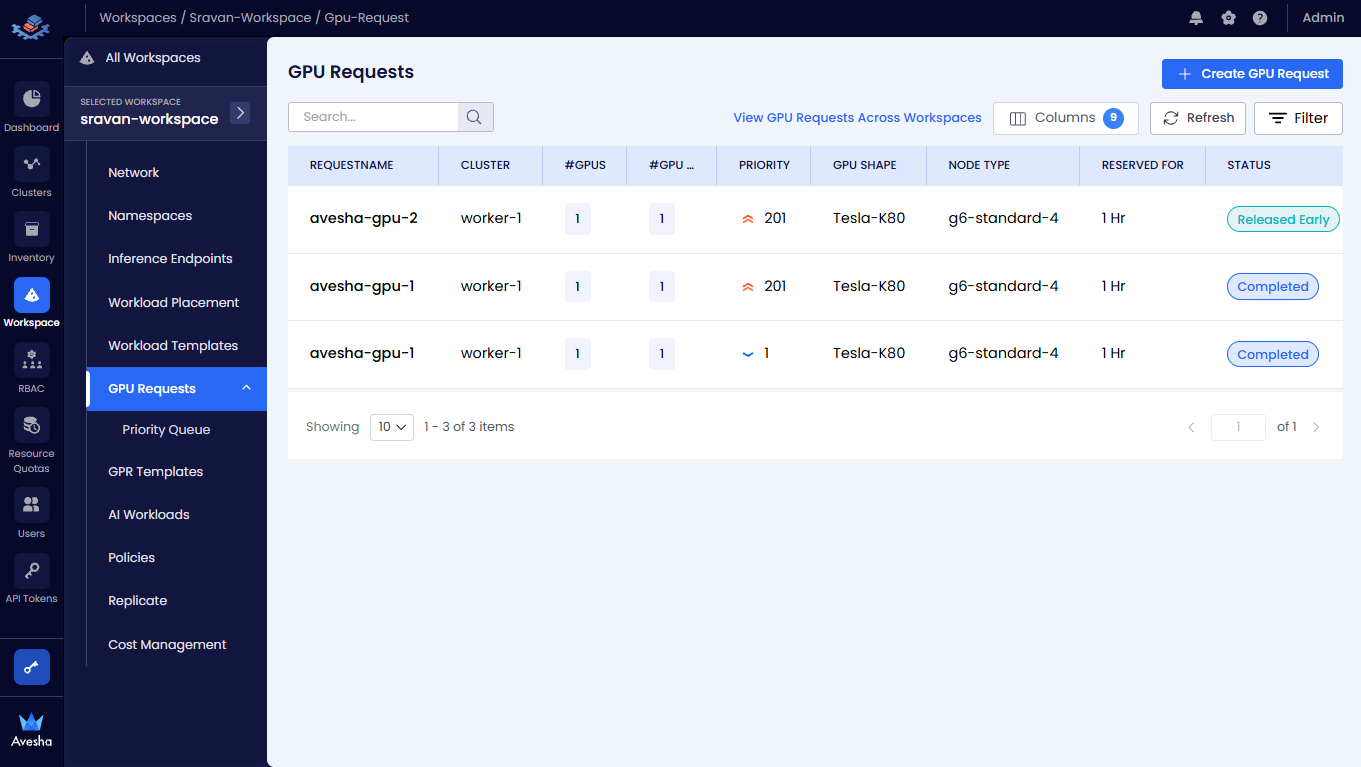
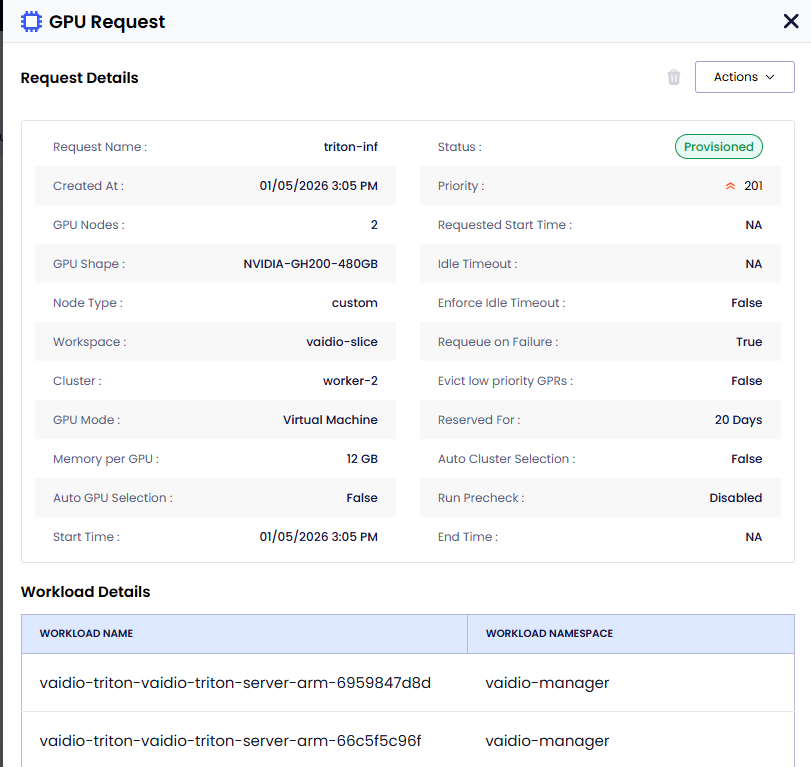
To view the GPU Request details, on the GPU Requests page, select the GPU Request. On the GPU Request pane, you can
view the details of the workloads, GPUs, and the Pre-Check details if it
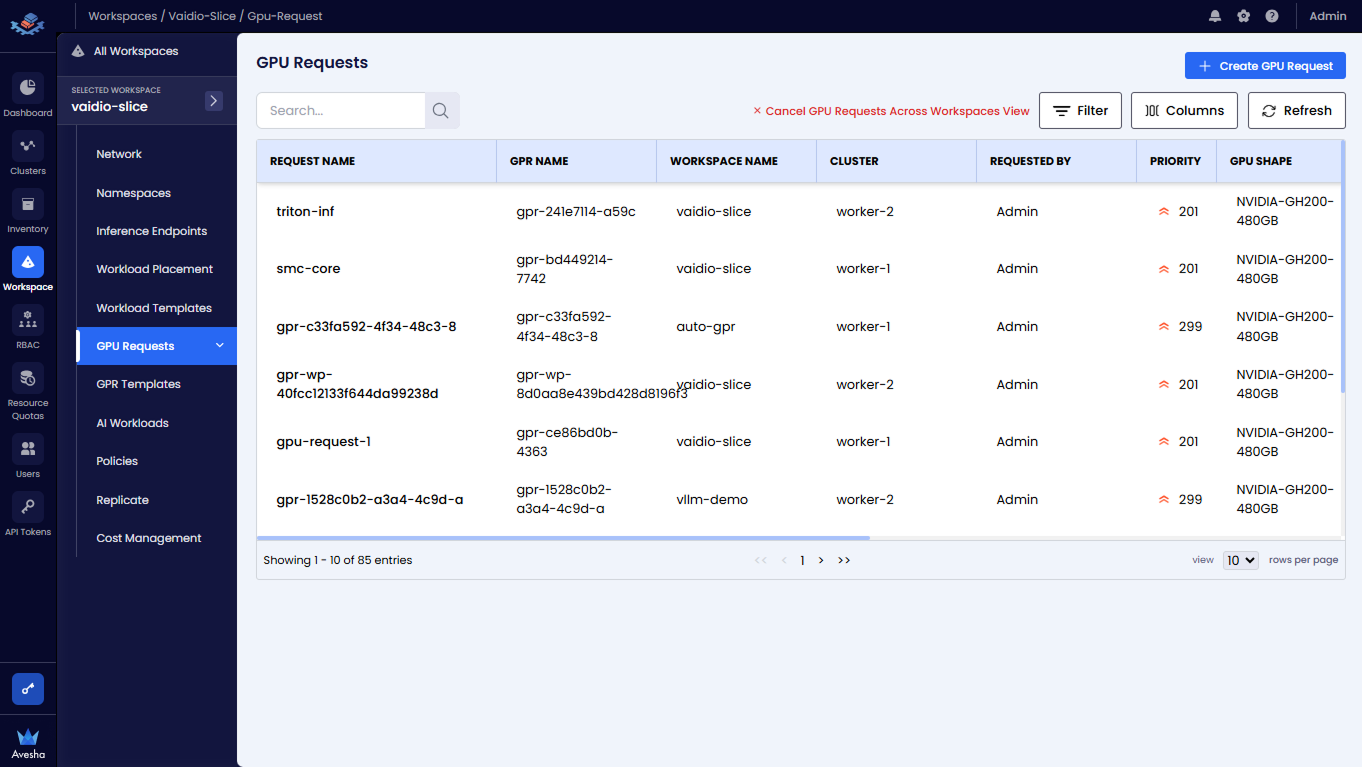
Manage GPRs Across Workspaces
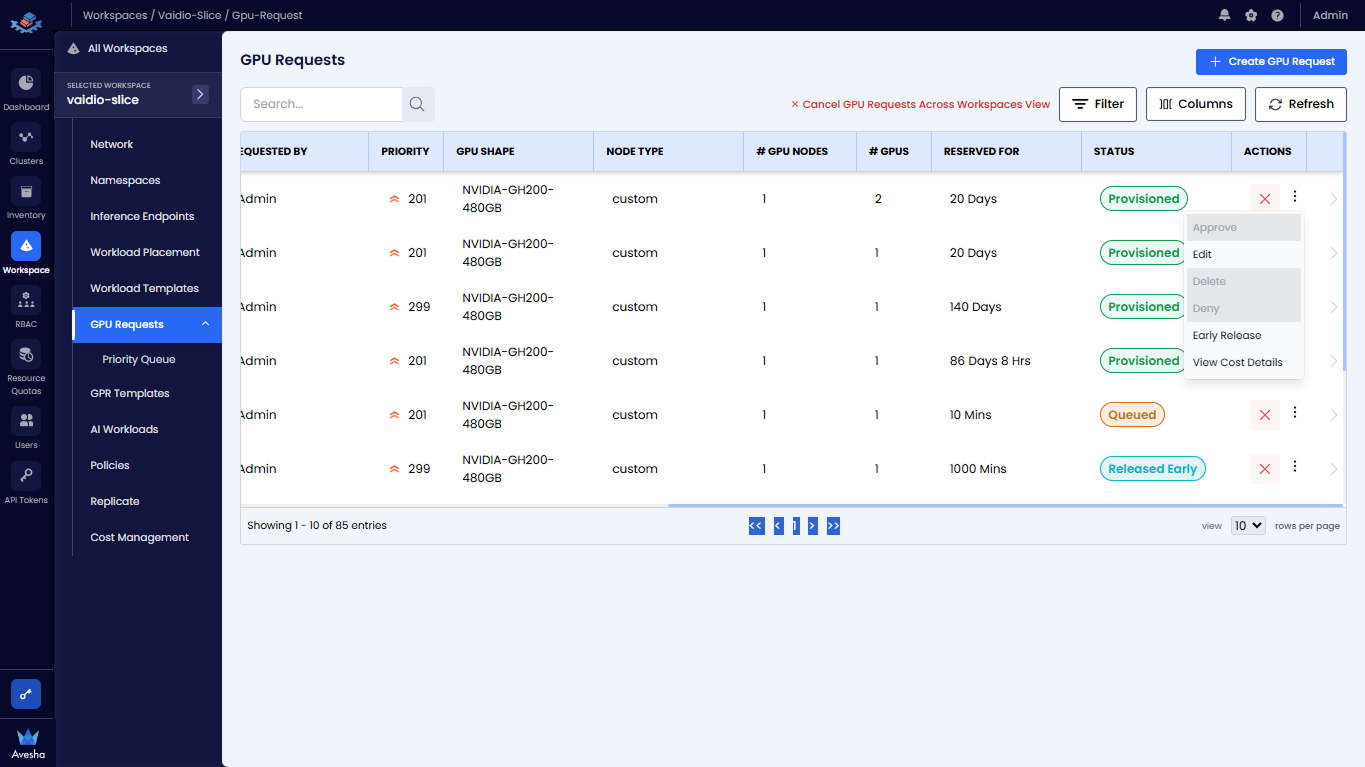
On the GPU Requests page, click View GPU Requests Across Workspaces to see all the GPRs across all the workspaces. Use the Search textbox or Filter to filter the GPRs.
 )
)
Early Release a Provisioned GPR
If a GPR is provisioned, you can early release it. Early releasing a GPR removes the associated GPU nodes from the workspace.
This is useful when you want to free up GPU resources for a higher priority GPR or if the provisioned GPR is no longer needed. You can early release a provisioned GPR only if it is in the Provisioned state. You can use this workflow for any other admin operations or under utilization of GPU resources and user requests.
After the GPR is early-released, the GPU nodes will no longer be available for any AI workloads running on the workspace . Any running workloads (pods/and so on) using GPUs and running on the node will go into a pending state.
To early release a provisioned GPR:
-
On the GPU Requests page, select the GPR that is in the Provisioned state and you want to early release.
-
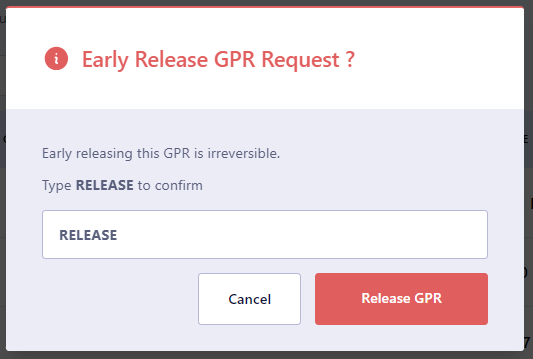
On the GPU Request pane, under Actions menu, click Early Release. You can only see the Early Release option if the GPR is in the Provisioned state.
-
On the confirmation dialog, enter RELEASE and click Release GPR.
View Cost Analysis
From a GPR, you can directly view cost analysis.
To view cost analysis:
-
On the GPU Requests page, click View GPU Requests Across Workspaces.
-
Select the GPR and scroll to the Actions column, expand the vertical ellipsis, and click View Cost Analysis from the menu.
-
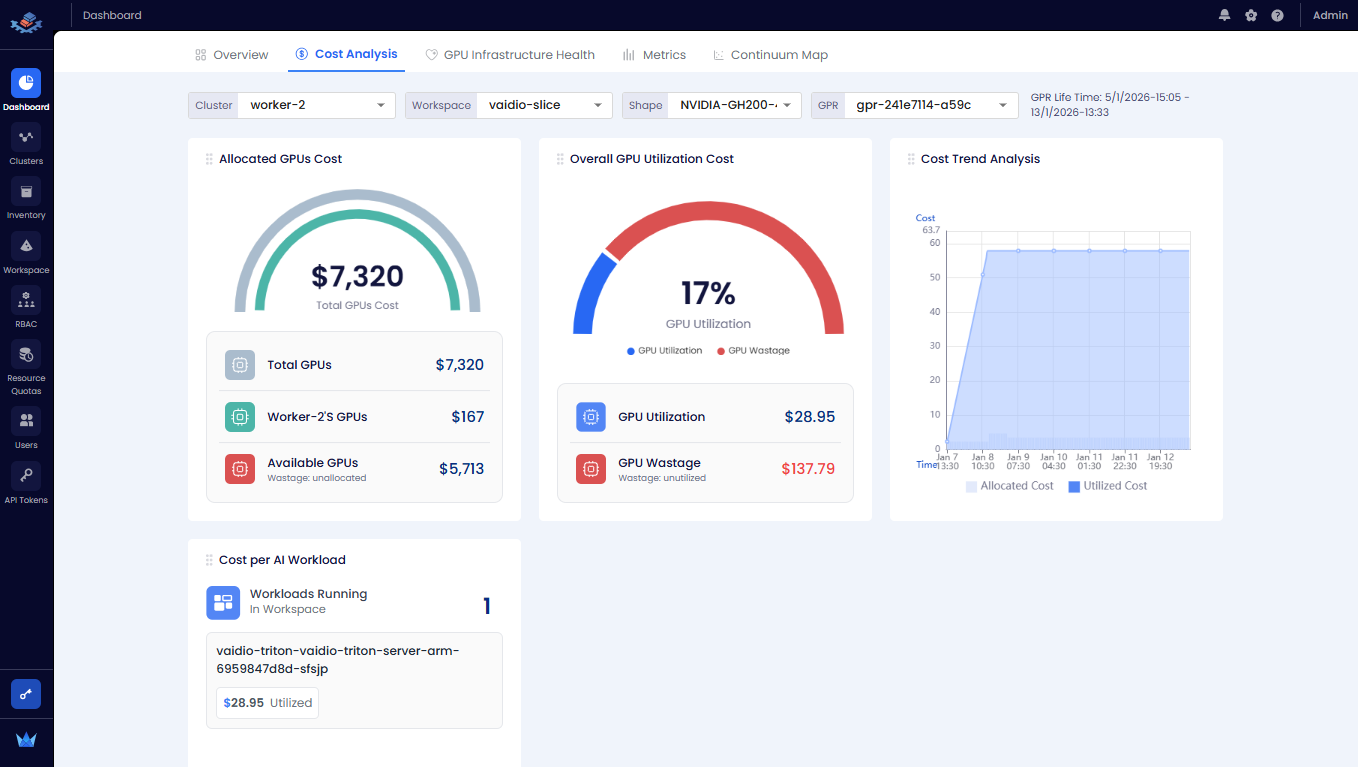
You are redirected to the Cost Analysis tab of the Dashboard page.
Manage GPR Queues
The GPR Queue helps to visualize and control how GPU requests created under various workspaces will be processed. As an admin, one can track queues for each cluster and node instances and change the execution order by adjusting priority.
View GPR Priority
To view the priority of a GPR:
-
Go to Priority Queue submenu under GPU Requests.
-
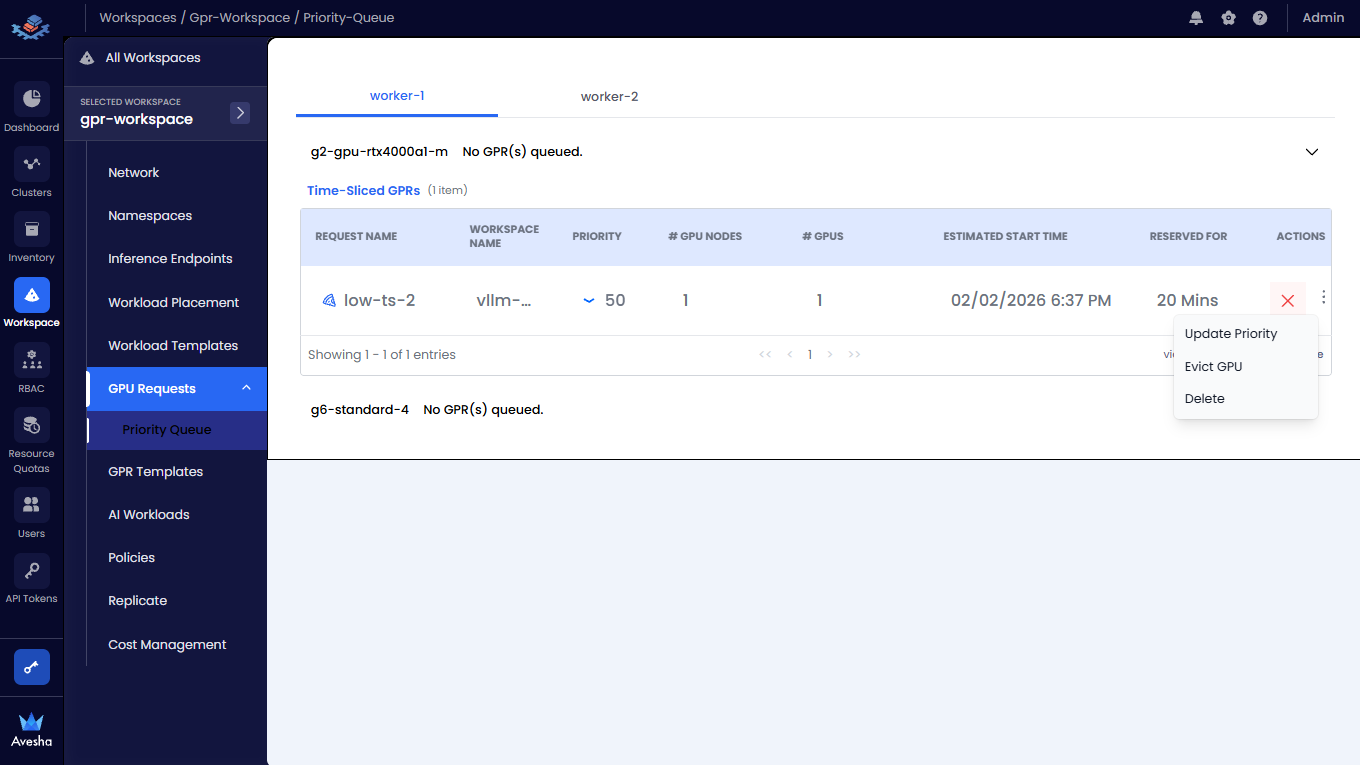
On thee Priority Queue page, you see the tabs for each worker clusters that are connected to the workspaces. Under each cluster, you can see the node types and the list of GPRs queued for that node type and Time Sliced GPRs.

Update a GPR Priority
You can change the priority of a GPR in the queue. You can select a GPR and increase the priority number (low: 1-100, medium: 1-200, high: 1-300) to move a GPR higher in the queue. When a GPR is moved to the top of the queue, it is provisioned when the resources are available to provision the GPR.
To update a GPR priority:
-
For a queued GPR, under Actions, expand the vertical ellipsis menu, and click Update Priority.
!
-
Update the Priority and the Priority Number as needed.
-
Click Update to save the changes. The GPR is moved in the queue based on the updated priority.
Delete a GPR from the Queue
You can delete a GPR that is queued. Deleting a GPR removes it from the queue and it will not be provisioned. To delete a GPR from the queue:
-
For a queued GPR, under Actions, expand the vertical ellipsis menu, and click Delete or click the
Xicon.
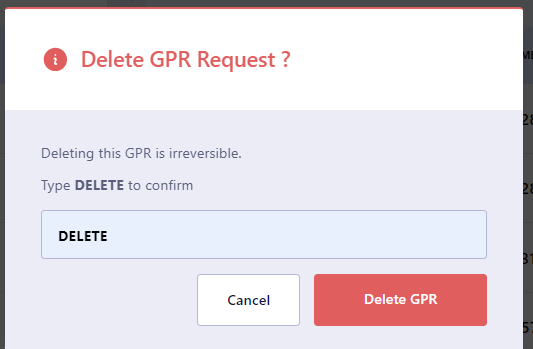
2.. On the confirmation dialog, enter DELETE and press Delete GPR.
Create a GPR from a Template
You can create a GPR from a template that is available for the parent workspace.
To create a GPR from a template:
-
On the GPU Requests page, go to the GPU Requests Per Workspace tab.
-
In the workspace list, click the workspace for which you want to create a GPR.
-
Click Create GPU Request.

-
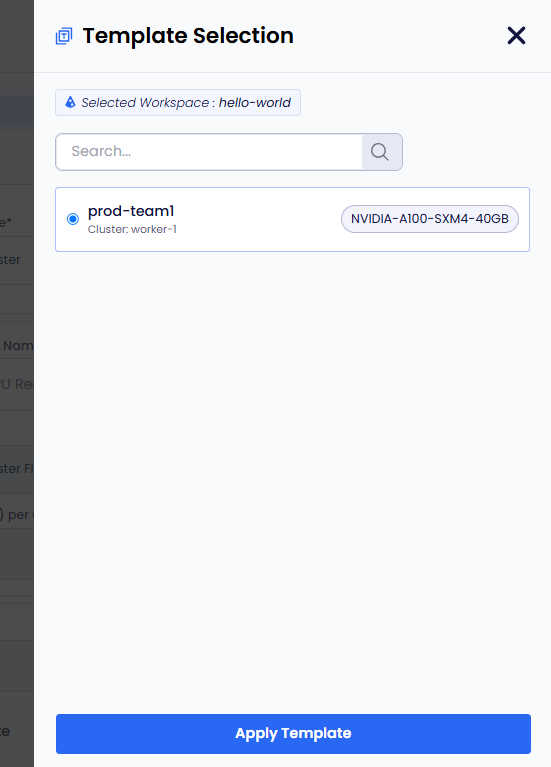
Click Select Template. The workspace should have at least one template to apply it to the new GPU request.
-
On the Template Selection pane, select a template and click Apply Template.
-
The template gets applied. You can review the template settings and make any necessary adjustments.
-
Click Get Wait Time. Clicking Get Wait Time automatically switches to the Request GPU tab. EGS shows the estimated wait time for the GPU nodes provisioning.
-
Select the GPU in the Available GPUs table with acceptable estimated wait time.
-
Click Request GPUs.
-
View the GPR in that workspace's GPU Requests queue or in the main GPU Requests landing page.