Install Using the Script
This topic describes the steps to install EGS on the Kubernetes cluster using the script provided in the egs-installation repository.
- The EGS Controller is also referred to as the KubeSlice Controller in some diagrams and in the YAML files.
- The EGS Admin Portal is also referred to as the KubeSlice Manager (UI) in some diagrams and in the YAML files.
EGS Installation Script Overview
The EGS installation script automates the process of deploying EGS components on a Kubernetes cluster. The
egs-installation repository includes the script to install EGS. The egs-installer script orchestrates the installation process by handling prerequisites, configuration, and installation steps based
on the parameters defined in the egs-installer-config.yaml file.
The installation process involves cloning the repository, checking prerequisites, modifying the configuration file, and running the installation script.
Prerequisites
Before you begin the installation, ensure that you have completed the following prerequisites:
- Have access to the Kubernetes cluster where you will install EGS and have the necessary permissions to create namespaces, deploy applications, and manage resources.
- Installed prerequisites for the EGS controller. For more information, see Install EGS Controller Prerequisites.
- Installed prerequisites for the worker cluster. For more information, see Install EGS Worker Prerequisites.
- Applied a valid EGS license received from Avesha. For more information, see EGS Registration.
- Have the required command-line tools installed, including
kubectlandHelm. For more information, see Install Command Line Tools.
Clone the Repository
Clone the EGS installation repository using the following command:
git clone https://github.com/kubeslice-ent/egs-installation.git
- Ensure the YAML configuration file is properly formatted and includes all required fields.
- The installation script will terminate with an error if any critical step fails, unless explicitly configured to skip on failure.
- All file paths specified in the YAML must be relative to the
base_path, unless absolute paths are provided.
Create Namespaces
If your cluster enforces namespace creation policies, pre-create the namespaces required for installation before running the script. This step is an Optional step and only necessary if your cluster has such policies in place.
Navigate to the cloned egs-installation repository and locate the create-namespaces.sh script and the namespace-input.yaml file.
Use the namespace-input.yaml file to specify the namespaces to be created. You must ensure that all required annotations
and labels for policy enforcement are correctly configured in the namespace-input.yaml file.
Use the following command to create namespaces:
create-namespaces.sh --input-yaml <NAMESPACE_INPUT_YAML> --kubeconfig <ADMIN KUBECONFIG> --kubecontext-list <KUBECTX>
Example Command:
./create-namespaces.sh --input-yaml namespace-input.yaml --kubeconfig ~/.kube/config --kubecontext-list context1,context2
For more information, see the Namespace Creation
readme file in the egs-installation repository.
Run the EGS Preflight Check Script
Use the egs-preflight-check.sh script to verify the prerequisites for installing EGS.
To run the preflight check script, use the following command:
./egs-preflight-check.sh --kubeconfig <ADMIN KUBECONFIG> --kubecontext-list <KUBECTX>
Example command:
./egs-preflight-check.sh --kubeconfig ~/.kube/config --kubecontext-list context1,context2
The script performs the following checks:
- Validates the presence of required binaries (for example,
kubectl,helm,jq,yq,curl) - Verifies access to the Kubernetes clusters specified in the
kubecontext-list - Validates namespaces, permissions, PVCs, and services, helping to identify and resolve potential issues before installation
Run the EGS Prerequisites Installer Script
Use the egs-install-prerequisites.sh script to configure additional applications required for EGS, such as GPU Operator,
Prometheus, and PostgreSQL.
To run the prerequisites installer script:
-
Navigate to the cloned
egs-installationrepository and locate the input configuration file namedegs-installer-config.yaml. -
Edit the
egs-installer-config.yamlfile with the globalkubeconfigandkubecontextparameters:global_kubeconfig: "" # Relative path to global kubeconfig file from base_path default is script directory (MANDATORY)
global_kubecontext: "" # Global kubecontext (MANDATORY)
use_global_context: true # If true, use the global kubecontext for all operations by default -
Enable additional applications installation by setting the following parameters in the
egs-installer-config.yamlfile:# Enable or disable specific stages of the installation
enable_install_controller: true # Enable the installation of the Kubeslice controller
enable_install_ui: true # Enable the installation of the Kubeslice UI
enable_install_worker: true # Enable the installation of Kubeslice workers
# Enable or disable the installation of additional applications (prometheus, gpu-operator, postgresql)
enable_install_additional_apps: true # Set to true to enable additional apps installation
# Enable custom applications
# Set this to true if you want to allow custom applications to be deployed.
# This is specifically useful for enabling NVIDIA driver installation on your nodes.
enable_custom_apps: false
# Command execution settings
# Set this to true to allow the execution of commands for configuring NVIDIA MIG.
# This includes modifications to the NVIDIA ClusterPolicy and applying node labels
# based on the MIG strategy defined in the YAML (e.g., single or mixed strategy).
run_commands: false
# Node labeling automation for KubeSlice networking
# Set this to true to automatically label nodes with 'kubeslice.io/node-type=gateway'
# Priority: 1) Nodes with external IPs, 2) Any available nodes (up to 2 nodes)
# This is required when kubesliceNetworking is enabled in worker clusters
add_node_label: truenoteImportant configuration in the
egs-installer-config.yamlfile:- Set
enable_custom_appstotrueif you need NVIDIA driver installation on your nodes. - Set
run_commandstotrueif you need NVIDIA MIG configuration and node labeling. - Set
add_node_labeltotrueto enable automatic node labeling for KubeSlice networking.
- Set
-
After configuring the YAML file, run the
egs-install-prerequisites.shscript to set up GPU Operator, Prometheus, and PostgreSQL:./egs-install-prerequisites.sh --input-yaml egs-installer-config.yamlThis step installs the required infrastructure components before the main EGS installation.
Single Cluster Installation
For single-cluster deployments, you can skip the worker cluster registration step. The controller and worker components are installed in the same cluster.
To install EGS in a single-cluster setup, follow these steps:
-
Navigate to the cloned
egs-installationrepository and locate the input configuration file namedegs-installer-config.yaml. -
Edit the
egs-installer-config.yamlwith basic configuration parameters:# Kubernetes Configuration (Mandatory)
global_kubeconfig: ""  # Relative path to global kubeconfig file from base_path default is script directory (MANDATORY)
global_kubecontext: ""  # Global kubecontext (MANDATORY)
use_global_context: true  # If true, use the global kubecontext for all operations by default
# Installation Flags (Mandatory)
enable_install_controller: true # Enable the installation of the Kubeslice controller
enable_install_ui: true # Enable the installation of the Kubeslice UI
enable_install_worker: true # Enable the installation of Kubeslice workers
enable_install_additional_apps: true # Set to true to enable additional apps installation
enable_custom_apps: true # Set to true if you want to allow custom applications to be deployed
run_commands: false # Set to true to allow the execution of commands for configuring NVIDIA MIG -
Run the EGS installation script to deploy EGS components in the single cluster:
./egs-installer.sh --input-yaml egs-installer-config.yaml
Multi-Cluster Installation
To install EGS in a multi-cluster setup, follow these steps:
-
Navigate to the cloned
egs-installationrepository and locate the input configuration file namedegs-installer-config.yaml. -
Edit the
egs-installer-config.yamlfile with the globalkubeconfigandkubecontextparameters:global_kubeconfig: "" # Relative path to global kubeconfig file from base_path default is script directory (MANDATORY)
global_kubecontext: "" # Global kubecontext (MANDATORY)
use_global_context: true # If true, use the global kubecontext for all operations by default -
(AirGap installation only) If you are performing an AirGap installation, update the
image_pull_secretssection in the config file with appropriate registry credentials or secret references. You can skip this step if you are not performing AirGap installation.# From the email received after registration with Avesha
IMAGE_REPOSITORY="https://index.docker.io/v1/"
USERNAME="xxx"
PASSWORD="xxx" -
(Optional) These settings are required only if you are not using local Helm charts and instead pulling them from a remote Helm repository.
-
Set
use_local_chartsto falseuse_local_charts: false -
Set the global Helm repository URL
global_helm_repo_url: "https://smartscaler.nexus.aveshalabs.io/repository/kubeslice-egs-helm-ent-prod"
-
EGS Controller Configuration
-
Update the EGS Controller (KubeSlice Controller) configuration, in the
egs-installer-config.yamlfile:#### Kubeslice Controller Installation Settings ####
kubeslice_controller_egs:
skip_installation: false # Do not skip the installation of the controller
use_global_kubeconfig: true # Use global kubeconfig for the controller installation
specific_use_local_charts: true # Override to use local charts for the controller
kubeconfig: "" # Path to the kubeconfig file specific to the controller, if empty, uses the global kubeconfig
kubecontext: "" # Kubecontext specific to the controller; if empty, uses the global context
namespace: "kubeslice-controller" # Kubernetes namespace where the controller will be installed
release: "egs-controller" # Helm release name for the controller
chart: "kubeslice-controller-egs" # Helm chart name for the controller
#### Inline Helm Values for the Controller Chart ####
inline_values:
global:
imageRegistry: harbor.saas1.smart-scaler.io/avesha/aveshasystems # Docker registry for the images
namespaceConfig: # user can configure labels or annotations that EGS Controller namespaces should have
labels: {}
annotations: {}
kubeTally:
enabled: false # Enable KubeTally in the controller
#### Postgresql Connection Configuration for Kubetally ####
postgresSecretName: kubetally-db-credentials # Secret name in kubeslice-controller namespace for PostgreSQL credentials created by install, all the below values must be specified
# then a secret will be created with specified name.
# alternatively you can make all below values empty and provide a pre-created secret name with below connection details format
postgresAddr: "kt-postgresql.kt-postgresql.svc.cluster.local" # Change this Address to your postgresql endpoint
postgresPort: 5432 # Change this Port for the PostgreSQL service to your values
postgresUser: "postgres" # Change this PostgreSQL username to your values
postgresPassword: "postgres" # Change this PostgreSQL password to your value
postgresDB: "postgres" # Change this PostgreSQL database name to your value
postgresSslmode: disable # Change this SSL mode for PostgreSQL connection to your value
prometheusUrl: http://prometheus-kube-prometheus-prometheus.egs-monitoring.svc.cluster.local:9090 # Prometheus URL for monitoring
kubeslice:
controller:
endpoint: "" # Endpoint of the controller API server; auto-fetched if left empty
#### Helm Flags and Verification Settings ####
helm_flags: "--wait --timeout 5m --debug" # Additional Helm flags for the installation
verify_install: false # Verify the installation of the controller
verify_install_timeout: 30 # Timeout for the controller installation verification (in seconds)
skip_on_verify_fail: true # If verification fails, do not skip the step
#### Troubleshooting Settings ####
enable_troubleshoot: false # Enable troubleshooting mode for additional logs and checks
KubeTally Configuration
-
(Optional) Configure PostgreSQL to use the KubeTally (Cost Management) feature. The PostgreSQL connection details required by the controller are stored in a Kubernetes Secret in the
kubeslice-controllernamespace.You can configure the secret in one of the following ways:
-
To use your own Kubernetes Secret, enter only the secret name in the configuration file and leave other fields blank. Confirm the secret exists in the
kubeslice-controllernamespace and uses the required key-value format.postgresSecretName: kubetally-db-credentials # Existing secret in kubeslice-controller namespace
postgresAddr: ""
postgresPort: ""
postgresUser: ""
postgresPassword: ""
postgresDB: ""
postgresSslmode: "" -
To automatically create a secret, provide all connection details and the secret name. The installer will then create a Kubernetes Secret in the
kubeslice-controllernamespace.postgresSecretName: kubetally-db-credentials # Secret to be created in kubeslice-controller namespace
postgresAddr: "kt-postgresql.kt-postgresql.svc.cluster.local" # PostgreSQL service endpoint
postgresPort: 5432 # PostgreSQL service port (default 5432)
postgresUser: "postgres" # PostgreSQL username
postgresPassword: "postgres" # PostgreSQL password
postgresDB: "postgres" # PostgreSQL database name
postgresSslmode: disable # SSL mode for PostgreSQL connection (for example, disable or require)infoYou can add the
kubeslice.io/managed-by-egs=falselabel to GPU nodes. This label excludes or filters the associated GPU nodes from the EGS inventory.
-
EGS Admin Portal Configuration
-
The EGS Admin Portal (KubeSlice UI) provides a web-based interface for managing and monitoring the EGS environment. To configure the EGS Admin Portal installation, update the following settings in the
egs-installer-config.yamlfile:noteThe DCGM_METRIC_JOB_VALUE must match the Prometheus scrape job name configured in your Prometheus configuration. Without a proper Prometheus scrape configuration, GPU metrics will not be collected, and UI visualization will not work. Ensure your Prometheus configuration includes the corresponding scrape job.
# Kubeslice UI Installation Settings
kubeslice_ui_egs:
skip_installation: false                     # Do not skip the installation of the UI
use_global_kubeconfig: true                  # Use global kubeconfig for the UI installation
kubeconfig: ""                               # Path to the kubeconfig file specific to the UI, if empty, uses the global kubeconfig
kubecontext: ""                              # Kubecontext specific to the UI; if empty, uses the global context
namespace: "kubeslice-controller"            # Kubernetes namespace where the UI will be installed
release: "egs-ui"                            # Helm release name for the UI
chart: "kubeslice-ui-egs"                    # Helm chart name for the UI

# Inline Helm Values for the UI Chart
inline_values:
  global:
    imageRegistry: harbor.saas1.smart-scaler.io/avesha/aveshasystems   # Docker registry for the UI images
  kubeslice:
    prometheus:
      url: http://prometheus-kube-prometheus-prometheus.egs-monitoring.svc.cluster.local:9090  # Prometheus URL for monitoring
    uiproxy:
      service:
        type: ClusterIP                  # Service type for the UI proxy
        ## if type selected to NodePort then set nodePort value if required
        # nodePort:
        # port: 443
        # targetPort: 8443
      labels:
        app: kubeslice-ui-proxy
      annotations: {}

      ingress:
        ## If true, ui‑proxy Ingress will be created
        enabled: false
        ## Port on the Service to route to
        servicePort: 443
        ## Ingress class name (e.g. "nginx"), if you're using a custom ingress controller
        className: ""
        hosts:
          - host: ui.kubeslice.com     # replace with your FQDN
            paths:
              - path: /             # base path
                pathType: Prefix    # Prefix | Exact
        ## TLS configuration (you must create these Secrets ahead of time)
        tls: []
          # - hosts:
          #     - ui.kubeslice.com
          #   secretName: uitlssecret
        annotations: []
        ## Extra labels to add onto the Ingress object
        extraLabels: {}
      apigw:
        env:
          - name: DCGM_METRIC_JOB_VALUE
            value: nvidia-dcgm-exporter  # This value must match the Prometheus scrape job name for GPU metrics collection

    egsCoreApis:
      enabled: true                         # Enable EGS core APIs for the UI
      service:
        type: ClusterIP                  # Service type for the EGS core APIs

# Helm Flags and Verification Settings
helm_flags: "--wait --timeout 5m --debug"            # Additional Helm flags for the UI installation
verify_install: false                        # Verify the installation of the UI
verify_install_timeout: 50                   # Timeout for the UI installation verification (in seconds)
skip_on_verify_fail: true                    # If UI verification fails, do not skip the step

# Chart Source Settings
specific_use_local_charts: true              # Override to use local charts for the UI
Worker Cluster: Monitoring Endpoint Configuration
-
In multi-cluster deployments, you must configure the
global_auto_fetch_endpointparameter in theegs-installer-config.yamlfile. This configuration is essential for proper monitoring and dashboard URL management across multiple clusters.note- In single-cluster deployments, this step is not required, as the controller and worker are in the same cluster.
- In a multi-cluster deployment, the controller cluster must be able to reach the Prometheus endpoint running on the worker clusters.
warningIf the Prometheus endpoints are not configured, you may experience issues with the dashboards (for example, missing or incomplete metric displays).
To configure monitoring endpoints for multi-cluster setups, follow these steps to update the inline values in your
egs-installer-config.yamlfile:-
Set the
global_auto_fetch_endpointparameter totrue. -
Use the following commands to get the Grafana and Prometheus LoadBalancer External IPs or NodePorts from the worker clusters:
kubectl get svc prometheus-grafana -n monitoring
kubectl get svc prometheus-kube-prometheus-prometheus -n monitorin
Example Output
NAME                        TYPE           CLUSTER-IP      EXTERNAL-IP      PORT(S)                      AGE
prometheus-grafana          LoadBalancer   10.96.0.1      <grafana-lb>      80:31380/TCP                 5d
prometheus-kube-prometheus LoadBalancer 10.96.0.2 <prometheus-lb> 9090:31381/TCP 5d -
Update the Prometheus and Grafana LoadBalancer IPs or NodePorts in the
inline_valuessection of youregs-installer-config.yamlfile:inline_values: # Inline Helm values for the worker chart
global:
imageRegistry: harbor.saas1.smart-scaler.io/avesha/aveshasystems # Docker registry for worker images
operator:
env:
- name: DCGM_EXPORTER_JOB_NAME
value: gpu-metrics # This value must match the Prometheus scrape job name for GPU metrics collection
egs:
prometheusEndpoint: "http://prometheus-kube-prometheus-prometheus.egs-monitoring.svc.cluster.local:9090" # Prometheus endpoint
grafanaDashboardBaseUrl: "http://<grafana-lb>/d/Oxed_c6Wz" # Grafana dashboard base URL
egsAgent:
secretName: egs-agent-access
agentSecret:
endpoint: ""
key: ""
metrics:
insecure: true # Allow insecure connections for metrics
kserve:
enabled: true # Enable KServe for the worker
kserve: # KServe chart options
controller:
gateway:
domain: kubeslice.com
ingressGateway:
className: "nginx" # Ingress class name for the KServe gateway
Register a Worker Cluster
The EGS installation script installs a EGS worker on the controller cluster by default for quick installation and testing purposes.
-
The installation script allows you to register multiple worker clusters at the same time. To register an additional worker cluster, follow these steps to update the
egs-installer-config.yamlfile:- Add worker cluster configuration under:
kubeslice_worker_egsarraycluster_registrationarray
- Repeat the configuration for each worker cluster you want to register.
To update the configuration file:
-
Add a new worker configuration to the
kubeslice_worker_egsarray in your configuration file. The following is an example configuration for a new worker:kubeslice_worker_egs:
- name: "worker-1" # Existing worker
# ... existing configuration ...
- name: "worker-2" # New worker
use_global_kubeconfig: true # Use global kubeconfig for this worker
kubeconfig: "" # Path to the kubeconfig file specific to the worker, if empty, uses the global kubeconfig
kubecontext: "" # Kubecontext specific to the worker; if empty, uses the global context
skip_installation: false # Do not skip the installation of the worker
specific_use_local_charts: true # Override to use local charts for this worker
namespace: "kubeslice-system" # Kubernetes namespace for this worker
release: "egs-worker-2" # Helm release name for the worker (must be unique)
chart: "kubeslice-worker-egs" # Helm chart name for the worker
inline_values: # Inline Helm values for the worker chart
global:
imageRegistry: harbor.saas1.smart-scaler.io/avesha/aveshasystems # Docker registry for worker images
egs:
prometheusEndpoint: "http://prometheus-kube-prometheus-prometheus.egs-monitoring.svc.cluster.local:9090" # Prometheus endpoint
grafanaDashboardBaseUrl: "http://<grafana-lb>/d/Oxed_c6Wz" # Grafana dashboard base URL
egsAgent:
secretName: egs-agent-access
agentSecret:
endpoint: ""
key: ""
metrics:
insecure: true # Allow insecure connections for metrics
kserve:
enabled: true # Enable KServe for the worker
kserve: # KServe chart options
controller:
gateway:
domain: kubeslice.com
ingressGateway:
className: "nginx" # Ingress class name for the KServe gateway
helm_flags: "--wait --timeout 5m --debug" # Additional Helm flags for the worker installation
verify_install: true # Verify the installation of the worker
verify_install_timeout: 60 # Timeout for the worker installation verification (in seconds)
skip_on_verify_fail: false # Do not skip if worker verification fails
enable_troubleshoot: false # Enable troubleshooting mode for additional logs and checks -
Add a worker cluster registration configuration in the
cluster_registrationarray in your configuration file. The following is an example configuration for a new worker cluster:cluster_registration:
- cluster_name: "worker-1" # Existing cluster
project_name: "avesha" # Name of the project to associate with the cluster
telemetry:
enabled: true # Enable telemetry for this cluster
endpoint: "http://prometheus-kube-prometheus-prometheus.egs-monitoring.svc.cluster.local:9090" # Telemetry endpoint
telemetryProvider: "prometheus" # Telemetry provider (Prometheus in this case)
geoLocation:
cloudProvider: "" # Cloud provider for this cluster (e.g., GCP)
cloudRegion: "" # Cloud region for this cluster (e.g., us-central1)
- cluster_name: "worker-2" # New cluster
project_name: "avesha" # Name of the project to associate with the cluster
telemetry:
enabled: true # Enable telemetry for this cluster
endpoint: "http://prometheus-kube-prometheus-prometheus.egs-monitoring.svc.cluster.local:9090" # Telemetry endpoint
telemetryProvider: "prometheus" # Telemetry provider (Prometheus in this case)
geoLocation:
cloudProvider: "" # Cloud provider for this cluster (e.g., GCP)
cloudRegion: "" # Cloud region for this cluster (e.g., us-central1)
- Add worker cluster configuration under:
Run the EGS Installation Script
The installation script creates a default project workspace and registers a worker cluster.
Use the following command to install EGS:
./egs-installer.sh --input-yaml egs-installer-config.yaml
Access the Admin Portal
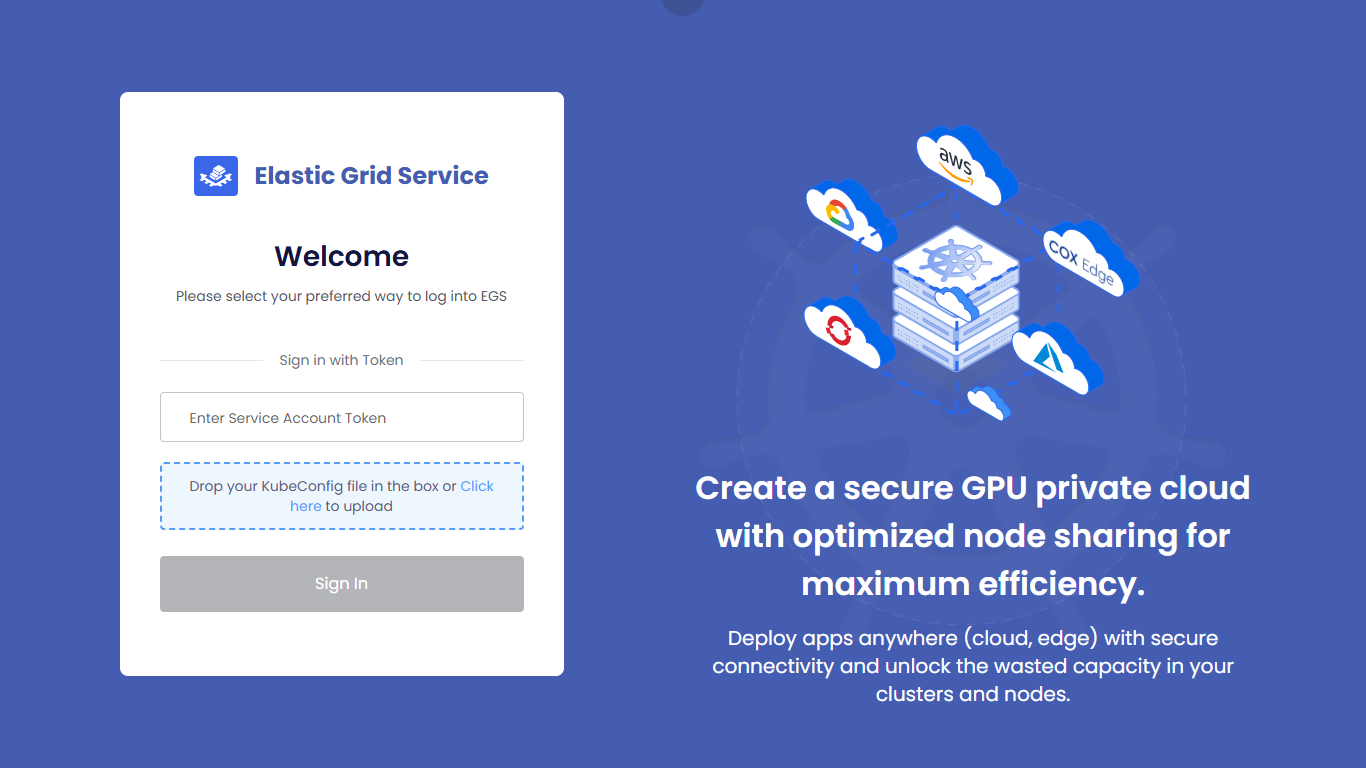
After the successful installation, the script displays the LoadBalancer external IP address and the admin access token to log in to the Admin Portal.
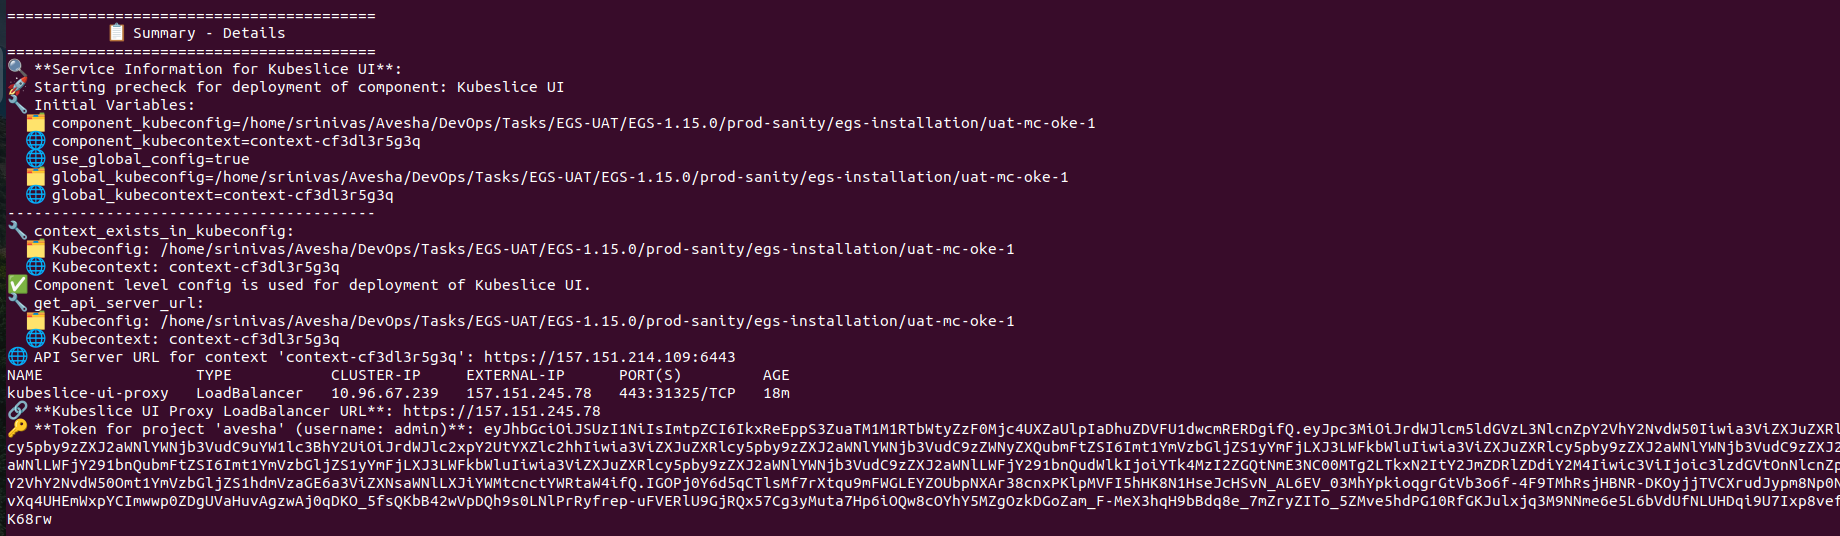
Make a note of the LoadBalancer external IP address and the admin access token required to log in to the Admin Portal. The KubeSlice UI Proxy LoadBalancer URL value is your Admin Portal URL and The token for project avesha (username: admin) is your login token.
Use the URL and the admin access token, from the previous step to log in to the Admin Portal.
Retrieve Admin Credentials Using kubectl
If you missed the LoadBalancer external IP address or the admin access token displayed after installation, you can retrieve them
using kubectl commands.
Perform the following steps to retrieve the admin access token and the Admin Portal URL:
-
Use the following command to retrieve the admin access token:
kubectl get secret kubeslice-rbac-rw-admin -o jsonpath="{.data.token}" -n kubeslice-avesha | base64 --decodeExample Output:
eyJhbGciOiJSUzI1NiIsImtpZCI6IjE2YjY0YzYxY2E3Y2Y0Y2E4YjY0YzYxY2E3Y2Y0Y2E4YjYiLCJ0eXAiOiJKV1QifQ.eyJpc3MiOiJrdWJlcm5ldGVzL3NlcnZpY2UtYWNjb3VudCIsImt1YmVybmV0ZXM6c2VydmljZS1hY2NvdW50Om5hbWUiOiJrdWJlc2xpY2UtcmJhYy1ydy1hZG1pbiIsImt1YmVybmV0ZXM6c2VydmljZS1hY2NvdW50OnVpZCI6Ijg3ZjhiZjBiLTU3ZTAtMTFlYS1iNmJlLTRmNzlhZTIyMWI4NyIsImt1YmVybmV0ZXM6c2VydmljZS1hY2NvdW50OnNlcnZpY2UtYWNjb3VudC51aWQiOiI4N2Y4YmYwYi01N2UwLTExZWEtYjZiZS00Zjc5YWUyMjFiODciLCJzdWIiOiJzeXN0ZW06c2VydmljZWFjY291bnQ6a3ViZXNsaWNlLXJiYWMtcnctYWRtaW4ifQ.MEYCIQDfXoX8v7b8k7c3
4mJpXHh3Zk5lYzVtY2Z0eXlLQAIhAJi0r5c1v6vUu8mJxYv1j6Kz3p7G9y4nU5r8yX9fX6c -
Use the following command to access the Load Balancer IP:
Example
kubectl get svc -n kubeslice-controller | grep kubeslice-ui-proxyExample Output
NAME                                                      TYPE           CLUSTER-IP    EXTERNAL-IP    PORT(S)         AGE
kubeslice-ui-proxy                                        LoadBalancer   10.96.2.238   172.18.255.201 443:31751/TCP   24h
Note down the LoadBalancer external IP of the kubeslice-ui-proxy pod. In the above example, 172.18.255.201 is
the external IP. The EGS Portal URL will be https://<ui-proxy-ip>.
Upload Custom Pricing for Cloud Resources
To upload custom pricing for cloud resources, you can use the custom-pricing-upload.sh script provided in the EGS installation repository.
This script allows you to upload custom pricing data for various cloud resources, which can be used for cost estimation and budgeting.
Ensure you have installed curl to upload the CSV file.
To upload custom pricing data:
-
Navigate to the cloned
egs-installationrepository and change the file permission using the following command:chmod +x custom-pricing-upload.sh -
Use the
customer-pricing-data.yamlfile to specify the custom pricing data. The file should contain the following structure:kubernetes:
kubeconfig: "" #absolute path of kubeconfig
kubecontext: "" #kubecontext name
namespace: "kubeslice-controller"
service: "kubetally-pricing-service"
#we can add as many cloud providers and instance types as needed
cloud_providers:
- name: "gcp"
instances:
- region: "us-east1"
component: "Compute Instance"
instance_type: "a2-highgpu-2g"
vcpu: 1
price: 20
gpu: 1
- region: "us-east1"
component: "Compute Instance"
instance_type: "e2-standard-8"
vcpu: 1
price: 5
gpu: 0 -
Run the script to upload the custom pricing data:
./custom-pricing-upload.sh
This script automates the process of loading custom cloud pricing data into the pricing API running inside a Kubernetes cluster.
Script Workflow:
-
Reads the cluster connection details (kubeconfig, context) from the YAML input file.
-
Identifies the target service and its exposed port (for example, kubetally-pricing-service:80).
-
Selects a random available local port on the host machine.
-
Establishes a port-forwarding tunnel from the selected local port to the Kubernetes service. Runs in the background to keep the tunnel active during upload.
-
Converts the pricing data from YAML format into CSV format for API ingestion.
-
Uploads the generated CSV file to the pricing API at:
http://localhost:<random_port>/api/v1/prices
Uninstall EGS
The uninstallation script removes all resources associated with EGS, including:
- Workspaces
- GPU Provision Requests (GPRs)
- All custom resources provisioned by EGS
Before running the uninstallation script, ensure that you have backed up any important data or configurations. The script will remove all EGS-related resources, and this action cannot be undone.
Use the following command to uninstall EGS:
./egs-uninstall.sh --input-yaml egs-installer-config.yaml
Troubleshooting
-
Missing Binaries
Ensure all required binaries are installed and available in your system’s PATH.
-
Cluster Access Issues
Verify that your
kubeconfigfiles are correctly configured so the script can access the clusters defined in the YAML configuration. -
Timeout Issues
If a component fails to install within the specified timeout, increase the
verify_install_timeoutvalue in the YAML file.