Licensing
This topic describes the licensing of KubeSlice, including the types of licenses available, how to manage and extend the license, and how to monitor vCPU usage with an enterprise license.
License Types
KubeSlice offers both trial and enterprise licenses.
Trial License
The trial license is valid for 90 days with a 5-day grace period. The trial license supports only one controller cluster and multiple worker clusters. The worker clusters can be attached to or detached from a slice, but the controller cluster must remain the same for the entire trial period. After a trial license is installed, the trial period begins providing complete access to all features and if needed, you can extend the trial license after its expiration. However, note that expired trial licenses cannot be exchanged for new ones.
Enterprise License
The enterprise license is valid for one year and supports multiple controller clusters and worker clusters. The enterprise license provides access to all features and support from Avesha.
Airgap License Activation
The airgap license activation is for clusters in isolated networks such as VPN and private clouds. We support a trial license for cluster in an isolated network.
To activate the trial license on an airgap cluster:
-
Identify a controller cluster to install the KubeSlice trial license.
-
Provide the cluster's Machine Key to the Avesha Support team.
Machine Key is a combination of the
kube-systemnamespacecreationTimestampanduidwith no space or any special character between them.For example, if the
creationTimestampis2022-09-20T19:28:50Zand theuidis738bf2f7-cbff-42c7-99d1-8d89cfe16d72, then the Machine Key of the cluster is2022-09-20T19:28:50Z738bf2f7-cbff-42c7-99d1-8d89cfe16d72. -
Contact Avesha Support at support@avesha.io to get a trial license for a private cluster.
-
The Avesha Support team generates a license secret and shares instructions to install it with you.
For more information on errors, see licensing events and issues. If you still cannot resolve an error, then contact Avesha Support at support@avesha.io.
Validate the License
On the KubeSlice Manager, you can validate the license installed on KubeSlice.
To validate the license:
-
Expand Settings on the left sidebar.
-
Click License from the menu to see the license trial period and key.
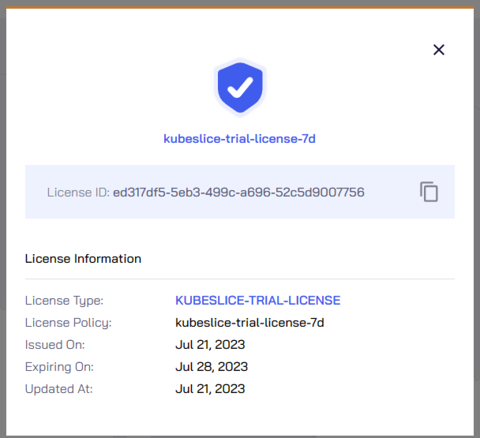
License Expiry Reminder
During the trial license period, you will receive notifications about the license expiry starting from the 71st day. On the KubeSlice Manager, a banner notifying users of the expiry is displayed. Every user receives a 5-day grace period following the 90-day trial licensing period. You are, however, notified of the time left until the license expires.
Extend the License Period
You can extend the same trial license after its expiry if your business requires it.
Extend the License Period on an Airgap Cluster
To extend or upgrade the trial license on an airgap cluster:
-
Contact Avesha Support support@aveshasystems.com to extend or upgrade a trial license for a private cluster
-
Provide the cluster's Machine Key to the Avesha Support team.
Machine Key is a combination of the
kube-systemnamespacecreationTimestampanduidwith no space or any special character between them.For example, if the
creationTimestampis2022-09-20T19:28:50Zand theuidis738bf2f7-cbff-42c7-99d1-8d89cfe16d72, then the Machine Key of the cluster is2022-09-20T19:28:50Z738bf2f7-cbff-42c7-99d1-8d89cfe16d72.Alternatively, if you can access KubeSlice Manager, you can also share the License ID.
To get the License ID from the KubeSlice Manager:
a. Expand Settings on the left sidebar.
b. Click License from the menu to see the license trial period and key.
c. Copy the License ID to share it with Avesha Support. Be sure to mention the time period for which you want to extend the trial license.
You can also get the License ID using the following command:
kubectl get secret kubeslice-license-file --template='{{index .data "license-id"}}' -n kubeslice-controller | base64 -dExpected Output
f6461a9d-09e9-4db8-a75f-bff8b4e6162b -
The Avesha Support team generates a license secret and shares instructions to install it with you.
Extend the License Period through KubeSlice Manager
Use the KubeSlice Manager to extend the license online. To extend the license:
-
On the left sidebar of the KubeSlice Manager, locate the Upgrade License label at the bottom left of the page.
-
Click the Upgrade License label.
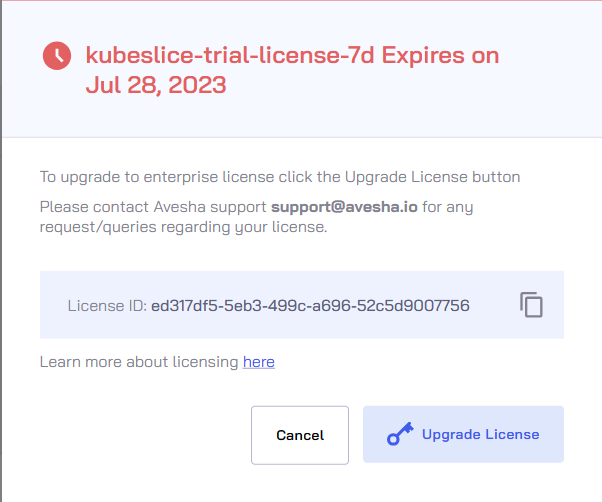
-
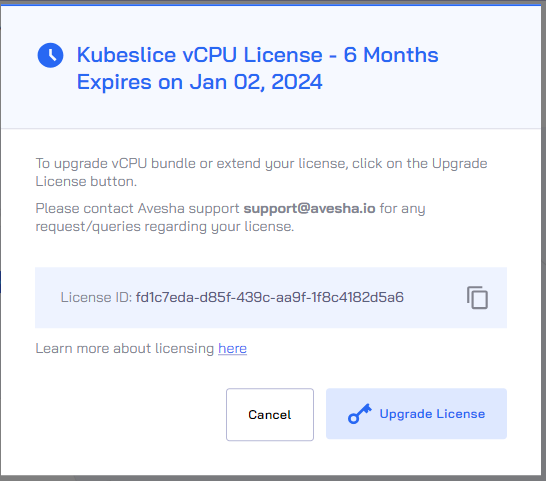
On the license dialog, click Upgrade License.
-
The button is integrated with a mail client that creates an email with all the required details such as License ID addressed to Avesha Support prefilled. Send the email to Avesha Support.
Be sure to mention the time period for which you want to extend the trial license.
-
The Avesha Support team generates a license secret and shares instructions to install it with you.
noteYou can also get the License ID using the following command:
kubectl get secret kubeslice-license-file --template='{{index .data "license-id"}}' -n kubeslice-controller | base64 -dExample Output
f6461a9d-09e9-4db8-a75f-bff8b4e6162b
Upgrade the Trial License to Enterprise
Use the KubeSlice Manager to upgrade to the enterprise license. To upgrade the license:
-
On the left sidebar of the KubeSlice Manager, locate the Upgrade License label at the bottom left of the page.
-
Click the Upgrade License label.
-
On the license dialog, click Upgrade Trial License.
-
The button is integrated with a mail client that creates an email with all the required details such as License ID addressed to Avesha Support prefilled. Send the email to Avesha Support.
Be sure to mention the required vCPU count and the license period.
-
The Avesha Support team generates a license secret and shares instructions to install it with you.
Enterprise License
The enterprise license is available for purchase on an annual basis through the following options:
- Contact
sales@avesha.ioto purchase the enterprise license directly. - You can upgrade from an existing trial license to purchase the license.
When obtaining the enterprise license, it is essential to provide a quotation for the total number of vCPUs required for the purchase. A vCPU represents a virtual central processing unit (CPU) assigned to a virtual machine (VM). The pricing is determined by the overall count of vCPUs needed.
Get the License Secret
-
After purchasing the license, identify a controller cluster to install the KubeSlice enterprise license.
-
Provide the cluster's Machine Key to the Avesha Support team.
Machine Key is a combination of the
kube-systemnamespacecreationTimestampanduidwith no space or any special character between them.For example, if the
creationTimestampis2022-09-20T19:28:50Zand theuidis738bf2f7-cbff-42c7-99d1-8d89cfe16d72, then the Machine Key of the cluster is2022-09-20T19:28:50Z738bf2f7-cbff-42c7-99d1-8d89cfe16d72. -
Contact Avesha Support at
support@avesha.ioto get an enterprise license for a cluster. -
The Avesha Support team generates a license secret and shares instructions to install it with you.
Install the License
To install the enterprise license:
-
Keep the license secret you received from Avesha handy to install it on the identified controller cluster.
-
On the identified controller cluster, use the following command to install the enterprise license:
kubectl apply -f <license secret> -n kubeslice-controller
For more information on errors, see licensing events and issues. If you still cannot resolve an error, then contact Avesha Support at support@avesha.io.
Validate the License
On the KubeSlice Manager, you can validate the enterprise license.
To validate the license:
-
Expand Settings on the left sidebar.
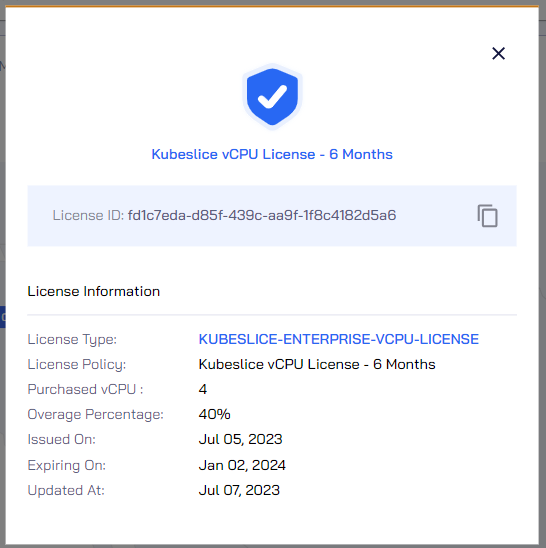
-
Click License from the menu to see the license trial period and key.
Monitor vCPU
You can monitor the vCPU usage and violation on the KubeSlice Manager.
On the KubeSlice Manager, on the top-right corner of the page, the vCPU icon is globally available from all the left sidebar tabs' landing page.
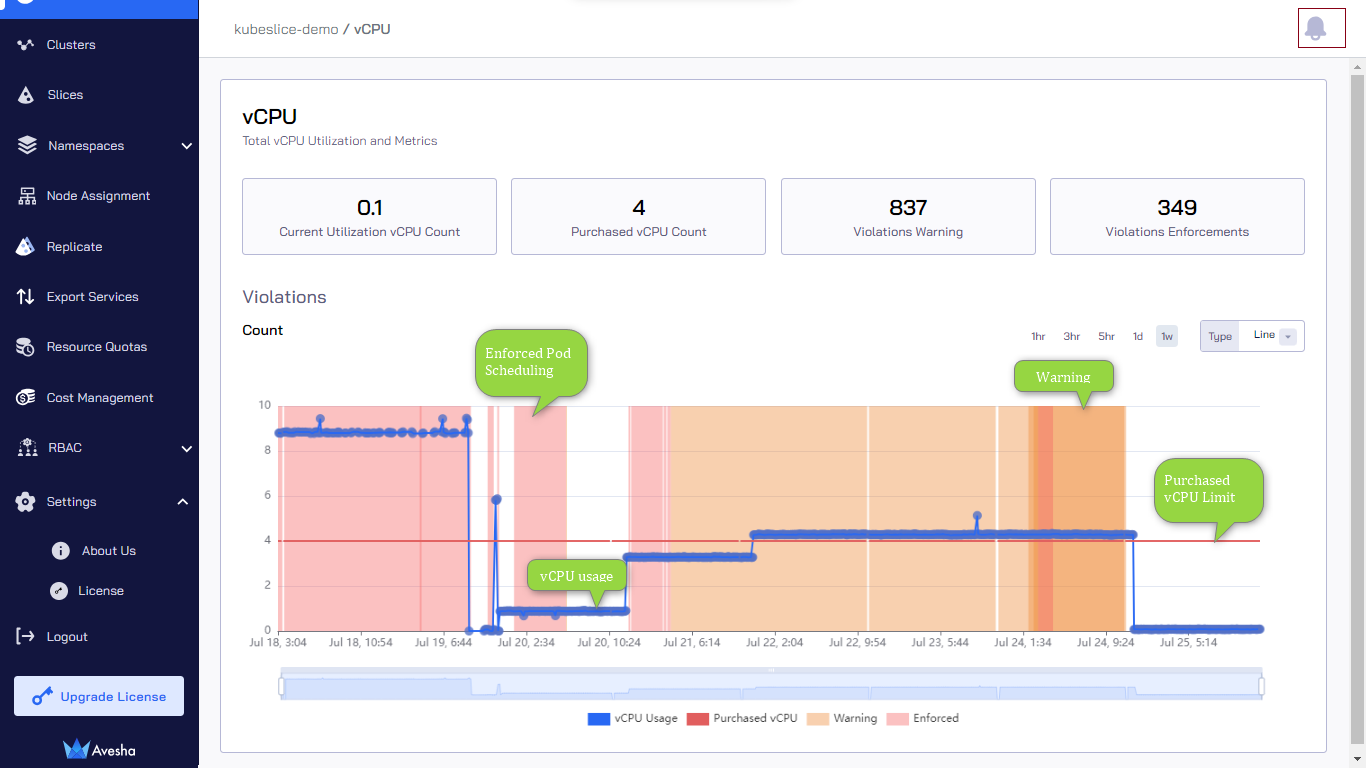
The vCPU page provides the details on the current utilization, purchased count, and warnings on violations along with violation-based enforcements.
The vCPU icon, located at the top-right corner of the KubeSlice Manager page, serves as an indicator for usage and violations. The usage is displayed as a quarterly percentage. When the usage is 50 percent or below, the vCPU icon appears green. However, if the usage reaches 75 percent and above, the icon turns red.
By default, the line graph is displayed. To switch to the area graph, select it from the drop-down list.
The graph under Violations provides the above details for the following time periods:
- 1 hour
- 3 hours
- 5 hours
- 1 day
- 1 week
Interpret the Graph
Based on the line graph, the following points provide an interpretation of the data:
-
The blue line with data points represents the vCPU usage.
-
The red horizontal-straight line represents the vCPU limit for this slice.
-
When the usage hits the purchased vCPU count limit, KubeSlice sends a warning event. The orange fill represents this warning.
infoTo see the events, click the bell icon located at the top right corner of the KubeSlice Manager page.
-
When the usage exceeds the purchased vCPU count limit, KubeSlice sends a violation event. The pink fill represents the violation of exceeding the vCPU count limit. It also represents that the pod scheduling is enforced.
Contact support@avesha.io to learn about the proper handling of these vCPU usage violations.
Upgrade the vCPU Count
Throughout the duration of the active license period, if your business demands a higher vCPU count, you have the option to acquire additional vCPUs by making a separate purchase.
Use the KubeSlice Manager to upgrade the vCPU count.
To upgrade vCPU count:
-
On the left sidebar of the KubeSlice Manager, locate the Upgrade License label at the bottom left of the page.
-
Click the Upgrade License* label.
-
On the license dialog, click Upgrade Trial License.
-
The button is linked to a mail client, which generates an email with essential information, including the License ID addressed to Avesha Support and pre-filled accordingly.
Be sure to provide the necessary details, such as the new vCPU count and the desired overage percentage, as required.
-
Send the email to Avesha Support.
-
The Avesha Support team generates a license secret and shares instructions to install it with you.
-
Install the license by following these instructions.
Extend the License Period
Use the KubeSlice Manager to extend the license duration with the required vCPU count.
To extend the license period:
-
On the left sidebar of the KubeSlice Manager, locate the Upgrade License label at the bottom left of the page.
-
Click the Upgrade License label.
-
On the license dialog, click Upgrade Trial License.
-
The button is linked to a mail client, which generates an email with essential information, including the License ID addressed to Avesha Support and pre-filled accordingly.
Be sure to provide the necessary details, such as the new vCPU count and the duration, as required.
-
Send an email to Avesha Support.
-
The Avesha Support team generates a license secret and shares instructions to install it with you.
-
Install the license by following these instructions.