KubeAccess
This topic describes how to configure KubeAccess to onboard cloud-managed services onto a slice. KubeAccess is an extension of KubeSlice.
Overview
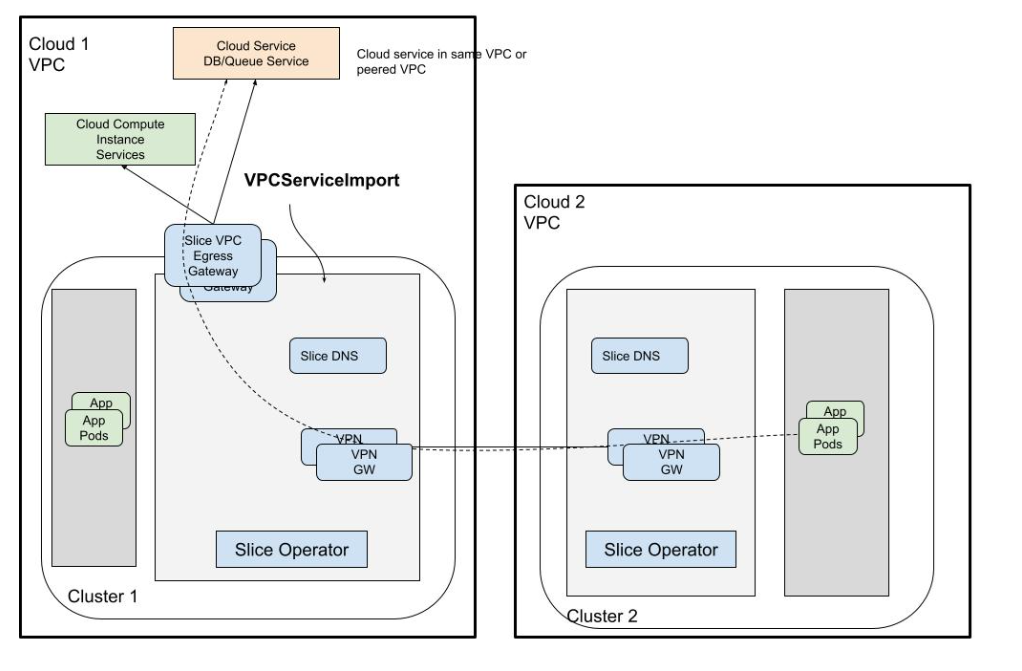
KubeAccess enables reachability for external managed services by acting as a gateway between the managed service and microservices running in the Kubernetes clusters. It provides access to private cloud managed services in a VPC through an Envoy-Proxy-based egress gateway. The VPC egress gateway feature enables users to import a private managed service running outside a Kubernetes cluster into a slice. This allows the application pods running in remote clusters to access the managed service through the slice network.
The following figure illustrates how application pods access a cloud-managed service that is onboarded onto a slice.
Configure KubeAccess on a Slice
Let us install the KubeSlice controller and register worker clusters. After registering worker clusters to the controller, connect worker clusters to create a slice.
-
You must clone the
examplesrepo as it contains all the required configuration files in theexamples/cloud-services-access-gatewaydirectory.Use the following command to clone the
examplesrepo:git clone https://github.com/kubeslice/examples.gitAfter cloning the repo, use the files from the
examples/cloud-services-access-gatewaydirectory. -
You must install the KubeSlice Controller. Identify a controller cluster to install the KubeSlice Controller. Identify two worker clusters, azure-1 and linode-2 with the KubeSlice Controller. Use the following template to install the KubeSlice Controller and register the two worker clusters:
examples/cloud-services-access-gateway/kubeslice-cli-topology-template/kubeslice-cli-topology-template.yaml-
Modify the values as per your requirement. Refer to topology parameters for more details. Add the project name as
kubeslice-aveshain which you would create a replication slice. If you want to provide a different project name, then be sure to add that project while creating the replication slice.infoFor more information, see kubeslice-cli. Refer to installing the KubeSlice Controller to install the KubeSlice Controller using YAML.
-
Install KubeSlice using the following command on the controller cluster:
kubeslice-cli --config examples/cloud-services-access-gateway/kubeslice-cli-topology-template/kubeslice-cli-topology-template.yaml installRunning this command installs the KubeSlice Controller and registers azure-1 and linode-2 clusters with it.
-
On the controller cluster, create a slice in the project namespace using the following command:
infoTo know more about the configuration parameters, see configuring the VPC Service Access Gateway on a slice.
kubectl apply -f examples/cloud-services-access-gateway/slice.yaml -n kubeslice-aveshaExpected Output
sliceconfig.controller.kubeslice.io/kubeaccess-demo created -
Validate the slice using the following command:
kubectl get sliceconfig kubeaccess-demo -n kubeslice-aveshaExpected Output
NAME     	       AGE
kubeaccess-demo 4s -
On the azure-1 worker cluster, validate the slice health using the following command:
kubectl get workersliceconfig kubeaccess-demo-azure-1 -n kubeslice-avesha -o jsonpath='{.status.sliceHealth}' | jqExpected Output
{
  "componentStatuses": [
	{
  	"component": "dns",
  	"componentHealthStatus": "Normal"
	},
	{
  	"component": "slice-gateway",
  	"componentHealthStatus": "Normal"
	},
	{
  	"component": "slice-router",
  	"componentHealthStatus": "Normal"
	},
	{
  	"component": "gateway-tunnel",
  	"componentHealthStatus": "Normal"
	}
  ],
  "lastUpdated": "2024-07-18T07:36:32Z",
  "sliceHealthStatus": "Normal"
} -
On the linode-2 worker cluster, validate the slice health using the following command:
kubectl get workersliceconfig kubeaccess-demo-linode-2 -n kubeslice-avesha -o jsonpath='{.status.sliceHealth}' | jqExpected Output
{
  "componentStatuses": [
	{
  	"component": "dns",
  	"componentHealthStatus": "Normal"
	},
	{
  	"component": "slice-gateway",
  	"componentHealthStatus": "Normal"
	},
	{
  	"component": "slice-router",
  	"componentHealthStatus": "Normal"
	},
	{
  	"component": "gateway-tunnel",
  	"componentHealthStatus": "Normal"
	}
  ],
  "lastUpdated": "2024-07-18T07:36:32Z",
  "sliceHealthStatus": "Normal"
}
-
Create a VPCServiceImport Object on the azure-1 Worker Cluster
On the azure-1 worker cluster, create a VPCServiceImport object using the following command:
To know more about the VPCServiceImport object parameters, see creating a VPCServiceImport object.
kubectl apply -f cosmosdb-import.yaml -n kubeaccess-demo-vpc-access-gw-system
Expected Output
vpcserviceimport.networking.kubeslice.io/cosmosdb created
Validate the VPCServiceImport Object
Validate the VPCServiceImport using the following command:
kubectl get vpcserviceimport cosmosdb -n kubeaccess-demo-vpc-access-gw-system
Expected Output
NAME       SLICE              STATUS
cosmosdb   kubeaccess-demo    Ready
Access the Azure-managed service on the linode-2 Worker Cluster
To access the Azure-managed service on the linode-2 worker cluster:
-
Create an application pod in the application namespace using the following command:
~/vpc_egress/akamai-uat$ kubectl apply -f app-pod.yaml -n appnsExpected Output
pod/alpine-shell created -
Execute Shell Commands into the pod using the following command:
~/vpc_egress/akamai-uat$ kubectl exec -i -t -n appns alpine-shell -c busybox -- shExpected Output
/ # -
On the application pod, install the MongoDb client using the following commands:
echo http://dl-cdn.alpinelinux.org/alpine/v3.6/main >> /etc/apk/repositories
echo http://dl-cdn.alpinelinux.org/alpine/v3.6/community >> /etc/apk/repositories
apk add mongodb mongodb-tools
Expected Output
fetch https://dl-cdn.alpinelinux.org/alpine/v3.19/main/x86_64/APKINDEX.tar.gz
fetch https://dl-cdn.alpinelinux.org/alpine/v3.19/community/x86_64/APKINDEX.tar.gz
fetch http://dl-cdn.alpinelinux.org/alpine/edge/main/x86_64/APKINDEX.tar.gz
fetch http://dl-cdn.alpinelinux.org/alpine/edge/testing/x86_64/APKINDEX.tar.gz
fetch http://dl-cdn.alpinelinux.org/alpine/edge/community/x86_64/APKINDEX.tar.gz
fetch http://dl-cdn.alpinelinux.org/alpine/v3.6/main/x86_64/APKINDEX.tar.gz
fetch http://dl-cdn.alpinelinux.org/alpine/v3.6/community/x86_64/APKINDEX.tar.gz
(1/18) Installing boost-system (1.62.0-r5)
(2/18) Installing boost-filesystem (1.62.0-r5)
(3/18) Installing boost-regex (1.62.0-r5)
(4/18) Installing boost-thread (1.62.0-r5)
(5/18) Installing boost (1.62.0-r5)
(6/18) Installing boost-iostreams (1.62.0-r5)
(7/18) Installing boost-program_options (1.62.0-r5)
(8/18) Installing libressl2.5-libcrypto (2.5.5-r2)
(9/18) Installing pcre (8.45-r3)
(10/18) Installing libpcrecpp (8.45-r3)
(11/18) Installing libsasl (2.1.28-r7)
(12/18) Installing snappy (1.1.4-r1)
(13/18) Installing libressl2.5-libssl (2.5.5-r2)
(14/18) Installing wiredtiger-libs (2.9.1.3.4.3-r0)
(15/18) Installing yaml-cpp (0.5.3-r3)
(16/18) Installing mongodb (3.4.4-r0)
Executing mongodb-3.4.4-r0.pre-install
(17/18) Installing mongodb-tools (100.9.4-r5)
(18/18) Installing zsh-pcre (5.9-r3)
Executing busybox-1.36.1-r26.trigger
OK: 623 MiB in 290 packages -
Check whether the database service is accessible using the following command:
mongo avesha.mongo.cosmos.azure.com:10256 -u slicedemo -p --sslExpected Output
DB18g40fytMVzJQxv3T0k3noPeDsF8cK1nBZLXPZNS2yz7tACDbawwtHg== --ssl
MongoDB shell version v3.4.4
connecting to: avesha.mongo.cosmos.azure.com:10256
MongoDB server version: 4.2.0
WARNING: shell and server versions do not match
globaldb:PRIMARY>