Application Bursting
Overview
When an application's resource demand surpasses what is available in its private cloud or on-premises data center where it runs, it
can burst its resource capacity dynamically by using resources from a public cloud. This concept is called Application Bursting.
Private data centers have a fixed number of nodes on which an application is deployed. If the application runs out of resources, the private cloud may extend to include resources from clusters in the public cloud. This application bursting provides additional capacity for uninterrupted service to the users of an application.
Enable Application Bursting on your Cluster
Select a public cloud provider that aligns with your requirements and preferences where DC bursts into the cloud for high-demand usage on reaching the resource capacity limit. Choosing where to place burstable clusters involves carefully considering various factors to align with your organization's goals, application requirements, and user needs. Here are some key considerations:
-
If minimizing latency is crucial for your applications, placing burstable clusters close to the on-premises data center can be beneficial. Low latency improves network connectivity and ensures fast communication between the on-premises infrastructure and the burstable resources.
-
Consider the geographic distribution of your end-users. Placing burstable clusters at strategic locations around the globe can reduce latency for users in different regions. This approach creates a global footprint and improves user experience.
Choose what is most appropriate for your application(s) and create the cluster in the locations of your choice.
Application Bursting through KubeSlice
KubeSlice simplifies the complicated issues of running multi-cluster applications at scale by introducing the concept of a Slice. This Slice establishes a virtual cluster that serves as a logical application boundary across a fleet of clusters. This abstraction allows pods and services to connect effortlessly. The Slice spans geographical boundaries, allowing applications to deploy on any cluster, cloud, edge, or K8s distribution.
Example
To enable application bursting through KubeSlice, we will install the KubeSlice Controller on the data center cluster and KubeSlice Worker on the data center and cloud clusters. Join the KubeSlice Workers to the KubeSlice controller installed on the data center cluster, and extend the slices to those cloud clusters. To know more, see Install KubeSlice.
The apps installed on the data center cluster can burst into cloud clusters for additional capacity being a part of the slice.
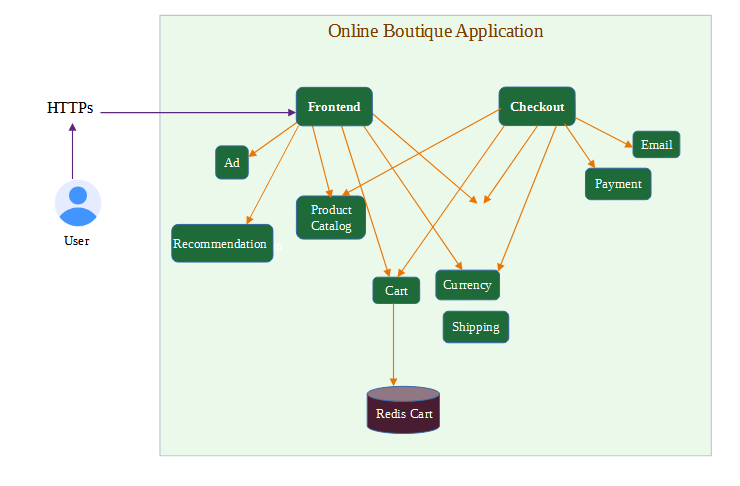
The following figure illustrates the application installed in the private cluster burst to the cloud cluster to get the additional
capacity through KubeSlice, the Red slice connects the data center and cloud clusters.

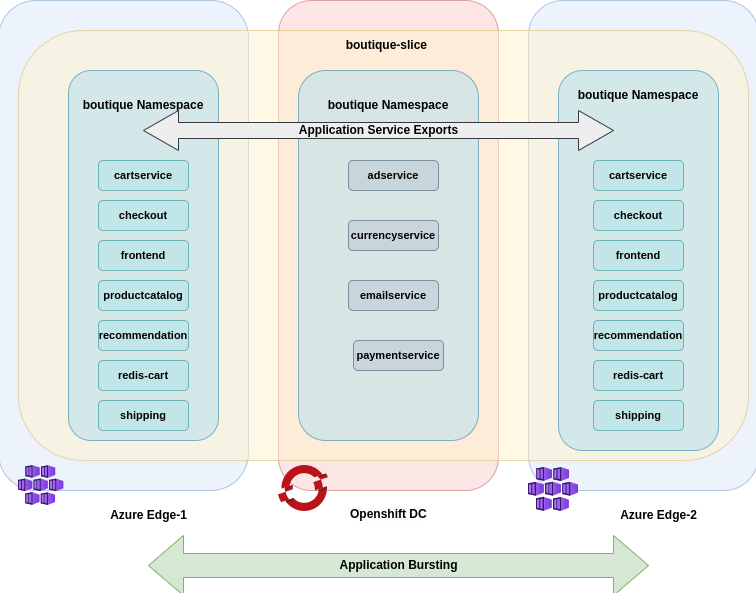
Application Bursting Demo
Let us install the KubeSlice controller, register worker clusters, create a slice and connect worker clusters to the slice. On the worker clusters, let us deploy the Boutique application microservices on a worker cluster to configure application bursting.
The Boutique application from the backend cluster gets burst into the Azure cloud clusters as illustrated in the following figure.
To configure application bursting:
-
You must clone the
examplesrepo as it contains all the required configuration files in theexamples/burst-demodirectory.Use the following command to clone the
examplesrepo:git clone https://github.com/kubeslice/examples.gitAfter cloning the repo, use the files from the
examples/burst-demodirectory.The following tree structure describes all the folders and files of the
examples/burst-demodirectory.├── boutique-app-manifests # Contains the Boutique application's frontend and backend services
│ ├── backend-services # Contains the Backend microservices
│ │ ├── adService.yaml
│ │ ├── currencyService.yaml
│ │ ├── emailService.yaml
│ │ └── paymentService.yaml
│ └── frontend-services # Contains the Frontend microservices
│ ├── frontendServices.yaml
│ ├── productcatalogService.yaml
│ ├── recommendationService.yaml
│ └── shippingService.yaml
├── boutique-slice-config # Contains the boutique-slice YAML configuration
│ └── boutique-slice.yaml
├── kubeslice-cli-topology-template # Contains the topology template for installing the KubeSlice Controller and register two worker clusters
│ └── kubeslice-cli-topology-template.yaml
└── serviceexports # Contains the service export YAML files for backend and frontend microservices
├── backend
│ └── backend-service-export.yaml
└── frontend
└── frontend-service-export.yaml -
You must install the KubeSlice Controller. Identify a controller cluster to install the KubeSlice Controller. Identify two worker clusters, worker-1 and worker-2 with the KubeSlice Controller. Use the following template to install the KubeSlice Controller and register the two worker clusters:
examples/burst-demo/kubeslice-cli-topology-template/kubeslice-cli-topology-template.yaml-
Modify the values as per your requirement. Refer to topology parameters for more details.
infoFor more information, see kubeslice-cli. Refer to installing the KubeSlice Controller to install the KubeSlice Controller and KubeSlice Manager using YAML.
noteKubeSlice Manager simplifies cluster registration and slice operations. To know more, see cluster operations.
-
Install KubeSlice using the following command:
kubeslice-cli --config examples/burst-demo/kubeslice-cli-topology-template/kubeslice-cli-topology-template.yaml installRunning this command installs the KubeSlice Controller and registers worker-1 and worker-2 clusters with it.
-
(Optional but recommended for registering the worker-3 cluster) To retrieve the endpoint/URL for accessing the KubeSlice Manager:
-
Run the following command on the KubeSlice Controller:
kubectl get service kubeslice-ui-proxy -n kubeslice-controller -o jsonpath='{.status.loadBalancer.ingress[0].ip}' -
The output should display the endpoint/URL in the following format:
https://<LoadBalancer-IP> -
Copy the endpoint/URL from the output and paste into your browser window to access the KubeSlice Manager.
-
You must create a service-account token to log in to the KubeSlice Manager. Create a service-account token using the following command:
noteThis command works for an admin with
admin-uias the username.kubectl get secret kubeslice-rbac-rw-admin-ui -o jsonpath="{.data.token}" -n kubeslice-avesha | base64 --decodeRunning this command returns a secret token. Use this token to log in to the KubeSlice Manager.
-
-
-
Create a slice called
boutique-slicewith theworker-1andworker-2clusters connected to it using the following command:kubectl apply -f examples/burst-demo/boutique-slice-config/boutique-slice.yamlThe
boutique-slice.yamlfile also contains the configuration to create a namespace calledboutique, and also onboard it onto theboutique slice. The configuration also enables namespace sameness, which means that theboutiqueslice will be onboarded onto any worker cluster that is connected to theboutique-slice.infoYou can also create a slice called
boutique-sliceusing the KubeSlice Manager. Connect the two worker clusters to that slice. To know more, see slice operations.However, you must create a
boutiquenamespace if you use KubeSlice Manager for slice creation. You can easily onboard namespaces using the KubeSlice Manager. To know more, see manage namespaces. -
Deploy the backend microservices of the Boutique application on the worker-1 cluster using the following commands:
kubectl apply -f examples/burst-demo/boutique-app-manifests/backend-services/adService.yaml -n boutique
kubectl apply -f examples/burst-demo/boutique-app-manifests/backend-services/currencyService.yaml -n boutique
kubectl apply -f examples/burst-demo/boutique-app-manifests/backend-services/emailService.yaml -n boutique
kubectl apply -f examples/burst-demo/boutique-app-manifests/backend-services/paymentService.yaml -n boutique-
Validate the Boutique application pods on the worker-1 cluster using the following command:
kubectl get pods -n boutiqueExpected Output
NAME                               READY   STATUS    RESTARTS   AGE
adservice-6794bd4ff8-ddkmf         2/2     Running   0          87m
currencyservice-7d87576dbb-ht9m5   2/2     Running   0          86m
emailservice-67b96c7d9b-528hv      2/2     Running   0          86m
paymentservice-fbb78f886-p9stb 2/2 Running 0 85m -
Create ServiceExport for the backend microservices using the following command:
kubectl apply -f examples/burst-demo/serviceexports/backend/backend-service-export.yaml -n boutique -
Validate ServiceExport on the worker-1 cluster using the following command:
kubectl get serviceexport -n boutiqueExpected Output
NAME               SLICE            INGRESS   PORT(S)     ENDPOINTS   STATUS   ALIAS
ad-service         boutique-slice             9555/TCP    1           READY
currency-service   boutique-slice             7000/TCP    1           READY
email-service      boutique-slice             5000/TCP    1           READY
payment-service boutique-slice 50051/TCP 1 READY -
Validate ServiceImport on the worker-1 cluster using the following command:
kubectl get serviceimport -n boutiqueExpected Output
NAME                     SLICE            PORT(S)     ENDPOINTS   STATUS   ALIAS
ad-service               boutique-slice   9555/TCP    1           READY
currency-service         boutique-slice   7000/TCP    1           READY
email-service            boutique-slice   5000/TCP    1           READY
payment-service          boutique-slice   50051/TCP   1           READY
-
-
Deploy the frontend microservices of the Boutique application on the worker-2 cluster using the following commands:
kubectl apply -f examples/burst-demo/boutique-app-manifests/frontend-services/frontendServices.yaml -n boutique
kubectl apply -f examples/burst-demo/boutique-app-manifests/frontend-services/productcatalogService.yaml -n boutique
kubectl apply -f examples/burst-demo/boutique-app-manifests/frontend-services/recommendationService.yaml -n boutique
kubectl apply -f examples/burst-demo/boutique-app-manifests/frontend-services/shippingService.yaml -n boutique-
Validate the Boutique application pods on the worker-2 cluster using the following command:
kubectl get pods -n boutiqueExpected Output
NAME                                     READY   STATUS    RESTARTS   AGE
cartservice-6c6b4f5999-6247f             2/2     Running   0          31m
checkoutservice-978cbf6ff-swcw8          2/2     Running   0          31m
frontend-6dd467fc7d-2qz69                2/2     Running   0          31m
productcatalogservice-5965dc7f67-747pd   2/2     Running   0          30m
recommendationservice-fdf8c6d98-j7s8w    2/2     Running   0          28m
redis-cart-8454887946-g7fjc              2/2     Running   0          31m
shippingservice-9dbbbbccf-5mvfc 2/2 Running 0 28m -
Create ServiceExport for the frontend microservices using the following command:
kubectl apply -f examples/burst-demo/serviceexports/frontend/frontend-service-export.yaml -n boutique -
Validate ServiceExport on the worker-2 cluster using the following command:
kubectl get serviceexport -n boutiqueExpected Output
NAME                     SLICE            INGRESS   PORT(S)     ENDPOINTS   STATUS   ALIAS
productcatalog-service   boutique-slice             3550/TCP    1           READY
recommendation-service   boutique-slice             8080/TCP    1           READY
shipping-service boutique-slice 50051/TCP 1 READY -
Validate ServiceImport on the worker-2 cluster using the following command:
kubectl get serviceimport -n boutiqueExpected Output
NAME                     SLICE            PORT(S)     ENDPOINTS   STATUS   ALIAS
ad-service               boutique-slice   9555/TCP    1           READY
currency-service         boutique-slice   7000/TCP    1           READY
email-service            boutique-slice   5000/TCP    1           READY
payment-service          boutique-slice   50051/TCP   1           READY
productcatalog-service   boutique-slice   3550/TCP    1           READY
recommendation-service   boutique-slice   8080/TCP    1           READY
shipping-service boutique-slice 50051/TCP 1 READY -
Validate the Boutique services using the following command:
kubectl get svc -n boutiqueThe output for validating the Boutique services varies based on the service type configured on the worker cluster.
For the LoadBalancer service type, the expected output is as follows.
NAME                    TYPE           CLUSTER-IP    EXTERNAL-IP     PORT(S)        AGE
cartservice             ClusterIP      10.7.33.57    <none>          7070/TCP       3m36s
checkoutservice         ClusterIP      10.7.41.14    <none>          5050/TCP       3m43s
frontend                ClusterIP      10.7.38.161   <none>          80/TCP         3m41s
frontend-external       LoadBalancer   10.7.42.20    34.89.159.154   80:32681/TCP   3m41s
productcatalogservice   ClusterIP      10.7.43.13    <none>          3550/TCP       2m49s
recommendationservice   ClusterIP      10.7.36.219   <none>          8080/TCP       90s
redis-cart              ClusterIP      10.7.34.116   <none>          6379/TCP       3m38s
shippingservice         ClusterIP      10.7.34.20    <none>          50051/TCP      75s
For the NodePort service type, the expected output is as follows.
NAME                    TYPE        CLUSTER-IP     EXTERNAL-IP   PORT(S)        AGE
cartservice             ClusterIP   10.0.159.156   <none>        7070/TCP       96m
checkoutservice         ClusterIP   10.0.33.193    <none>        5050/TCP       97m
frontend                ClusterIP   10.0.150.237   <none>        80/TCP         97m
frontend-external       NodePort    10.0.232.250   <none>        80:32701/TCP   97m
productcatalogservice   ClusterIP   10.0.117.202   <none>        3550/TCP       96m
recommendationservice   ClusterIP   10.0.230.202   <none>        8080/TCP       95m
redis-cart              ClusterIP   10.0.178.43    <none>        6379/TCP       96m
shippingservice ClusterIP 10.0.65.185 <none> 50051/TCP 95m -
Validate the Boutique application based on the following service type:
-
For Nodeport, use
http://externalip:nodeport/. -
For LoadBalancer, use
https://<external-ip-of-LoadBalancer>/.The seven microservices that comprises the online boutique application you have deployed communicate with each other.
-
-
-
Register another worker cluster, worker-3 with the KubeSlice Controller. You can easily register cluster using the KubeSlice Manager. To know more, see cluster operations.
-
Connect the worker-3 cluster to the
boutique-slice. It is very easy and simple to connect the worker-3 cluster to theboutique-sliceusing the KubeSlice Manager. To know more, see slice operations. -
Clone the
examplesrepo for deploying the application and create service export on the worker clusters. Use the following command to clone theexamplesrepo:git clone https://github.com/kubeslice/examples.gitAfter cloning the repo, deploy the microservices from the
examples/burst-demofolder. -
The
boutiquenamespace that is onboarded onto theboutique-slicewill be part of the worker-3 cluster namespace sameness by settingclusters: -*undernamespaceIsolationProfilein theboutique-slice.yaml.noteYou can verify this using the KubeSlice Manager. If you had used KubeSlice Manager to create a slice earlier, then you must create a
boutiquenamespace on the worker-3 cluster and onboard it onto theboutique-slice. To know more, see manage namespaces. -
On the worker-3 cluster, deploy the Frontend microservices of the Boutique application using the following commands:
kubectl apply -f examples/burst-demo/boutique-app-manifests/frontend-services/frontendServices.yaml -n boutique
kubectl apply -f examples/burst-demo/boutique-app-manifests/frontend-services/productcatalogService.yaml -n boutique
kubectl apply -f examples/burst-demo/boutique-app-manifests/frontend-services/recommendationService.yaml -n boutique
kubectl apply -f examples/burst-demo/boutique-app-manifests/frontend-services/shippingService.yaml -n boutique-
Validate the Boutique application pods using the following command:
kubectl get pods -n boutiqueExpected Output
NAME                                     READY   STATUS    RESTARTS   AGE
cartservice-6c6b4f5999-6247f             2/2     Running   0          31m
checkoutservice-978cbf6ff-swcw8          2/2     Running   0          31m
frontend-6dd467fc7d-2qz69                2/2     Running   0          31m
productcatalogservice-5965dc7f67-747pd   2/2     Running   0          30m
recommendationservice-fdf8c6d98-j7s8w    2/2     Running   0          28m
redis-cart-8454887946-g7fjc              2/2     Running   0          31m
shippingservice-9dbbbbccf-5mvfc 2/2 Running 0 28m -
Create ServiceExport for the frontend microservices using the following command:
kubectl apply -f examples/burst-demo/serviceexports/frontend/frontend-service-export.yaml -n boutique -
Validate ServiceExport on the worker-3 cluster using the following command:
kubectl get serviceexport -n boutiqueExpected Output
NAME                     SLICE            INGRESS   PORT(S)     ENDPOINTS   STATUS   ALIAS
productcatalog-service   boutique-slice             3550/TCP    1           READY
recommendation-service   boutique-slice             8080/TCP    1           READY
shipping-service boutique-slice 50051/TCP 1 READY -
Validate ServiceImport on the worker-3 cluster using the following command:
kubectl get serviceimport -n boutiqueExpected Output
NAME                     SLICE            PORT(S)     ENDPOINTS   STATUS   ALIAS
ad-service               boutique-slice   9555/TCP    1           READY
currency-service         boutique-slice   7000/TCP    1           READY
email-service            boutique-slice   5000/TCP    1           READY
payment-service          boutique-slice   50051/TCP   1           READY
productcatalog-service   boutique-slice   3550/TCP    2           READY
recommendation-service   boutique-slice   8080/TCP    2           READY
shipping-service boutique-slice 50051/TCP 2 READY -
Validate the Boutique services using the following command:
kubectl get svc -n boutiqueThe output for validating the Boutique services varies based on the service type configured on the worker cluster.
For the LoadBalancer service type, the expected output is as follows.
NAME                    TYPE           CLUSTER-IP    EXTERNAL-IP     PORT(S)        AGE
cartservice             ClusterIP      10.7.33.57    <none>          7070/TCP       3m36s
checkoutservice         ClusterIP      10.7.41.14    <none>          5050/TCP       3m43s
frontend                ClusterIP      10.7.38.161   <none>          80/TCP         3m41s
frontend-external       LoadBalancer   10.7.42.20    34.89.159.154   80:32681/TCP   3m41s
productcatalogservice   ClusterIP      10.7.43.13    <none>          3550/TCP       2m49s
recommendationservice   ClusterIP      10.7.36.219   <none>          8080/TCP       90s
redis-cart              ClusterIP      10.7.34.116   <none>          6379/TCP       3m38s
shippingservice         ClusterIP      10.7.34.20    <none>          50051/TCP      75s
For the NodePort service type, the expected output is as follows.
NAME                    TYPE        CLUSTER-IP     EXTERNAL-IP   PORT(S)        AGE
cartservice             ClusterIP   10.0.159.156   <none>        7070/TCP       96m
checkoutservice         ClusterIP   10.0.33.193    <none>        5050/TCP       97m
frontend                ClusterIP   10.0.150.237   <none>        80/TCP         97m
frontend-external       NodePort    10.0.232.250   <none>        80:32701/TCP   97m
productcatalogservice   ClusterIP   10.0.117.202   <none>        3550/TCP       96m
recommendationservice   ClusterIP   10.0.230.202   <none>        8080/TCP       95m
redis-cart              ClusterIP   10.0.178.43    <none>        6379/TCP       96m
shippingservice ClusterIP 10.0.65.185 <none> 50051/TCP 95m -
Validate the Boutique application based on the following service type:
- For Nodeport, use
http://externalip:nodeport/. - For LoadBalancer, use
https://<external-ip-of-LoadBalancer>/.
- For Nodeport, use
-