KubeSlice Enterprise on Kind Clusters
Welcome to the installation guide for KubeSlice on kind clusters. In this topic, we will walk you through the process of registering your kind clusters with the KubeSlice Controller and creating a slice across the clusters. Our goal is to make this experience as seamless as possible, and we hope that you find this guide helpful.
If you have any questions or issues, do not hesitate to contact Avesha Support at support@avesha.io. We are always here to assist you.
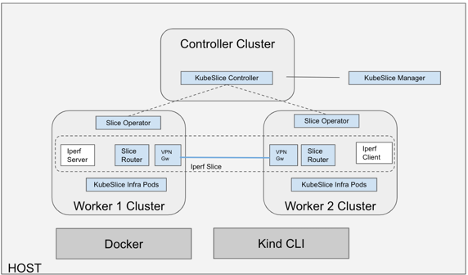
KubeSlice Topology
To give you an overview of KubeSlice installed on kind clusters, refer to the figure below:
What You Will Learn
This topic covers the following topics:
- Installing the KubeSlice Controller on the controller cluster
- Registering the worker clusters on the controller cluster and installing the Slice Operator (Worker Operator) on the worker clusters
- Creating a slice
- Testing the connectivity between the worker clusters using the iPerf tool
- Visualizing the Clusters, Slice, and related data using KubeSlice Manager UI.
We hope that you find this guide useful and informative. Let's get started!
Installation Instructions
This guide will walk you through the steps to create a free sandbox VM with a 4 hour duration, also with pre-installed Kubernetes tools and install KubeSlice-CLI on it. Follow the steps below to get started:
Create Sandbox VM
Create a free sandbox VM:
- Go to https://community.aveshalabs.io/
- Enter your company name, name, and email ID to register and create a VM.
- Check your email for VM access instructions (may take a few minutes).
- Access the VM using ssh (see email for instructions).
Install KubeSlice-CLI
Install the latest kubeSlice-cli:
- Release images are available on the GitHub releases page.
- Download the latest release image and verify.
- Run the following command to get the image:
curl -fL https://github.com/kubeslice/kubeslice-cli/releases/download/0.5.3/kubeslice-cli-0.5.3-linux-amd64 -o kubeslice-cli - Change the permission:
chmod a+x kubeslice-cli - Verify the image version by running the command:
The output should be:
./kubeslice-cli -vubuntu@ip-10-0-54-61:~$ ./kubeslice-cli -v
kubeslice-cli version 0.5.3
Enterprise Artifact Registration
Register to get Enterprise artifacts access tokens from Avesha.io:
- Go to https://avesha.io/kubeslice-registration and complete the registration step.
- Choose Data Center for Select Cloud Type.
- Check your email for the imagePullSecrets.
- Note down the imagePullSecrets password:
<xxx_xxxxx_xxxxxxx>
Create Kind Clusters
Create kind clusters and deploy the iperf demo:
-
Create an environment variable with the imagePullSecret password value:
export KUBESLICE_IMAGE_PULL_PASSWORD=xxx_xxxxx_xxxxxxx -
Run the following command to deploy the enterprise-demo:
./kubeslice-cli install -p enterprise-demoThis deployment creates a demo slice and deploys iperf-server on worker-1 cluster and iperf-client on worker-2 cluster.
-
The installation takes a few minutes. Wait for the install to complete with the following messages:
Message "iperf-demo slice created successfully" "iperf-client deployed successfully on worker2" "iperf-server deployed successfully on worker1"
Install output:
========================================================================
KubeSlice Enterprise Setup (1 Controller + 2 Worker) is complete
with a sample iPerf deployment.
You can now access Kubeslice Manager UI using the following URL:
🌐https://localhost:8443
To access Kubeslice Manager use the following token in the login screen:
🔒
eyJhbGciOiJSUzI1NiIsImtpZCI6IkVPUzhFSjkzVFNOOFNwbGVLaHVDQTNsR1dhVjI5X2piTERmNFRYTUdTU2cifQ.
eyJpc3MiOiJrdWJlcm5ldGVzL3NlcnZpY2VhY2NvdW50Iiwia3ViZXJuZXRlcy5pby9zZXJ2aWNlYWNjb3VudC9uYW1lc
3BhY2UiOiJrdWJlc2xpY2UtZGVtbyIsImt1YmVybmV0ZXMuaW8vc2VydmljZWFjY291bnQvc2VjcmV0Lm5hbWUiOiJrd
WJlc2xpY2UtcmJhYy1ydy1hZG1pbiIsImt1YmVybmV0ZXMuaW8vc2VydmljZWFjY291bnQvc2VydmljZS1hY2NvdW50
Lm5hbWUiOiJrdWJlc2xpY2UtcmJhYy1ydy1hZG1pbiIsImt1YmVybmV0ZXMuaW8vc2VydmljZWFjY291bnQvc2Vydmlj
ZS1hY2NvdW50LnVpZCI6ImQ3N2RlZTc0LTJmMmQtNDI4ZS05MTBkLWJlZjE1OWJhYjJlZSIsInN1YiI6InN5c3RlbTpz
ZXJ2aWNlYWNjb3VudDprdWJlc2xpY2UtZGVtbzprdWJlc2xpY2UtcmJhYy1ydy1hZG1pbiJ9.W-p89sdDKG2-8fuRVDT
3C1Nb89vUDus2_P5zE7hiZq3gYy-0sPD2Bl5umLSnLj20Hzwp07ujds8WQN2GSjzZlcuYStCuwKICPjPZNzDUt-Uxyr1
ZQQ8nhu6rHF25zrhWQLYXBgfO2ItvNEqTPDWJppb2oD_onpS5bwrzAIK1lnNuSMB_DIkMvHVS_xmjJA4tqtn4pwTP
XFPpX5yB0KfdetcPReY8KEyYS7xs4BN_9DUFFNgG3RVwcyLIKAcvwQ_c-OG1hJlUHjuIXBToffoQQESMVAO7TBaZ
8miU5A4pWe_upvCTI5N6pmHRuxCpVmw8JDD8kc4aGwnpHq9
KubeSlice Manager UI Token
Note down the KubeSlice Manager (UI) access token from the previous command install output to get your token - we will use it to login to UI later.
Verify Cluster Connectivity
To verify the iPerf Connectivity between Worker 1 and Worker 2:
-
Wait for DNS propagation to complete, which may take a minute or two.
-
Open the terminal on your local machine and run the following command:
/usr/local/bin/kubectl --context=kind-ks-w-2 --kubeconfig=kubeslice/kubeconfig.yaml exec -it deploy/iperf-sleep -c iperf -- iperf -c iperf-server.iperf.svc.slice.local -p 5201 -i 1 -b 10Mb;
This command will start the iPerf client on Worker 1 and attempt to reach out to the iPerf service installed on Worker 2.
If the connection is successful, you should see the iPerf results in the terminal. If there is any issue with the connectivity, troubleshoot the network settings on both the Worker nodes.
Output
/usr/local/bin/kubectl --context=kind-ks-w-2 --kubeconfig=kubeslice/kubeconfig.yaml exec -it deploy/iperf-sleep -c iperf -n iperf -- iperf -c iperf-server.iperf.svc.slice.local -p 5201 -i 1 -b 10Mb;
------------------------------------------------------------
Client connecting to iperf-server.iperf.svc.slice.local, TCP port 5201
TCP window size: 16.0 KByte (default)
------------------------------------------------------------
[ 1] local 10.1.16.4 port 58250 connected with 10.1.0.4 port 5201
[ ID] Interval       Transfer     Bandwidth
[ 1]  0.00-1.00 sec  640 KBytes  5.24 Mbits/sec
[ 1]  1.00-2.00 sec  640 KBytes  5.24 Mbits/sec
[ 1]  2.00-3.37 sec  640 KBytes  3.84 Mbits/sec
[ 1]  0.00-3.37 sec  1.88 MBytes  4.67 Mbits/sec
Explore KubeSlice Enterprise Deployment Files
Notice the kubeslice folder created during the installation. This folder has all the demo
config/deployment files.
ls kubeslice
Output:
cluster-registration.yaml
helm-values-ks-w-1.yaml
iperf-client.yaml
iperf-server.yaml
kubeconfig.yaml
slice-demo.yaml
helm-values-controller.yaml
helm-values-ks-w-2.yaml
iperf-server-service-export.yaml
kind
project.yaml
Slice YAML
cat kubeslice/slice-demo.yaml
iPerf Server ServiceExport YAML
cat kubeslice/iperf-server-service-export.yaml
Setting the KUBECONFIG Environment Variable
export KUBECONFIG=/home/ubuntu/kubeslice/kubeconfig.yaml
Cluster Contexts
Run kubectx to see clusters contexts.
kubectx
Output:
kind-ks-ctrl
kind-ks-w-1
Kind-ks-w-2
Controller Cluster
Explore the Controller cluster resources using kubectl.
kubectx kind-ks-ctrl
kubectl get pods -n kubeslice-controller
kubectl get clusters -n kubeslice-demo
kubectl get sliceconfig -n kubeslice-demo
Worker Cluster
Explore Worker-1 cluster resources using kubectl.
kubectx kind-ks-w-1
kubectl get pods -n iperf
kubectl get pods -n kubeslice-system
kubectl get slices -n kubeslice-system
kubectl get slicegateways -n kubeslice-system
kubectl get networkservices -n kubeslice-system
kubectl get serviceexports -n iperf
Explore Worker-2 cluster resources using kubectl.
kubectx kind-ks-w-2
kubectl get pods -n iperf
kubectl get pods -n kubeslice-system
kubectl get slices -n kubeslice-system
kubectl get slicegateways -n kubeslice-system
kubectl get networkservices -n kubeslice-system
kubectl get serviceexports -n iperf
Explore the KubeSlice Manager UI
To access the UI service from your browser, note down the Sandbox VM's public IP address from the email received.
From Community Registration email:
To establish the SSH connectivity, run the following command:
chmod 0600 /path/to/kubeslice-playground-key.pem
ssh -i /path/to/kubeslice-playground-key.pem ubuntu@xx.xx.xx.xx
-
Open https://xx.xx.xx.xx:8443 in your browser.
noteReplace xx.xx.xx.xx with your VM public IP address.
-
Click through Advanced and Continue to land on the KubeSlice Manager login page.
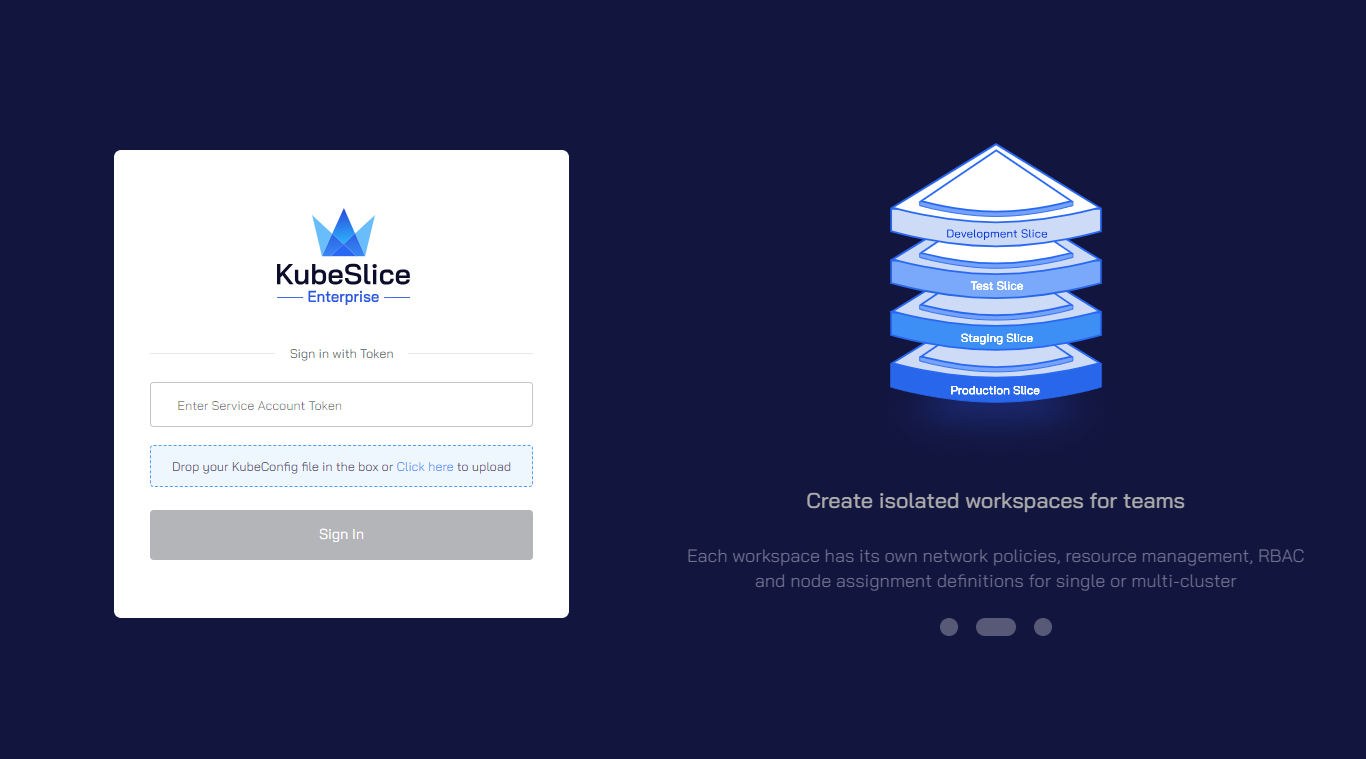
-
Login using Sign in with the Token using the KubeSlice-Manager-UI-Token saved from install output
Paste the token in **Enter Service Account Token** field on the Login page.After login is successful, you are redirected to the Dashboard page.
- Explore the dashboard features like - metrics/nodes/cluster-health etc.
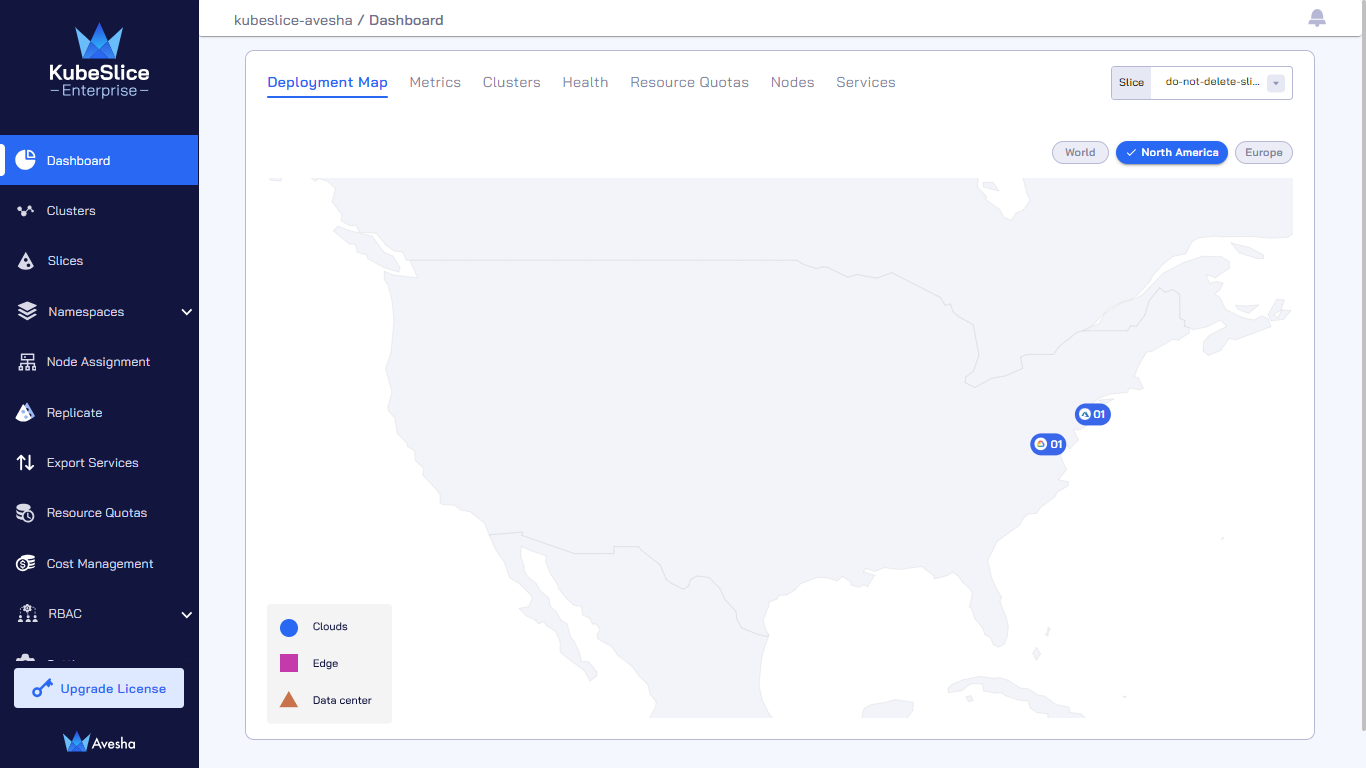
-
Now you can explore the slice details by clicking Slices on the left sidebar.
- Refer to KubeSlice Manager for more details
-
To add additional applications to the slice:
- Refer to how to onboard other applications onto the slice.
Uninstall KubeSlice
- To delete the demo clusters/deployment run the following command:
./kubeslice-cli uninstall. - Remove the kubeslice folder:
rm -r kubeslice.