Create Slices
This topic describes the steps to create a slice with overlay network (single-network or multi-network). The worker clusters must be registered with the KubeSlice Controller to create a slice with single or multi-network that will onboard the application namespaces. For more information, see how to register worker clusters.
To leverage KubeSlice's capabilities to provide application oversight for services that are distributed across multiple clusters, select:
- Service Mapped Connectivity if your applications are distributed and require the ability to communicate, but do not have need of a dedicated overlay. The overlay network deployment mode associated with this type is multi network.
- Overlay Connectivity if your applications benefit from communication through a dedicated overlay network. The overlay network deployment mode associated with this type is single network.
- No Connectivity if your distributed applications do not require extended-cluster communication. The overlay network deployment mode associated with this type is no network.
Slice Creation
Limit the cluster name and slice name to 15 characters or fewer, as exceeding the limit results in a service export error.
To know more about the configuration details, see slice parameters
Slice VPN Key Rotation
Any new slice created using the KubeSlice Manager or a YAML file will have a duration of 30 days to renew the SliceGateway certificates.
When creating a slice, you can change the rotation interval by modifying the rotationInterval parameter in the slice configuration
YAML file. This interval can be adjusted, with the minimum being 30 days and the maximum being 90 days.
You can also update this parameter after the creation of slice.
Create the slice configuration YAML file using the following template.
apiVersion: controller.kubeslice.io/v1alpha1
kind: SliceConfig
metadata:
  name: <slice-name>
  namespace: kubeslice-<projectname>
spec:
  sliceSubnet: <slice-subnet>
  maxClusters: <2 - 32> #Ex: 5. By default, the maxClusters value is set to 16
  sliceType: Application
  overlayNetworkDeploymentMode: multi-network # The default value is single-network, which is even applied when you don't pass the `overlayNetworkDeploymentMode` parameter.
  sliceGatewayProvider:
    sliceGatewayType: OpenVPN
    sliceCaType: Local
    sliceGatewayServiceType:
      - cluster: <registered-cluster-name-1>
        type: LoadBalancer # By default, the gateway service type is NodePort.
        protocol: TCP # By default, the gateway protocol is UDP
      - cluster: <registered-cluster-name-2>
        type: LoadBalancer # By default, the gateway service type is NodePort.
        protocol: TCP # By default, the gateway protocol is UDP
  sliceIpamType: Local
  rotationInterval: 60 # If not provided, by default key rotation interval is 30 days
  vpnConfig:
    cipher: AES-128-CBC # If not provided, by default cipher is AES-256-CBC
  clusters:
    - <registered-cluster-name-1>
    - <registered-cluster-name-2>
  qosProfileDetails:
    queueType: HTB
    priority: <qos_priority> #keep integer values from 0 to 3
    tcType: BANDWIDTH_CONTROL
    bandwidthCeilingKbps: 5120
    bandwidthGuaranteedKbps: 2560
    dscpClass: AF11
  namespaceIsolationProfile:
    applicationNamespaces:
      - namespace: iperf
        clusters:
          - "*"
    isolationEnabled: false #make this true in case you want to enable isolation
    allowedNamespaces:
      - namespace: kube-system
        clusters:
          - "*"
Renew Slice Gateway Certificates
You can use the renewBefore option to start the certificate renewal process right away. Using this option, you can start the
certificate renewal procedure before the rotation interval expires. The renewBefore parameter in the YAML file can be set
to a suitable value to ensure that the certificate renewal process begins right away, maintaining your system's security and compliance.
Before you use the renewBefore parameter to renew the gateway certificates, ensure the slice gateways are operational.
Use the following template to renew your certificates.
apiVersion: controller.kubeslice.io/v1alpha1
kind: SliceConfig
metadata:
  name: <slice-name>
  namespace: kubeslice-<projectname>
spec:
  sliceSubnet: <slice-subnet>
  maxClusters: <2 - 32> #Ex: 5. By default, the maxClusters value is set to 16
  sliceType: Application
  overlayNetworkDeploymentMode: multi-network # The default value is single-network, which is even applied when you don't pass the `overlayNetworkDeploymentMode` parameter.
  sliceGatewayProvider:
    sliceGatewayType: OpenVPN
    sliceGatewayServiceType:
      - cluster: <registered-cluster-name-1>
        type: LoadBalancer # By default, the gateway service type is NodePort.
        protocol: TCP # By default, the gateway protocol is UDP
      - cluster: <registered-cluster-name-2>
        type: LoadBalancer # By default, the gateway service type is NodePort.
        protocol: TCP # By default, the gateway protocol is UDP
    sliceCaType: Local
  sliceIpamType: Local
  renewBefore: 2023-07-18T14:27:08Z #only required if you want to renew your certificates before hand
  rotationInterval: 60 # If not provided, by default key rotation interval is 30 days
  clusters:
    - <registered-cluster-name-1>
    - <registered-cluster-name-2>
  qosProfileDetails:
    queueType: HTB
    priority: <qos_priority> #keep integer values from 0 to 3
    tcType: BANDWIDTH_CONTROL
    bandwidthCeilingKbps: 5120
    bandwidthGuaranteedKbps: 2560
    dscpClass: AF11
  namespaceIsolationProfile:
    applicationNamespaces:
      - namespace: iperf
        clusters:
          - "*"
    isolationEnabled: false #make this true in case you want to enable isolation
    allowedNamespaces:
      - namespace: kube-system
        clusters:
          - "*"
Inter-Cluster Connectivity in KubeSlice
KubeSlice supports cluster connectivity among public and private clusters. Kubeslice extends the support to private clusters
using a Load Balancer. In the slice configuration YAML file, the user can specify the type of gateway connectivity to use on a cluster.
The type can be either NodePort or LoadBalancer. If you do not use LoadBalancer as the gateway connectivity type,
then NodePort is used by default. Like other configuration options in KubeSlice, the * (asterisk) wildcard character is
allowed to indicate all clusters of a slice.
Add the gateway service type and protocol and the corresponding clusters under the sliceGatewayServiceType in the slice
configuration YAML as illustrated below.
sliceGatewayProvider:
  sliceGatewayType: OpenVPN
  sliceGatewayServiceType:
    - cluster: <registered-cluster-name-1>
      type: LoadBalancer # By default, the gateway service type is NodePort.
      protocol: TCP # By default. the gateway protocol is UDP.
    - cluster: <registered-cluster-name-2>
      type: LoadBalancer # By default, the gateway service type is NodePort.
      protocol: TCP # By default, the gateway protocol is UDP.
Change the Gateway Provider for Inter-Cluster Connectivity
After the LoadBalancer gateway service type and TCP/UDP gateway protocol are set, they become immutable. However, if you want to change the gateway service type and protocol, then follow these steps:
- Detach the cluster from the slice by removing it from the attached slice configuration ,
that is under
clustersand remove the cluster, its protocol and type undersliceGatewayServiceTypein the slice configuration YAML. - Apply the slice configuration to completely detach it.
- Add the same cluster under
clustersand set thesliceGatewayServiceTypefor this cluster. - Reapply the slice configuration to connect the cluster to the slice.
Manage Namespaces
This section describes how to onboard namespaces to a slice. In Kubernetes, a namespace is a logical separation of resources within a cluster, where resources like pods and services are associated with a namespace and are guaranteed to be uniquely identifiable within it. Namespaces created for application deployments can be onboarded onto a slice to form a micro-network segment. Once a namespace is bound to a slice, all pods scheduled in the namespace get connected to the slice.
Onboard Namespaces
To exclude pods from a deployment, add the kubeslice.io/exclude label to
the template section of your deployment.
To onboard namespaces, you must add them as part of applicationNamespaces in the
slice configuration
YAML file.
In the slice configuration YAML file, add the namespaces using one of these methods:
- Add namespaces for each worker cluster.
- Add a wildcard * (asterisk) to add all namespaces on the worker clusters.
Ensure that the namespace that you want to onboard exists on the worker cluster.
Add the namespace and the corresponding clusters under the applicationNamespaces in the slice
configuration file as illustrated below.
namespaceIsolationProfile:
  applicationNamespaces:
    - namespace: iperf
      clusters:
        - "worker-cluster-1"
    - namespace: bookinfo
      clusters:
        - "*"
Adding the asterisk (*) enables the namespace sameness, which means that the namespace is onboarded on all the worker clusters of that slice. This configuration ensures that all the application deployments from that namespace are onboarded automatically on to the slice. Enabling namespace sameness creates that namespace on a worker cluster that does not contain it. Thus, all the worker clusters part of that slice contains that namespace.
Limitations
We cannot have an application namespace placed in the Kubernetes Pod Security Standard (PSS) restricted profile.
KubeSlice is interoperable with the Kubernetes PSS-defined profiles: baseline and privileged. These profiles could be applied to an application namespace that is part of a multi-cluster slice created using KubeSlice. To be fully operational, KubeSlice requires certain privileges that are allowed in the baseline and privileged profiles, but not in the restricted profile. Hence, an application namespace should not be placed in the restricted profile if it needs to be connected to a slice.
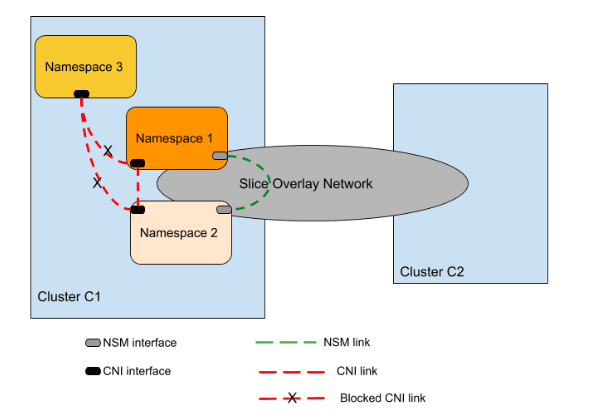
Isolate Namespaces
The namespace isolation feature allows you to confine application namespaces to a slice. The associated namespaces are connected to the slice and are isolated from other namespaces in the cluster. This forms a secure inter-cluster network segment of pods that are isolated from the rest of the pods in the clusters. The slice segmentation isolates and protects applications from each other, and reduces blast radius of failure conditions.
The following figure illustrates how the namespaces are isolated from different namespaces on a worker cluster. Namespaces are isolated with respect to sending and receiving data traffic to other namespaces in a cluster.
Enable Namespace Isolation
To enable the Namespace Isolation on a slice, set the isolationEnabled value to true in the slice
configuration YAML file and to disable the Namespace Isolation set the value to false.
By default, the isolationEnabled value is set to false.
Slice Istio Gateway Configurations
A slice can be configured to use Istio ingress and egress gateways for East-West traffic(inter-cluster, egress from one cluster, and ingress into another cluster). Gateways operate at the edges of the clusters. Ingress gateway act as an entry point and Egress gateway acts as exit point for East-West traffic in a slice. Ingress/Egress gateway is not a core component of KubeSlice, it is an add-on feature that users can activate if needed.
Currently, Istio gateways are the only type of external gateways supported.
There are different ways to configure a slice that enables you to route the application traffic. Below are the scenarios to configure a slice with/without egress and ingress gateways.
Scenario 1: Slice Configuration only with Egress Gateways
Create the slice configuration file with Istio egress gateway using the following template.
apiVersion: controller.kubeslice.io/v1alpha1
kind: SliceConfig
metadata:
  name: <slice-name>
  namespace: kubeslice-<projectname>
spec:
  sliceSubnet: <slice-subnet>         #Ex: 10.1.0.0/16
  maxClusters: <2 - 32>               #Ex: 5. By default, the maxClusters value is set to 16
  sliceType: Application
  overlayNetworkDeploymentMode: multi-network    # The default value is single-network, which is even applied when you don't pass the `overlayNetworkDeploymentMode` parameter.
  sliceGatewayProvider:
    sliceGatewayType: OpenVPN
    sliceCaType: Local
  sliceIpamType: Local
  clusters:
    - <registered-cluster-name-1>
    - <registered-cluster-name-2>
  qosProfileDetails:<qos-profile>
    queueType: HTB
    priority: 1               #keep integer values from 0 to 3
    tcType: BANDWIDTH_CONTROL
    bandwidthCeilingKbps: 5120
    bandwidthGuaranteedKbps: 2560
    dscpClass: AF11
  namespaceIsolationProfile:
    applicationNamespaces:
     - namespace: iperf
       clusters:
       - '*'
    isolationEnabled: false                   #make this true in case you want to enable isolation
    allowedNamespaces:
     - namespace: kube-system
       clusters:
       - '*'
  externalGatewayConfig:
    - ingress:
        enabled: false
      egress:
        enabled: true
      nsIngress:
        enabled: false
      gatewayType: istio
      clusters:
        - <cluster-name-1>
    - ingress:
        enabled: false
      egress:
        enabled: false
      nsIngress:
        enabled: false
      gatewayType: istio
      clusters:
        - <cluster-name-2>
Scenario 2: Slice Configuration only with Ingress Gateways
Create the slice configuration file with Istio ingress gateways using the following template.
apiVersion: controller.kubeslice.io/v1alpha1
kind: SliceConfig
metadata:
  name: <slice-name>
  namespace: kubeslice-<projectname>
spec:
  sliceSubnet: <slice-subnet> #Ex: 10.1.0.0/16
  maxClusters: <2 - 32> #Ex: 5. By default, the maxClusters value is set to 16
  sliceType: Application
  overlayNetworkDeploymentMode: multi-network # The default value is single-network, which is even applied when you don't pass the `overlayNetworkDeploymentMode` parameter.
  sliceGatewayProvider:
    sliceGatewayType: OpenVPN
    sliceCaType: Local
  sliceIpamType: Local
  clusters:
    - <registered-cluster-name-1>
    - <registered-cluster-name-2>
  qosProfileDetails:
    queueType: HTB
    priority: 1 #keep integer values from 0 to 3
    tcType: BANDWIDTH_CONTROL
    bandwidthCeilingKbps: 5120
    bandwidthGuaranteedKbps: 2560
    dscpClass: AF11
  namespaceIsolationProfile:
    applicationNamespaces:
      - namespace: iperf
        clusters:
          - "*"
    isolationEnabled: false #make this true in case you want to enable isolation
    allowedNamespaces:
      - namespace: kube-system
        clusters:
          - "*"
  externalGatewayConfig:
    - ingress:
        enabled: false
      egress:
        enabled: false
      nsIngress:
        enabled: false
      gatewayType: istio
      clusters:
        - <cluster-name-1>
    - ingress:
        enabled: true
      egress:
        enabled: false
      nsIngress:
        enabled: false
      gatewayType: istio
      clusters:
        - <cluster-name-2>
Scenario 3: Slice Configuration with Egress and Ingress Gateways
Create the slice configuration file with Istio ingress and egress gateways using the following template.
apiVersion: controller.kubeslice.io/v1alpha1
kind: SliceConfig
metadata:
  name: <slice-name>
  namespace: kubeslice-<projectname>
spec:
  sliceSubnet: <slice-subnet>
  maxClusters: <2 - 32> #Ex: 5. By default, the maxClusters value is set to 16
  sliceType: Application
  overlayNetworkDeploymentMode: multi-network # The default value is single-network, which is even applied when you don't pass the `overlayNetworkDeploymentMode` parameter.
  sliceGatewayProvider:
    sliceGatewayType: OpenVPN
    sliceCaType: Local
  sliceIpamType: Local
  clusters:
    - <registered-cluster-name-1>
    - <registered-cluster-name-2>
  qosProfileDetails:
    queueType: HTB
    priority: <qos_priority> #keep integer values from 0 to 3
    tcType: BANDWIDTH_CONTROL
    bandwidthCeilingKbps: 5120
    bandwidthGuaranteedKbps: 2560
    dscpClass: AF11
  namespaceIsolationProfile:
    applicationNamespaces:
      - namespace: iperf
        clusters:
          - "*"
    isolationEnabled: false #make this true in case you want to enable isolation
    allowedNamespaces:
      - namespace: kube-system
        clusters:
          - "*"
  externalGatewayConfig: #enable which gateway we wanted to and on which cluster
    - ingress:
        enabled: false
      egress:
        enabled: true
        gatewayType: istio
      clusters:
        - <cluster-name-1>
    - ingress:
        enabled: true
      egress:
        enabled: false
      gatewayType: istio
      clusters:
        - <cluster-name-2>
Apply Slice Configuration
The following information is required.
| Variable | Description |
|---|---|
<cluster name> | The name of the cluster. |
<slice configuration> | The name of the slice configuration file. |
<project namespace> | The project namespace on which you apply the slice configuration file. |
Perform these steps:
- Switch the context to the KubeSlice Controller using the following command:
kubectx <cluster name>
- Apply the YAML file on the project namespace using the following command:
kubectl apply -f <slice configuration>.yaml -n <project namespace>
Validate the Slice on the Controller Cluster
To validate the slice configuration on the controller cluster, use the following command:
kubectl get workersliceconfig -n kubeslice-<projectname>
Example
kubectl get workersliceconfig -n kubeslice-avesha
Example Output
NAME                        AGE
red-dev-worker-cluster-1    45s
red-dev-worker-cluster-2    45s
To validate the slice gateway on the controller cluster, use the following command:
kubectl get workerslicegateway -n kubeslice-<projectname>
Example
kubectl get workerslicegateway -n kubeslice-avesha
Example Output
NAME                                            AGE
red-dev-worker-cluster-1-dev-worker-cluster-2   45s
red-dev-worker-cluster-2-dev-worker-cluster-1   45s
Validate the Slice on the Worker Clusters
To validate the slice creation on each of the worker clusters, use the following command:
kubectl get slice -n kubeslice-system
Example Output
NAME    AGE
red     45s
To validate the slice gateway on each of the worker cluster, use the following command:
kubectl get slicegw -n kubeslice-system
Example Output
NAME                                          SUBNET        REMOTE SUBNET   REMOTE CLUSTER        GW STATUS
red-dev-worker-cluster-1-dev-worker-cluster-2   10.1.1.0/24   10.1.2.0/24     dev-worker-cluster-2
To validate the gateway pods on the worker cluster, use the following command:
kubectl get pods
Example Output
NAME                                         READY   STATUS      RESTARTS   AGE
blue-cluster1-cluster2-0-d948856f9-sqztd     3/3     Running     0          43s
blue-cluster1-cluster2-1-65f64b67c8-t975h    3/3     Running     0          43s
forwarder-kernel-g6b67                       1/1     Running     0          153m
forwarder-kernel-mv52h                       1/1     Running     0          153m
kubeslice-dns-6976b58b5c-kzbgg               1/1     Running     0          153m
kubeslice-netop-bfb55                        1/1     Running     0          153m
kubeslice-netop-c4795                        1/1     Running     0          153m
kubeslice-operator-7cf497857f-scf4w          2/2     Running     0          79m
nsm-admission-webhook-k8s-747df4b696-j7zh9   1/1     Running     0          153m
nsm-install-crds--1-ncvkl                    0/1     Completed   0          153m
nsmgr-tdx2t                                  2/2     Running     0          153m
nsmgr-xdwm5                                  2/2     Running     0          153m
registry-k8s-5b7f5986d5-g88wx                1/1     Running     0          153m
vl3-slice-router-blue-c9b5fcb64-9n4qp        2/2     Running     0          2m5s
Validate Namespace Isolation
When the namespace isolation feature is enabled, the namespace isolation policy is applied to isolate the application namespaces. Verify the namespace isolation policy by running the following command to confirm that the namespace isolation feature is enabled:
kubectl get netpol -n <application_namespace>
** Expected Output**
NAME                  POD-SELECTOR            AGE
peacock-bookinfo      <none>                  15s
In the above output, peacock is the slice name and bookinfo is the onboarded
namespace to which the namespace isolation policy is applied.
After creating a slice on the worker clusters, it should be noted that all the slice configuration is applied at the KubeSlice Controller level and the creation process was successful.
ServiceExports and ServiceImports
Service Discovery is implemented using the CRDs ServiceExport and ServiceImport.
If you want the service discoverable across the KubeSlice DNS, you must create a ServiceExport.
ServiceExport CRD is used to configure an existing service on the slice to be exposed and discovered across the clusters on the slice. On creating a ServiceExport on a cluster, a corresponding ServiceImport is created on all the clusters that includes the list of endpoints populated from ServiceExport. This CRD contains endpoints aggregated from all the clusters that expose the same service. The reconciler populates the DNS entries and ensures traffic to reach the correct clusters and endpoint.
Create a ServiceExport YAML File
To know more about the configuration details, see slice parameters
To export a service, you must create a service export .yaml file using the following template.
apiVersion: networking.kubeslice.io/v1beta1
kind: ServiceExport
metadata:
  name: <serviceexport name>
  namespace: <application namespace>
spec:
  slice: <slice name>
  aliases:
    - <alias name>
    - <alias name>
  selector:
    matchLabels:
      <key>: <value>
  ports:
    - name: <protocol name>
      containerPort: <port>
      protocol: <protocol>
      serviceProtocol: <protocol> # HTTPS or HTTP; only relevant to a multi-network slice
      servicePort: <port_number> # only mandatory for a multi-network slice
Apply the ServiceExport YAML File
To apply the service export YAML file, use the following command:
kubectl apply -f <serviceexport yaml> -n <namespace>
Verify ServiceExport
Verify if the service is exported successfully using the following command:
kubectl get serviceexport -n <namespace>
ServiceExport DNS
The service is exported and reachable through KubeSlice DNS at:
<serviceexport name>.<namespace>.<slice name>.svc.slice.local
ServiceImports
When a ServiceExport is deployed, the corresponding ServiceImport is automatically created on each of the worker clusters that are part of the slice. This populates the necessary DNS entries and ensures your traffic always reaches the correct cluster and endpoint.
To verify that the service is imported on other worker clusters, use the following command:
kubectl get serviceimport -n <namespace>
You have successfully deployed and exported a service to your KubeSlice cluster.
Limitations
A slice configured with the Istio gateway for egress/ingress only supports HTTP services.