Distributed MongoDB Spanning Multi Cloud/Cluster using KubeSlice
This use case describes how to set up distributed MongoDB on multi-cluster/multi-cloud using KubeSlice.
Prerequisites
Ensure that you meet the following requirements:
-
Three Kubernetes clusters with admin access
-
Ensure that the three Kubernetes clusters support Persistent Volume provisioning.
-
Kubeconfig for all the three Kubernetes clusters
Example:
k8s-cluster-1.config # kubeslice controller cluster, kubeslice worker cluster 1 and Mongodb master cluster & mongodb  member cluster 1
k8s-cluster-2.config # kubeslice worker cluster 2 and mongodb  member cluster 2
k8s-cluster-3.config # kubeslice worker cluster 3 and mongodb member cluster 3 -
kubectx to switch between clusters. Download kubectx and install.
-
Install kubeslice-cli based on the OS.
Configure Distributed MongoDB
Let us configure the distributed MongoDB on multi cloud using KubeSlice.
Step 1: Clone the Examples Repo
-
You must clone the
examplesrepo as it contains all the required configuration files in theexamples/distributed-mongodbdirectory.Use the following command to clone the
examplesrepo:git clone https://github.com/kubeslice/examples.gitAfter cloning the repo, use the files from the
examples/distributed-mongodbdirectory.
Step 2: Merge the Kubeconfig Files
-
Use the following commands to merge the Kubeconfig files:
export KUBECONFIG=/path/to/kubeconfig/cluster-1.config:/path/to/kubeconfig/cluster-2.config:/path/to/kubeconfig/cluster-3.configkubectl config view --flatten=true > merged.config -
Verify the
merged.configfile using the following command:Example:
export KUBECONFIG=/path/to/kubeconfig/merged.config
kubectx
Example Output
k8s-cluster-1 # kubeslice controller cluster & kubeslice worker cluster 1 & Mongodb central cluster & mongodb member cluster 1
k8s-cluster-2 # kubeslice worker cluster 2 & mongodb member cluster 2
k8s-cluster-3 # kubeslice worker cluster 3 & mongodb member cluster 3
Step 3: Install KubeSlice
Identify a controller cluster to install the KubeSlice Controller. Identify three worker clusters, worker-1, worker-2, and worker-3 with the KubeSlice Controller.
-
Use the following template to install the KubeSlice Controller and register the worker clusters:
examples/distributed-mongodb/kubeslice-cli-topology-template/kubeslice-cli-topology-template.yaml -
Modify the values as per your requirement. Refer to topology parameters for more details.
noteKubeSlice Manager simplifies cluster registration and slice operations. To know more, see cluster operations.
-
Install KubeSlice using the following command:
kubeslice-cli --config examples/distributed-mongodb/kubeslice-cli-topology-template/kubeslice-cli-topology-template.yaml installRunning this command installs the KubeSlice Controller and registers worker-1, worker-2, and worker-3 clusters with it.
-
(Optional) To retrieve the endpoint/URL for accessing the KubeSlice Manager:
-
Run the following command on the KubeSlice Controller:
kubectl get service kubeslice-ui-proxy -n kubeslice-controller -o jsonpath='{.status.loadBalancer.ingress[0].ip}'The IP is used when the LoadBalancer assigns an external IP address.
When the LoadBalancer assigns a DNS name to the service, use the hostname in the following command:
kubectl get service kubeslice-ui-proxy -n kubeslice-controller -o jsonpath='{.status.loadBalancer.ingress[0].hostname}' -
The output should display the endpoint/URL in the following format:
https://<LoadBalancer-IP> -
Copy the endpoint/URL from the output and paste into your browser window to access the KubeSlice Manager.
-
You must create a service-account token to log in to the KubeSlice Manager. Create a service-account token using the following command:
kubectl get secret kubeslice-rbac-rw-admin -o jsonpath="{.data.token}" -n kubeslice-mongodb-project | base64 --decodeRunning this command returns a secret token. Use this token to log in to the KubeSlice Manager.
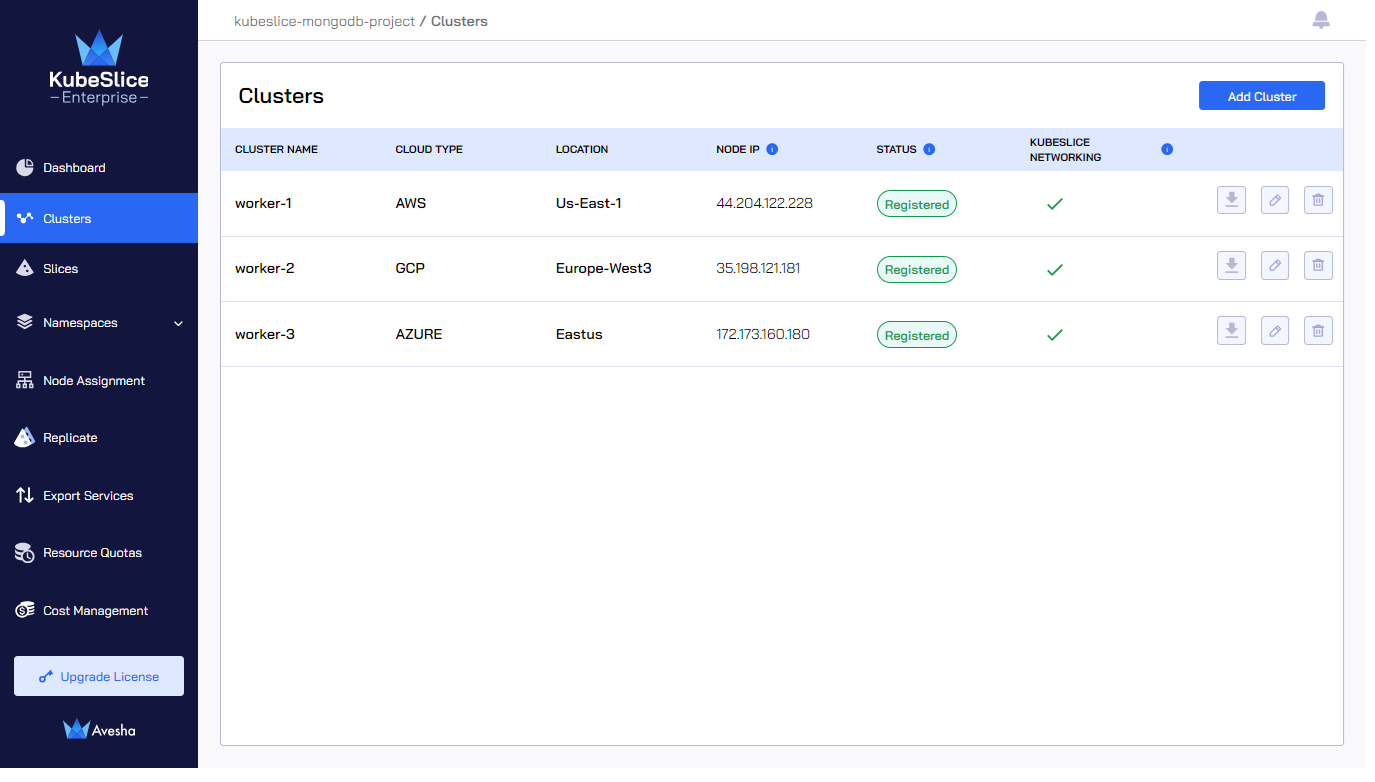
After logging in to the Kubeslice Manager, navigate to Clusters on the left sidebar. On the Clusters page, you can see the registered clusters installed using the template.
-
Step 4: Create a Slice
-
Set the context to the controller cluster to create a slice called
demo-sliceusing the following command:export KUBECONFIG=</path/to/the/controller/cluster/kubeconfig> -
Create a slice called
demo-sliceusing one of the following command based on the Slice Gateway Type:-
With OpenVPN SliceGateway Type:
kubectl apply -f examples/distributed-mongodb/mongodb-slice/mongodb-slice.yaml -
With LoadBalancer SliceGateway Type:
kubectl apply -f examples/distributed-mongodb/mongodb-slice/mongodb-slice-lb.yaml
The
mongodb-slice.yamlormongodb-slice-lb.yamlfiles also contains the configuration to create a namespace calledmongodb, and also onboard it onto thedemo-slice. The configuration also enables namespace sameness, which means that themongodbnamespace will be onboarded onto any worker cluster that is connected to thedemo-slice.infoYou can also create a slice called
demo-sliceusing the KubeSlice Manager. Connect the three worker clusters to that slice. To know more, see slice operations.However, you must create a
mongodbnamespace if you use KubeSlice Manager for slice creation. You can easily onboard namespaces using the KubeSlice Manager. To know more, see manage namespaces. -
Step 5: Deploy the MongoDB Enterprise Kubernetes Operator
-
Set the Kubernetes context to your MongoDB master cluster using the following command:
kubectx k8s-cluster-1Replace k8s-cluster 1 with your MongoDB master cluster if it is different.
-
Add the MongoDB helm repo to your local machine using the following command:
helm repo add mongodb https://kubeslice.aveshalabs.io/repository/kubeslice-helm-ent-stage/ -
Create the
mongodb-operatornamespace using the following command:NAMESPACE=mongodb-operator
kubectl create ns "${NAMESPACE}" -
Verify the namespaces using the following command:
kubectl get nsExample Output
NAME                        STATUS   AGE
cert-manager                Active   159m
default                     Active   4h52m
kube-node-lease             Active   4h52m
kube-public                 Active   4h52m
kube-system                 Active   4h52m
kubernetes-dashboard        Active   105m
kubeslice-controller        Active   144m
kubeslice-mongodb-project   Active   112m
kubeslice-system            Active   112m
mongodb                     Active   22m
mongodb-operator            Active   5m21s
spire Active 111m -
Install the MongoDB Kubernetes Operator and set it to only watch the
mongodb-operatornamespace using the following command:HELM_CHART_VERSION=1.16.3
helm install enterprise-operator mongodb/enterprise-operator \
--namespace "${NAMESPACE}" \
--version="${HELM_CHART_VERSION}" \
--set operator.watchNamespace="${NAMESPACE}" -
Verify the helm installation using the following command:
helm list --namespace mongodb-operatorExample Output
NAME               	NAMESPACE       	REVISION	UPDATED                                	STATUS  	CHART                     	APP VERSION
enterprise-operator mongodb-operator 1 2023-03-13 16:24:25.368968635 +0530 IST deployed enterprise-operator-1.16.3 -
Verify the pods on the
mongodb-operatornamespace using the following command:kubectl get pods -n mongodb-operatorExample Output
NAME                                           READY   STATUS    RESTARTS   AGE
mongodb-enterprise-operator-68cb5dd658-v2wrf 1/1 Running 0 6m44s -
Verify the Custom Resource Definitions installed in the previous step in the watched namespace using the following command:
kubectl -n mongodb-operator get crd | grep -E '^(mongo|ops)'Example Output
mongodb.mongodb.com                                   2023-03-13T10:54:20Z
mongodbmulti.mongodb.com                              2023-03-13T10:54:21Z
mongodbusers.mongodb.com                              2023-03-13T10:54:21Z
opsmanagers.mongodb.com 2023-03-13T10:54:21Z -
Verify the required service accounts has been created in watched namespace using the following command:
kubectl -n mongodb-operator get sa | grep -E '^(mongo)'Example Output
mongodb-enterprise-appdb           1         11m
mongodb-enterprise-database-pods   1         11m
mongodb-enterprise-operator        1         11m
mongodb-enterprise-ops-manager 1 11m -
Verify if the Kubernetes Operator was installed correctly using the following command:
kubectl describe deployments mongodb-enterprise-operator -n mongodb-operator
Step 6: Deploy the MongoDB Ops Manager
To know more, see mastering MongoDB Ops Manager.
The master cluster should contain the MongoDB Enterprise Operator deployed.
-
Set the Kubernetes context to your MongoDB master cluster using the following command:
kubectx k8s-cluster-1 -
Ensure that the MongoDB Enterprise Operator is running using the following command:
kubectl get po -n mongodb-operatorExample Output
NAME                                           READY   STATUS    RESTARTS   AGE
mongodb-enterprise-operator-68cb5dd658-v2wrf 1/1 Running 0 22m -
To access the Operator Manager user interface after installation, create a secret containing the username and password on the master Kubernetes cluster using the following command:
kubectl -n mongodb-operator create secret generic om-admin-secret \
--from-literal=Username="<username>" \
--from-literal=Password="<password>" \
--from-literal=FirstName="Ops" \
--from-literal=LastName="Manager" -
Deploy the Ops Manager using the following command by replacing the values as required:
kubectl apply -f - <<EOF
apiVersion: mongodb.com/v1
kind: MongoDBOpsManager
metadata:
  name: ops-manager
  namespace: mongodb-operator
spec:
  version: 6.0.5
  # the name of the secret containing admin user credentials.
  adminCredentials: om-admin-secret
  externalConnectivity:
    type: LoadBalancer
  configuration:
    mms.ignoreInitialUiSetup: "true"
    automation.versions.source: mongodb
    mms.adminEmailAddr: user@aveshasystems.com
    mms.fromEmailAddr: user@aveshasystems.com
    mms.replyToEmailAddr: user@aveshasystems.com
    mms.mail.hostname: aveshasystems.com
    mms.mail.port: "465"
    mms.mail.ssl: "false"
    mms.mail.transport: smtp
  # the Replica Set backing Ops Manager.
  applicationDatabase:
    members: 3
    version: 5.0.5-ent
EOF -
Verify the Ops Manager and check its MongoDB application database pods using the following command:
kubectl get pods -n mongodb-operatorExample Output
NAME                                           READY   STATUS    RESTARTS   AGE
mongodb-enterprise-operator-68cb5dd658-v2wrf   1/1     Running   0          51m
ops-manager-0                                  1/1     Running   0          8m36s
ops-manager-backup-daemon-0                    1/1     Running   0          2m15s
ops-manager-db-0                               3/3     Running   0          2m55s
ops-manager-db-1                               3/3     Running   0          3m49s
ops-manager-db-2 3/3 Running 0 4m30s -
Verify the volumes created for the Ops Manager using the following command:
kubectl -n mongodb-operator get pvcExample Output
NAME                               STATUS   VOLUME                                     CAPACITY   ACCESS MODES   STORAGECLASS   AGE
data-ops-manager-db-0              Bound    pvc-33b74868-f61f-499b-8c7d-ce61782aac88   15Gi       RWO            standard       23m
data-ops-manager-db-1              Bound    pvc-c0962ecc-b374-4e36-a17a-d7f404176c30   15Gi       RWO            standard       22m
data-ops-manager-db-2              Bound    pvc-b237acf9-6333-415c-9115-175f67ded4d6   15Gi       RWO            standard       21m
head-ops-manager-backup-daemon-0 Bound pvc-2bd40fdf-2971-4250-b0d8-47315485b4bf 30Gi RWO standard 4m2s -
[Optional] Verify the stateful sets created by the Ops Manager using the following command:
kubectl -n "mongodb-operator" get stsExample Output
NAME                        READY   AGE
ops-manager                 1/1     12m
ops-manager-backup-daemon   1/1     6m
ops-manager-db 3/3 13m -
[Optional] Verify the external service created for accessing the Ops Manager using the following command:
kubectl -n "mongodb-operator" get svcExample Output
NAME                            TYPE           CLUSTER-IP    EXTERNAL-IP    PORT(S)                          AGE
operator-webhook                ClusterIP      10.7.47.251   <none>         443/TCP                          56m
ops-manager-backup-daemon-svc   ClusterIP      None          <none>         8443/TCP                         7m13s
ops-manager-db-svc              ClusterIP      None          <none>         27017/TCP                        14m
ops-manager-svc                 ClusterIP      None          <none>         8080/TCP                         13m
ops-manager-svc-ext LoadBalancer 10.7.32.125 34.23.212.14 8080:31348/TCP,25999:31914/TCP 13m -
To generate the Ops Manager URL address if the service is exposed as a LoadBalancer, use the following command:
cautionThe command below only works if your service is exposed as a LoadBalancer. If, it is exposed as node port service, then use the URL format as given below:
URL=http://<External Node IP>:<NodePort>Where External Node IP is the worker node IP address where the Ops Manager is deployed, and NodePort is the node port on which
ops-manager-svc-extis exposed.noteUse the host name in the command when the LoadBalancer assigns a DNS Name to the service.
URL=http://$(kubectl -n "mongodb-operator" get svc ops-manager-svc-ext -o jsonpath='{.status.loadBalancer.ingress[0].hostname}'):$(kubectl -n "mongodb-operator" get svc ops-manager-svc-ext -o jsonpath='{.spec.ports[0].port}')
echo $URL
Use the IP address when the LoadBalancer assigns an external IP address in the following command:
URL=http://$(kubectl -n "mongodb-operator" get svc ops-manager-svc-ext -o jsonpath='{.status.loadBalancer.ingress[0].ip}'):$(kubectl -n "mongodb-operator" get svc ops-manager-svc-ext -o jsonpath='{.spec.ports[0].port}')
echo $URL
Example Output
http://34.23.212.14:8080 -
Update the Ops Manager Kubernetes manifest to include an external IP address created by LoadBalancer in
spec.configuration.mms.centralUrlviakubectl patchusing the following command:kubectl -n "mongodb-operator" patch om ops-manager --type=merge -p "{\"spec\":{\"configuration\":{\"mms.centralUrl\":\"${URL}\"}}}"Example Output
mongodbopsmanager.mongodb.com/ops-manager patchedcautionWait for few minutes. The Ops Manager pod must be restarted, so wait until the
ops-manager-0pod is in the running state again. -
Using the username and password stored in the om-admin-secret (as created under the third sub-step of Step 6 ), log in to the Ops Manager. (Get the address from in the $URL variable.)

-
Kubernetes Operator is in the Ops Manager ops-manager-db organization and the ops-manager-db project.

-
Click the ops-manager-db project. You are redirected to the panel that displays the database pods of the Ops Manager application. The Ops Manager monitors this database. Under Deployment, go to the Servers tab.
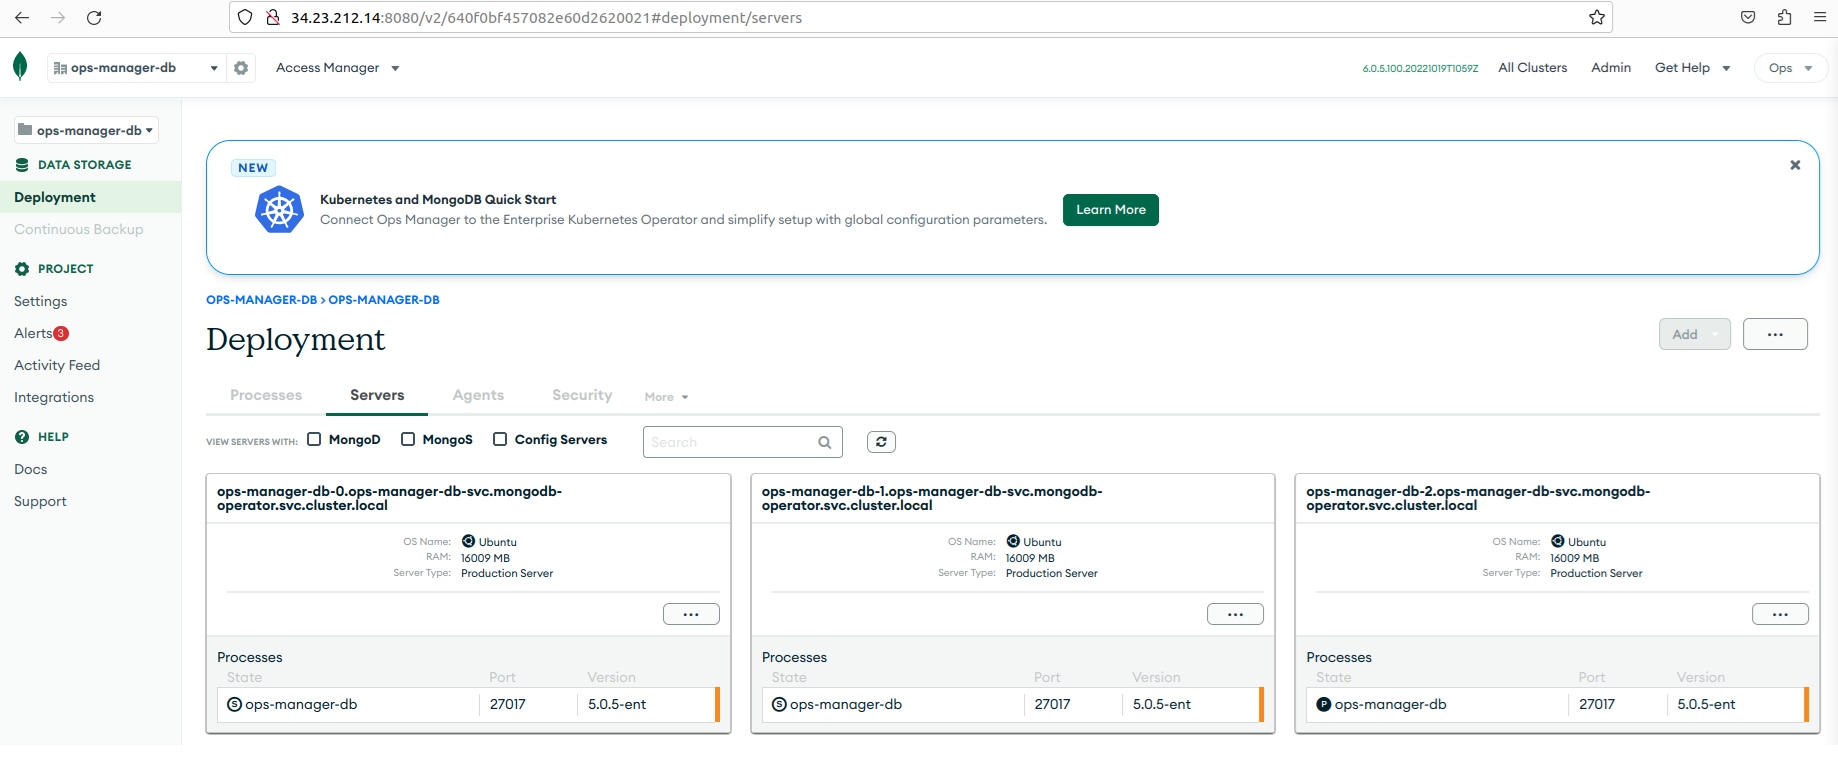
-
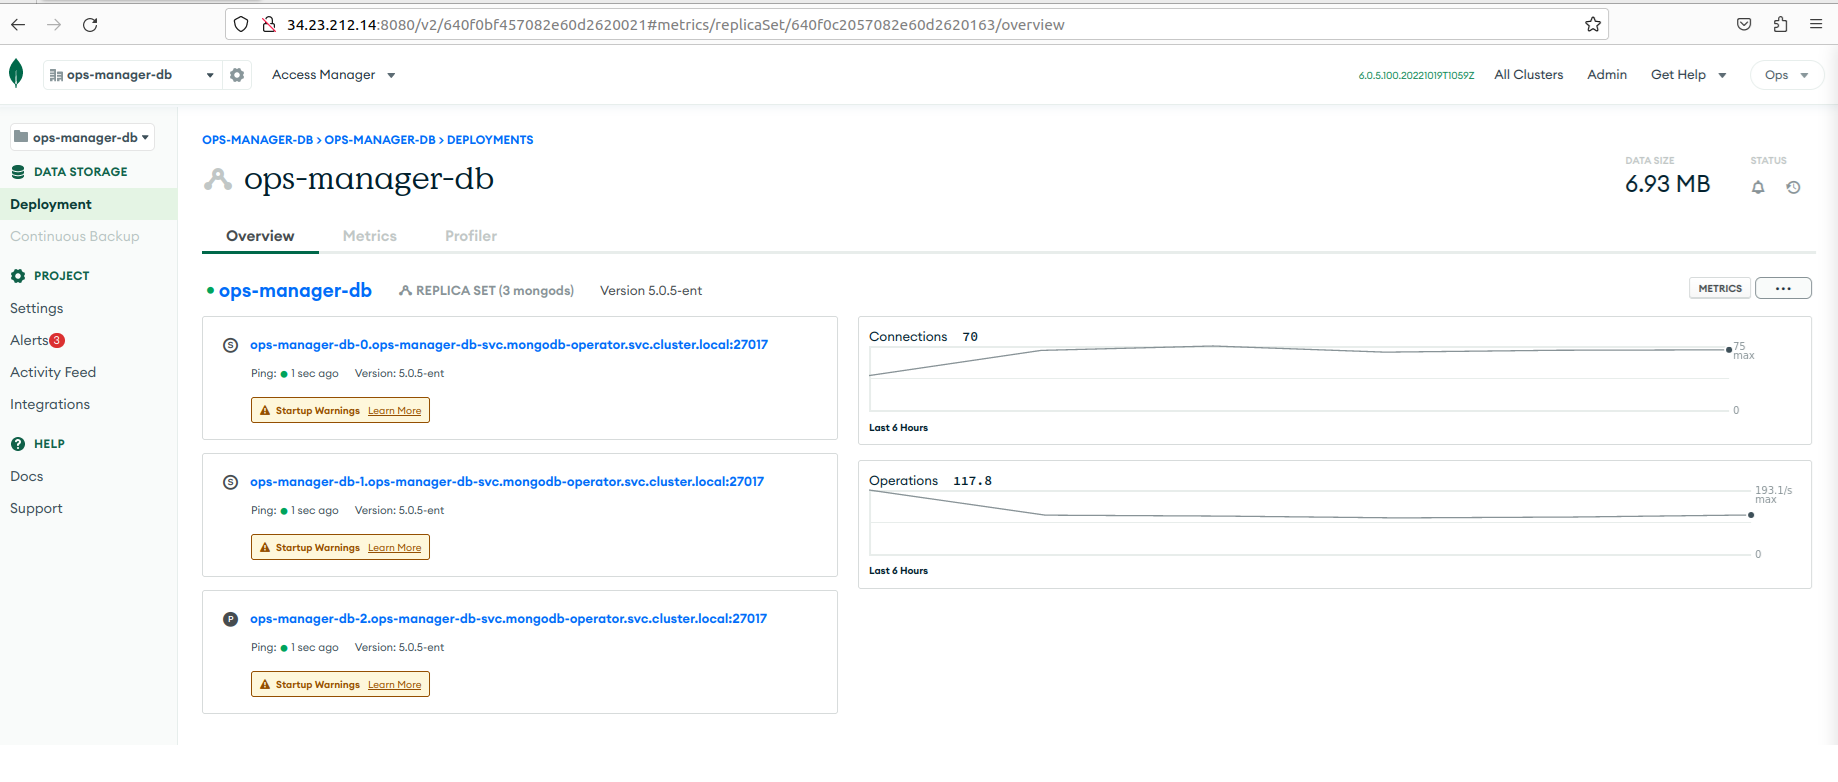
Click a deployment to see the details.
Step-7: Deploy MongoDB Across Multiple Kubernetes Clusters With MongoDBMulti
To know more, see deploying MongoDB across multiple Kubernetes clusters with MongoDBMulti.
-
Set the environment variables,
Masterfor the master Kubernetes cluster, andMDB1,MDB2, andMDB3for clusters that host MongoDB replica set members. Ensure that the variables contain the full Kubernetes cluster names.-
List all Kubernetes clusters using the following command:
kubectxExample Output
k8s-cluster-1
k8s-cluster-2
k8s-cluster-3 -
Export the environment variables using the following command:
export MASTER=k8s-cluster-1
export MDB_1=k8s-cluster-1
export MDB_2=k8s-cluster-2
export MDB_3=k8s-cluster-3 -
Verify the environment variables using the following command:
echo $MASTER $MDB_1 $MDB_2 $MDB_3Example Output
k8s-cluster-1 k8s-cluster-1 k8s-cluster-2 k8s-cluster-3
-
-
Download the MongoDB Enterprise Kubernetes Operator Golang scripts for setting up multi cluster configurations using the following command:
wget https://kubeslice.aveshalabs.io/repository/avesha-file-store/devops/mongodb-enterprise-kubernetes.tar.xz -
Extract the downloaded `mongodb-enterprise-kubernetes.tar.xz* file using the following command:
tar -xvf mongodb-enterprise-kubernetes.tar.xz -
Change the directory to which you cloned the Kubernetes Operator repository, and then to the directory that contains the multi-cluster-cli using the following command:
cd mongodb-enterprise-kubernetes/ -
Run the multi cluster CLI using the following command:
CLUSTERS=$MDB_1,$MDB_2,$MDB_3
cd tools/multicluster
go run main.go setup \
  -central-cluster="${MASTER}" \
  -member-clusters="${CLUSTERS}" \
  -member-cluster-namespace="mongodb" \
-central-cluster-namespace="mongodb"cautionIf this script fails due to the Kubernetes cluster version being greater than 1.23. As service accounts don't automatically create secrets, then create the secret manually again in the three clusters using the below yaml file and run the go script again.
kubectl apply -f - <<EOF
apiVersion: v1
kind: Secret
metadata:
  name: mongodb-enterprise-operator-multi-cluster-token
  namespace: mongodb
  annotations:
    kubernetes.io/service-account.name: "mongodb-enterprise-operator-multi-cluster"
type: kubernetes.io/service-account-token
EOF -
Verify the output of the previous command.
Example Output
Ensured namespaces exist in all clusters.
creating central cluster roles in cluster: gke_avesha-dev2_us-east1-c_demo-cluster-1-third
skipping creation of member roles in cluster (it is also the central cluster): gke_avesha-dev2_us-east1-c_demo-cluster-1-third
creating member roles in cluster: gke_avesha-dev2_us-east1-c_demo-cluster-2-third
creating member roles in cluster: gke_avesha-dev2_us-east1-c_demo-cluster-3-third
Ensured ServiceAccounts and Roles.
Creating KubeConfig secret mongodb/mongodb-enterprise-operator-multi-cluster-kubeconfig in cluster gke_avesha-dev2_us-east1-c_demo-cluster-1-third -
Using
kubectxswitch to each cluster and verify that the service account is created in all of them using the following command:kubectl -n mongodb get saExample Output
NAME                                        SECRETS   AGE
default                                     1         141m
mongodb-enterprise-operator-multi-cluster 1 6m -
Install the MongoDB Multi Cluster Kubernetes Operator on the master cluster. Verify that you are on the master cluster by using kubectx.
On the master cluster, install the MongoDB Multi Cluster Kubernetes Operator using the following command:
helm upgrade --install mongodb-enterprise-operator-multi-cluster mongodb/enterprise-operator \
  --namespace mongodb \
  --set namespace=mongodb \
  --version="1.16.3" \
  --set operator.name=mongodb-enterprise-operator-multi-cluster \
  --set "multiCluster.clusters={${CLUSTERS}}" \
  --set operator.createOperatorServiceAccount=false \
--set multiCluster.performFailover=false -
Check if the MongoDB Enterprise Operator multi cluster pod on the master cluster is running using the following command:
kubectl get pods -n mongodbExample Output
NAME                                                         READY   STATUS    RESTARTS   AGE
mongodb-enterprise-operator-multi-cluster-7fd7c6766d-pcpf9 2/2 Running 0 2m28s -
Link all the clusters together using the MongoDB Multi CRD. The Kubernetes API has already been extended with a MongoDB-specific object,
mongodbmulti. Use the following command to link the clusters:kubectl -n mongodb get crd | grep multiExample Output
mongodbmulti.mongodb.com 2023-03-13T10:54:21Z -
[Optional] Review the installation logs and ensure that there are no issues or errors using the following command:
POD=$(kubectl -n mongodb get po|grep operator|awk '{ print $1 }')
kubectl -n mongodb logs -f po/$POD -c mongodb-enterprise-operator
Example Output
kubectl -n mongodb logs -f po/$POD -c mongodb-enterprise-operator -
Configure the required service accounts for each member cluster using the following commands:
cautionBefore running the commands below, be sure that the environment variables are set to the context of your member clusters as before. Use the following command to check the context:
echo $MASTER $MDB_1 $MDB_2 $MDB_3helm template --show-only templates/database-roles.yaml mongodb/enterprise-operator --namespace "mongodb" | kubectl apply -f - --context=$MDB_1 --namespace mongodb;
helm template --show-only templates/database-roles.yaml mongodb/enterprise-operator --namespace "mongodb" | kubectl apply -f - --context=$MDB_2 --namespace mongodb;
helm template --show-only templates/database-roles.yaml mongodb/enterprise-operator --namespace "mongodb" | kubectl apply -f - --context=$MDB_3 --namespace mongodb; -
[Optional] Verify the command output after executing the previous command for service accounts.
WARNING: Kubernetes configuration file is group-readable. This is insecure. Location: /home/user/mongo-setup/kubeconfig/merged.config
WARNING: Kubernetes configuration file is world-readable. This is insecure. Location: /home/user/mongo-setup/kubeconfig/merged.config
Warning: resource serviceaccounts/mongodb-enterprise-appdb is missing the kubectl.kubernetes.io/last-applied-configuration annotation which is required by kubectl apply. kubectl apply should only be used on resources created declaratively by either kubectl create --save-config or kubectl apply. The missing annotation will be patched automatically.
serviceaccount/mongodb-enterprise-appdb configured
Warning: resource serviceaccounts/mongodb-enterprise-database-pods is missing the kubectl.kubernetes.io/last-applied-configuration annotation which is required by kubectl apply. kubectl apply should only be used on resources created declaratively by either kubectl create --save-config or kubectl apply. The missing annotation will be patched automatically.
serviceaccount/mongodb-enterprise-database-pods configured
Warning: resource serviceaccounts/mongodb-enterprise-ops-manager is missing the kubectl.kubernetes.io/last-applied-configuration annotation which is required by kubectl apply. kubectl apply should only be used on resources created declaratively by either kubectl create --save-config or kubectl apply. The missing annotation will be patched automatically.
serviceaccount/mongodb-enterprise-ops-manager configured
Warning: resource roles/mongodb-enterprise-appdb is missing the kubectl.kubernetes.io/last-applied-configuration annotation which is required by kubectl apply. kubectl apply should only be used on resources created declaratively by either kubectl create --save-config or kubectl apply. The missing annotation will be patched automatically.
role.rbac.authorization.k8s.io/mongodb-enterprise-appdb configured
Warning: resource rolebindings/mongodb-enterprise-appdb is missing the kubectl.kubernetes.io/last-applied-configuration annotation which is required by kubectl apply. kubectl apply should only be used on resources created declaratively by either kubectl create --save-config or kubectl apply. The missing annotation will be patched automatically.
rolebinding.rbac.authorization.k8s.io/mongodb-enterprise-appdb configured
WARNING: Kubernetes configuration file is group-readable. This is insecure. Location: /home/user/mongo-setup/kubeconfig/merged.config
WARNING: Kubernetes configuration file is world-readable. This is insecure. Location: /home/user/mongo-setup/kubeconfig/merged.config
serviceaccount/mongodb-enterprise-appdb created
serviceaccount/mongodb-enterprise-database-pods created
serviceaccount/mongodb-enterprise-ops-manager created
role.rbac.authorization.k8s.io/mongodb-enterprise-appdb created
rolebinding.rbac.authorization.k8s.io/mongodb-enterprise-appdb created
WARNING: Kubernetes configuration file is group-readable. This is insecure. Location: /home/user/mongo-setup/kubeconfig/merged.config
WARNING: Kubernetes configuration file is world-readable. This is insecure. Location: /home/user/mongo-setup/kubeconfig/merged.config
serviceaccount/mongodb-enterprise-appdb created
serviceaccount/mongodb-enterprise-database-pods created
serviceaccount/mongodb-enterprise-ops-manager created
role.rbac.authorization.k8s.io/mongodb-enterprise-appdb created
rolebinding.rbac.authorization.k8s.io/mongodb-enterprise-appdb created -
Switch to the master cluster and generate Ops Manager API keys and add our IP addresses to the Ops Manager access list using the following command when the LoadBalancer assigns an external IP address:
cautionThe command below only works if your service is exposed as a LoadBalancer. If, it is exposed as node port service, then use the URL format as given below:
URL=http://<External Node IP>:<NodePort>Where External Node IP is the worker node IP address where the Ops Manager is deployed, and NodePort is the node port on which
ops-manager-svc-extis exposed.kubectx $MASTER
URL=http://$(kubectl -n mongodb-operator get svc ops-manager-svc-ext -o jsonpath='{.status.loadBalancer.ingress[0].ip}:{.spec.ports[0].port}')
echo $URLExample Output
Switched to context "k8s-cluster-1".
http://34.23.212.14:8080
Use the host name in the following command when the LoadBalancer assigns a DNS name to the service:
kubectx $MASTER
URL=http://$(kubectl -n mongodb-operator get svc ops-manager-svc-ext -o jsonpath='{.status.loadBalancer.ingress[0].hostname}:{.spec.ports[0].port}')
echo $URL -
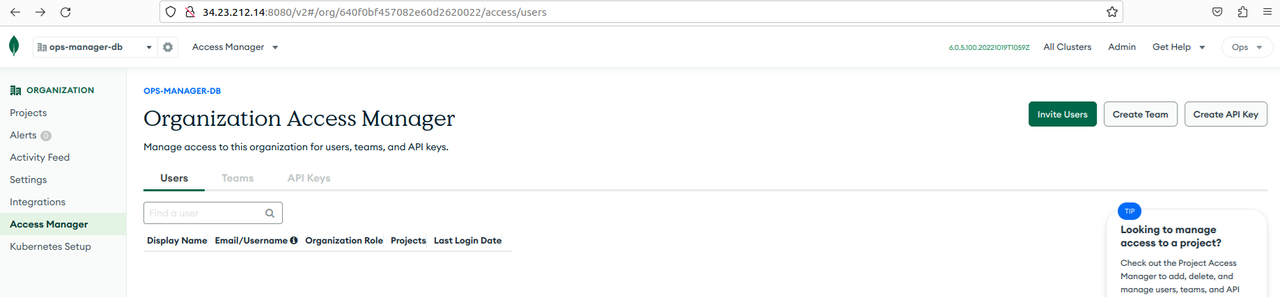
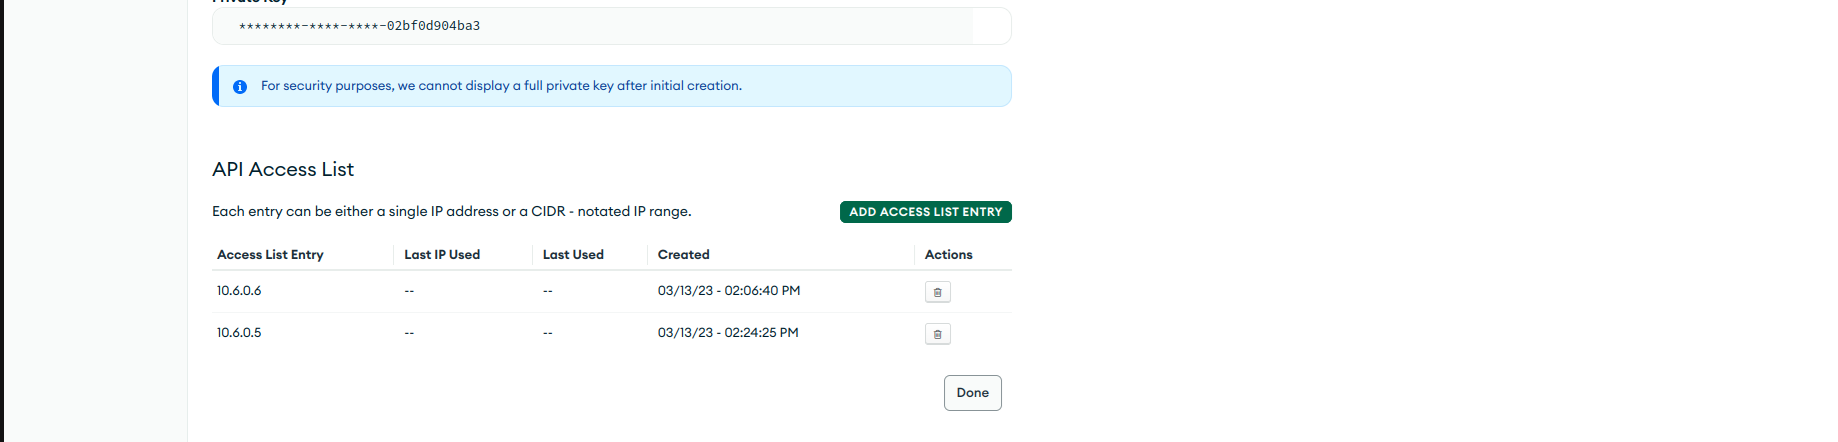
Log in to Ops Manager, and generate public and private API keys. When you create API keys, be sure to add your current IP address to the API access list. To do so, log in to the Ops Manager and go to
ops-manager-db organization.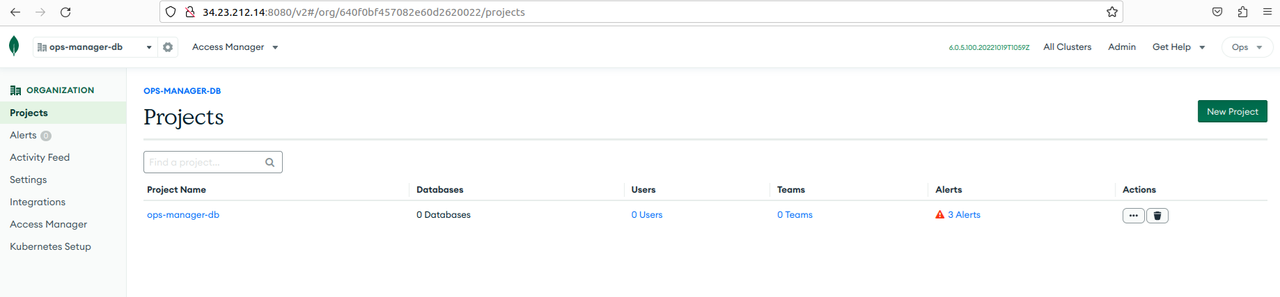
-
Click Access Manager on the left side bar, and choose Organization Access > Create API KEY in the top-right corner.
-
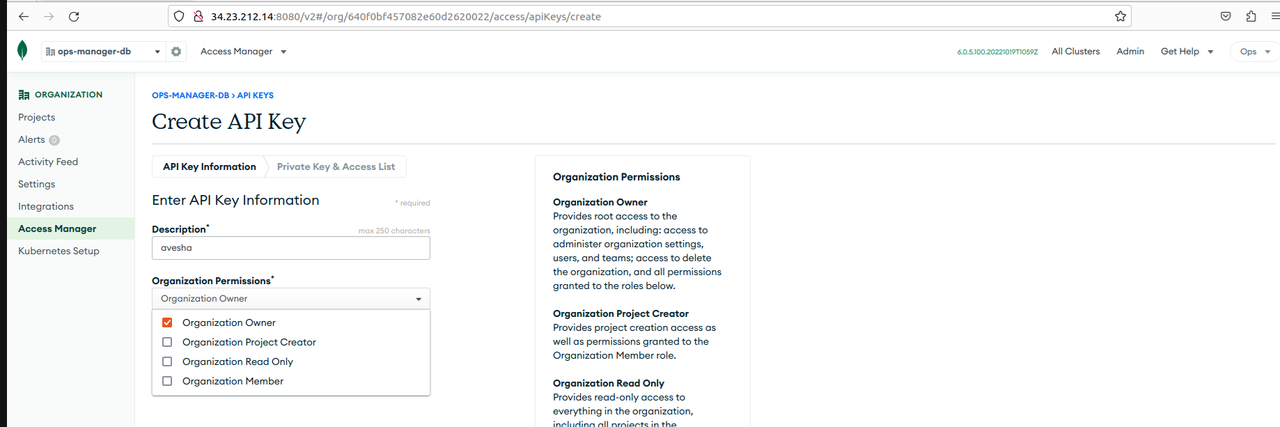
On the Create API Key page, enter the name for the key and set permission to Organization Owner and click Next.
-
On the Create API Key page, under Save API Key Information, copy the public and private keys for later use.
cautionYou cannot see the private and public keys again. So, you must save both the keys securely.
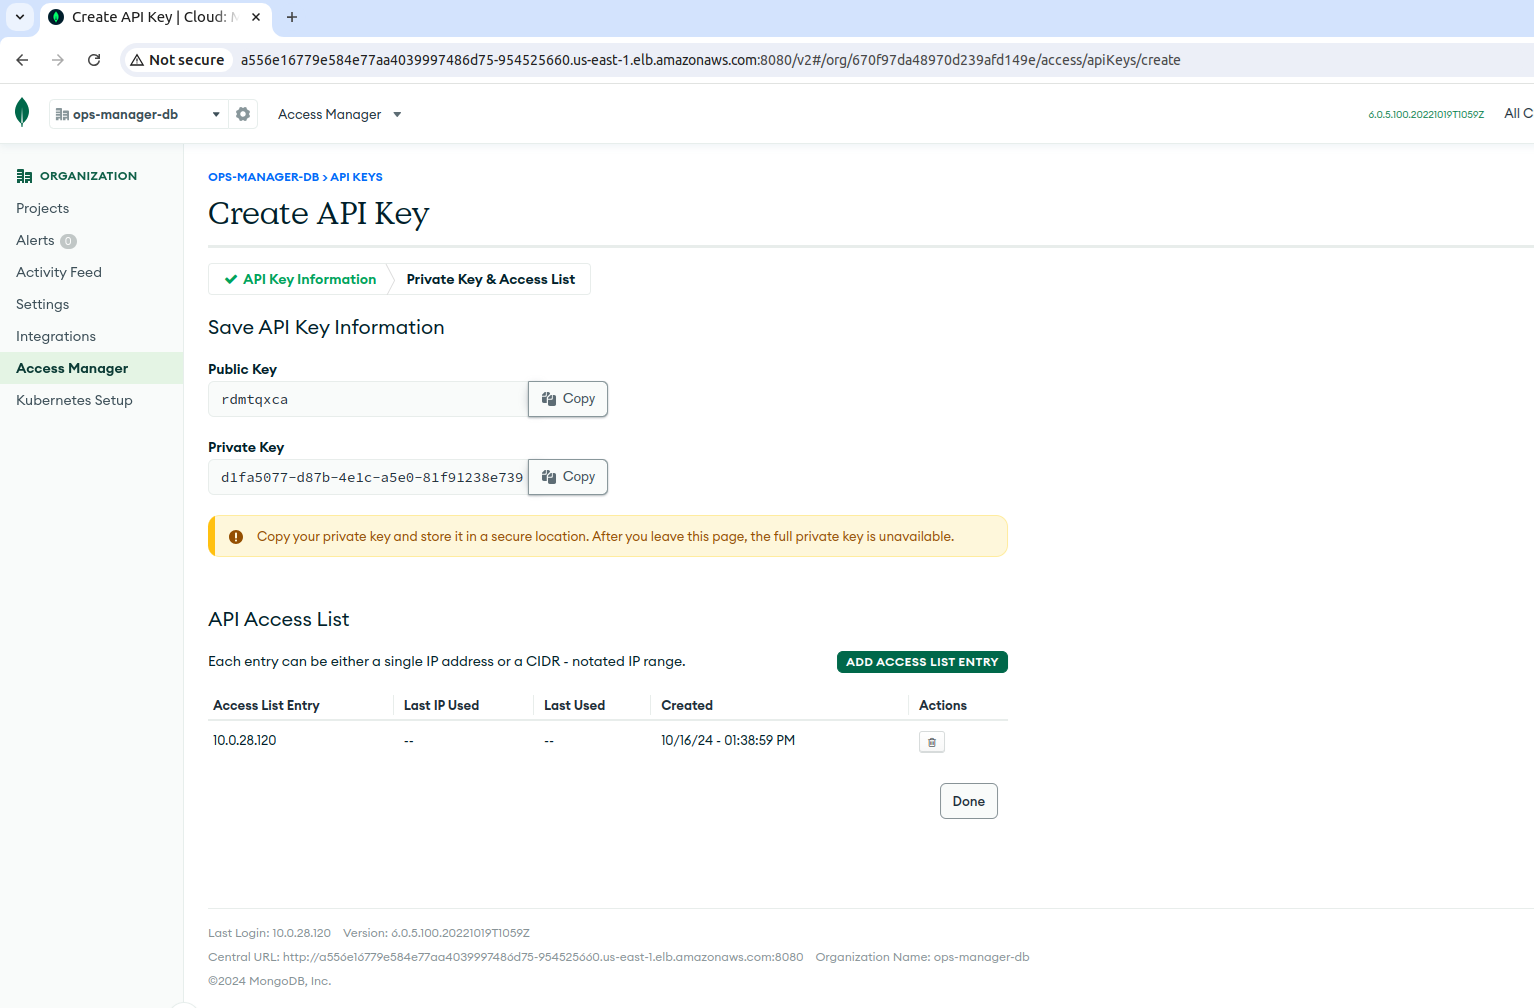
Ensure that you have added your current IP address to the API access list.

-
Switch to the master cluster and add the public and private keys that you copied from the Ops Manager DB to the Kubernetes secret using the following command:
kubectl apply -f - <<EOF
apiVersion: v1
kind: Secret
metadata:
  name: multi-organization-secret
  namespace: mongodb
stringData:
  publicKey: <public key>
  privateKey: <private key>
EOF -
You need Organizations ID to add to the Kubernetes secret. To get the ID:
-
Go to the Ops Manager and go to the Organizations on the left sidebar.
-
Click ops-manager-db.
-
Go to Settings under Organization on the left sidebar.
-
On the Organization Settings page, under General Settings, copy the Organization ID and save it for later use.
-
-
Apply the following command on the master cluster after replacing the Organization ID and base URL as per your setup:
kubectl apply -f - <<EOF
apiVersion: v1
kind: ConfigMap
metadata:
  name: multi-project
  namespace: mongodb
data:
  baseUrl: <baseURL>
  orgId: <Org ID>
EOF
Step-8: Create a MongoDB Replica Set using MongoDBMultiCRD
Be sure that the following environment variables are set for MDB_1 MDB_2 MDB_3 in your shell as per your MongoDB member clusters.
$ echo $MDB_1 $MDB_2 $MDB_3
k8s-cluster-1 k8s-cluster-2 k8s-cluster-3
-
On the master cluster, apply the following command:
export MDB_VERSION=6.0.2-ent

kubectl apply -f - <<EOF
apiVersion: mongodb.com/v1
kind: MongoDBMulti
metadata:
   name: multi-replica-set
   namespace: mongodb
spec:
   version: "${MDB_VERSION}"
   type: ReplicaSet
   persistent: true
   duplicateServiceObjects: true
   credentials: multi-organization-secret
   opsManager:
     configMapRef:
       name: multi-project
   clusterSpecList:
     clusterSpecs:
     - clusterName: ${MDB_1}
       members: 1
     - clusterName: ${MDB_2}
       members: 1
     - clusterName: ${MDB_3}
       members: 1
EOF -
[Optional] If the replicas are not created, then verify the operator logs to see any connection error.
Use the following command to view the operator logs:
POD=$(kubectl -n mongodb get po|grep operator|awk '{ print $1 }')

kubectl -n mongodb logs -f po/$POD -c mongodb-enterprise-operator |grep IP_ADDRESS_NOT_ON_ACCESS_LIST
Example Output with Possible Error
{"level":"error","ts":1678717432.7588468,"caller":"workflow/failed.go:72","msg":"Error establishing connection to Ops Manager: error reading or creating project in Ops Manager: organization with id 640f0bf457082e60d2620022 not found: Status: 403 (Forbidden), ErrorCode: IP_ADDRESS_NOT_ON_ACCESS_LIST, Detail: IP address 10.6.0.5 is not allowed to access this resource.","MultiReplicaSet":"mongodb/multi-replica-set","stacktrace":"github.com/10gen/ops-manager-kubernetes/controllers/operator/workflow.failedStatus.Log\n\t/go/src/github.com/10gen/ops-manager-kubernetes/controllers/operator/workflow/failed.go:72\ngithub.com/10gen/ops-manager-kubernetes/controllers/operator.(*ReconcileCommonController).updateStatus\n\t/go/src/github.com/10gen/ops-manager-kubernetes/controllers/operator/common_controller.go:152\ngithub.com/10gen/ops-manager-kubernetes/controllers/operator.(*ReconcileMongoDbMultiReplicaSet).Reconcile\n\t/go/src/github.com/10gen/ops-manager-kubernetes/controllers/operator/mongodbmultireplicaset_controller.go:114\nsigs.k8s.io/controller-runtime/pkg/internal/controller.(*Controller).Reconcile\n\t/go/pkg/mod/sigs.k8s.io/controller-runtime@v0.11.2/pkg/internal/controller/controller.go:114\nsigs.k8s.io/controller-runtime/pkg/internal/controller.(*Controller).reconcileHandler\n\t/go/pkg/mod/sigs.k8s.io/controller-runtime@v0.11.2/pkg/internal/controller/controller.go:311\nsigs.k8s.io/controller-runtime/pkg/internal/controller.(*Controller).processNextWorkItem\n\t/go/pkg/mod/sigs.k8s.io/controller-runtime@v0.11.2/pkg/internal/controller/controller.go:266\nsigs.k8s.io/controller-runtime/pkg/internal/controller.(*Controller).Start.func2.2\n\t/go/pkg/mod/sigs.k8s.io/controller-runtime@v0.11.2/pkg/internal/controller/controller.go:227"}
{"level":"error","ts":1678717442.807198,"caller":"workflow/failed.go:72","msg":"Error establishing connection to Ops Manager: error reading or creating project in Ops Manager: organization with id 640f0bf457082e60d2620022 not found: Status: 403 (Forbidden), ErrorCode: IP_ADDRESS_NOT_ON_ACCESS_LIST, Detail: IP address 10.6.0.5 is not allowed to access this resource.","MultiReplicaSet":"mongodb/multi-replica-set","stacktrace":"github.com/10gen/ops-manager-kubernetes/controllers/operator/workflow.failedStatus.Log\n\t/go/src/github.com/10gen/ops-manager-kubernetes/controllers/operator/workflow/failed.go:72\ngithub.com/10gen/ops-manager-kubernetes/controllers/operator.(*ReconcileCommonController).updateStatus\n\t/go/src/github.com/10gen/ops-manager-kubernetes/controllers/operator/common_controller.go:152\ngithub.com/10gen/ops-manager-kubernetes/controllers/operator.(*ReconcileMongoDbMultiReplicaSet).Reconcile\n\t/go/src/github.com/10gen/ops-manager-kubernetes/controllers/operator/mongodbmultireplicaset_controller.go:114\nsigs.k8s.io/controller-runtime/pkg/internal/controller.(*Controller).Reconcile\n\t/go/pkg/mod/sigs.k8s.io/controller-runtime@v0.11.2/pkg/internal/controller/controller.go:114\nsigs.k8s.io/controller-runtime/pkg/internal/controller.(*Controller).reconcileHandler\n\t/go/pkg/mod/sigs.k8s.io/controller-runtime@v0.11.2/pkg/internal/controller/controller.go:311\nsigs.k8s.io/controller-runtime/pkg/internal/controller.(*Controller).processNextWorkItem\n\t/go/pkg/mod/sigs.k8s.io/controller-runtime@v0.11.2/pkg/internal/controller/controller.go:266\nsigs.k8s.io/controller-runtime/pkg/internal/controller.(*Controller).Start.func2.2\n\t/go/pkg/mod/sigs.k8s.io/controller-runtime@v0.11.2/pkg/internal/controller/controller.go:227"}
{"level":"info","ts":1678717452.8275588,"caller":"operator/mongodbmultireplicaset_controller.go:95","msg":"-> MultiReplicaSet.Reconcile","MultiReplicaSet":"mongodb/multi-replica-set"}
{"level":"error","ts":1678717452.859466,"caller":"workflow/failed.go:72","msg":"Error establishing connection to Ops Manager: error reading or creating project in Ops Manager: organization with id 640f0bf457082e60d2620022 not found: Status: 403 (Forbidden), ErrorCode: IP_ADDRESS_NOT_ON_ACCESS_LIST, Detail: IP address 10.6.0.5 is not allowed to access this resource.","MultiReplicaSet":"mongodb/multi-replica-set","stacktrace":"github.com/10gen/ops-manager-kubernetes/controllers/operator/workflow.failedStatus.Log\n\t/go/src/github.com/10gen/ops-manager-kubernetes/controllers/operator/workflow/failed.go:72\ngithub.com/10gen/ops-manager-kubernetes/controllers/operator.(*ReconcileCommonController).updateStatus\n\t/go/src/github.com/10gen/ops-manager-kubernetes/controllers/operator/common_controller.go:152\ngithub.com/10gen/ops-manager-kubernetes/controllers/operator.(*ReconcileMongoDbMultiReplicaSet).Reconcile\n\t/go/src/github.com/10gen/ops-manager-kubernetes/controllers/operator/mongodbmultireplicaset_controller.go:114\nsigs.k8s.io/controller-runtime/pkg/internal/controller.(*Controller).Reconcile\n\t/go/pkg/mod/sigs.k8s.io/controller-runtime@v0.11.2/pkg/internal/controller/controller.go:114\nsigs.k8s.io/controller-runtime/pkg/internal/controller.(*Controller).reconcileHandler\n\t/go/pkg/mod/sigs.k8s.io/controller-runtime@v0.11.2/pkg/internal/controller/controller.go:311\nsigs.k8s.io/controller-runtime/pkg/internal/controller.(*Controller).processNextWorkItem\n\t/go/pkg/mod/sigs.k8s.io/controller-runtime@v0.11.2/pkg/internal/controller/controller.go:266\nsigs.k8s.io/controller-runtime/pkg/internal/controller.(*Controller).Start.func2.2\n\t/go/pkg/mod/sigs.k8s.io/controller-runtime@v0.11.2/pkg/internal/controller/controller.go:227"}
{"level":"info","ts":1678717462.8728528,"caller":"operator/mongodbmultireplicaset_controller.go:95","msg":"-> MultiReplicaSet.Reconcile","MultiReplicaSet":"mongodb/multi-replica-set"}
{"level":"error","ts":1678717462.9028342,"caller":"workflow/failed.go:72","msg":"Error establishing connection to Ops Manager: error reading or creating project in Ops Manager: organization with id 640f0bf457082e60d2620022 not found: Status: 403 (Forbidden), ErrorCode: IP_ADDRESS_NOT_ON_ACCESS_LIST, Detail: IP address 10.6.0.5 is not allowed to access this resource.","MultiReplicaSet":"mongodb/multi-replica-set","stacktrace":"github.com/10gen/ops-manager-kubernetes/controllers/operator/workflow.failedStatus.Log\n\t/go/src/github.com/10gen/ops-manager-kubernetes/controllers/operator/workflow/failed.go:72\ngithub.com/10gen/ops-manager-kubernetes/controllers/operator.(*ReconcileCommonController).updateStatus\n\t/go/src/github.com/10gen/ops-manager-kubernetes/controllers/operator/common_controller.go:152\ngithub.com/10gen/ops-manager-kubernetes/controllers/operator.(*ReconcileMongoDbMultiReplicaSet).Reconcile\n\t/go/src/github.com/10gen/ops-manager-kubernetes/controllers/operator/mongodbmultireplicaset_controller.go:114\nsigs.k8s.io/controller-runtime/pkg/internal/controller.(*Controller).Reconcile\n\t/go/pkg/mod/sigs.k8s.io/controller-runtime@v0.11.2/pkg/internal/controller/controller.go:114\nsigs.k8s.io/controller-runtime/pkg/internal/controller.(*Controller).reconcileHandler\n\t/go/pkg/mod/sigs.k8s.io/controller-runtime@v0.11.2/pkg/internal/controller/controller.go:311\nsigs.k8s.io/controller-runtime/pkg/internal/controller.(*Controller).processNextWorkItem\n\t/go/pkg/mod/sigs.k8s.io/controller-runtime@v0.11.2/pkg/internal/controller/controller.go:266\nsigs.k8s.io/controller-runtime/pkg/internal/controller.(*Controller).Start.func2.2\n\t/go/pkg/mod/sigs.k8s.io/controller-runtime@v0.11.2/pkg/internal/controller/controller.go:227"}
{"level":"info","ts":1678717472.9217105,"caller":"operator/mongodbmultireplicaset_controller.go:95","msg":"-> MultiReplicaSet.Reconcile","MultiReplicaSet":"mongodb/multi-replica-set"}
Whitelist an IP to resolve connection errors.
-
Verify that the multi cluster is ready by using the following command:
kubectl -n mongodb get mdbmExample Output
NAME                PHASE         AGE
multi-replica-set Reconciling 10m -
Create Service Export for each member cluster as described below:
-
Switch context to the k8s-cluster-1 and apply the following command:
kubectl apply -f examples/distributed-mongodb/service-export/k8s-cluster-1.yaml -n mongodb -
Switch context to the k8s-cluster-2 and apply the following command:
kubectl apply -f examples/distributed-mongodb/service-export/k8s-cluster-2.yaml -n mongodb- Switch context to the k8s-cluster-3 and apply the following command:
kubectl apply -f examples/distributed-mongodb/service-export/k8s-cluster-3.yaml -n mongodb -
-
After applying the service exports in all the three clusters, verify the service imports in all of them using the following command:
infoEnsure that service imports are in ready state and endpoints are available.
k8s-cluster-1
kubectl get serviceimport -n mongodb --context=$MDB_1Example Output
NAME                    SLICE        PORT(S)     ENDPOINTS   STATUS   ALIAS
multi-replica-set-0-0   demo-slice   27017/TCP   1           READY    ["multi-replica-set-0-0-svc.mongodb.svc.cluster.local"]
multi-replica-set-1-0   demo-slice   27017/TCP   1           READY    ["multi-replica-set-1-0-svc.mongodb.svc.cluster.local"]
multi-replica-set-2-0   demo-slice   27017/TCP   1           READY    ["multi-replica-set-2-0-svc.mongodb.svc.cluster.local"]
k8s-cluster-2
kubectl get serviceimport -n mongodb --context=$MDB_2Example Output
NAME                    SLICE        PORT(S)     ENDPOINTS   STATUS   ALIAS
multi-replica-set-0-0   demo-slice   27017/TCP   1           READY    ["multi-replica-set-0-0-svc.mongodb.svc.cluster.local"]
multi-replica-set-1-0   demo-slice   27017/TCP   1           READY    ["multi-replica-set-1-0-svc.mongodb.svc.cluster.local"]
multi-replica-set-2-0   demo-slice   27017/TCP   1           READY    ["multi-replica-set-2-0-svc.mongodb.svc.cluster.local"]
k8s-cluster-3
kubectl get serviceimport -n mongodb --context=$MDB_3Example Output
NAME                    SLICE        PORT(S)     ENDPOINTS   STATUS   ALIAS
multi-replica-set-0-0   demo-slice   27017/TCP   1           READY    ["multi-replica-set-0-0-svc.mongodb.svc.cluster.local"]
multi-replica-set-1-0   demo-slice   27017/TCP   1           READY    ["multi-replica-set-1-0-svc.mongodb.svc.cluster.local"]
multi-replica-set-2-0 demo-slice 27017/TCP 1 READY ["multi-replica-set-2-0-svc.mongodb.svc.cluster.local"] -
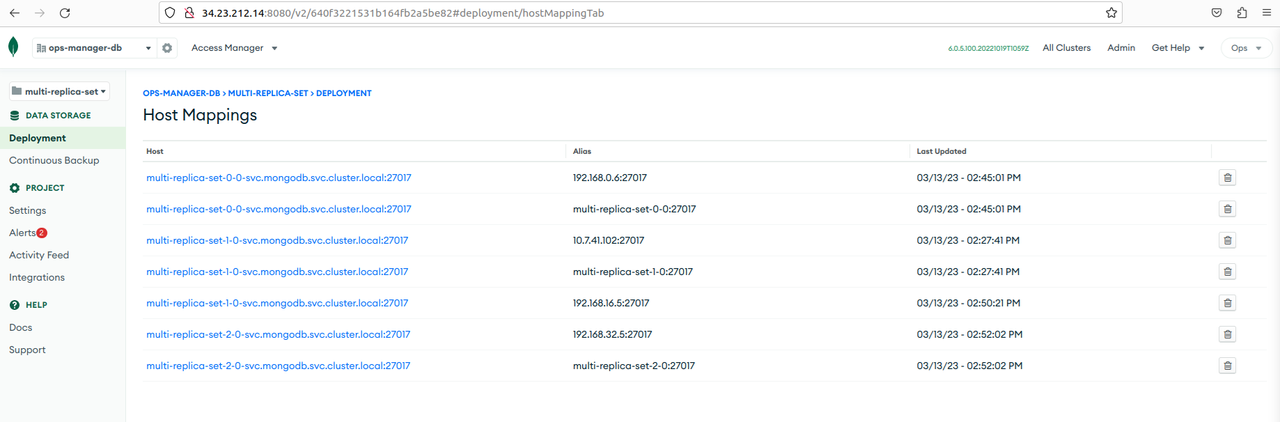
Go to the Ops Manager console, and verify the host mapping for multi replica set deployment is pointing to NSM IP addresses.
To verify:
-
On the Ops Manager console, go to Organizations on the left sidebar, and click
ops-manager-db. -
Choose multiple-replica set from the left drop-down list.
-
Go to Deployments on the left sidebar.
-
On the Host Mappings page, verify the NSM IP addresses.
-
-
On the master cluster, verify the multi cluster is ready using the following command:
kubectl -n mongodb get mdbmExample Output
NAME                PHASE     AGE
multi-replica-set Running 31m -
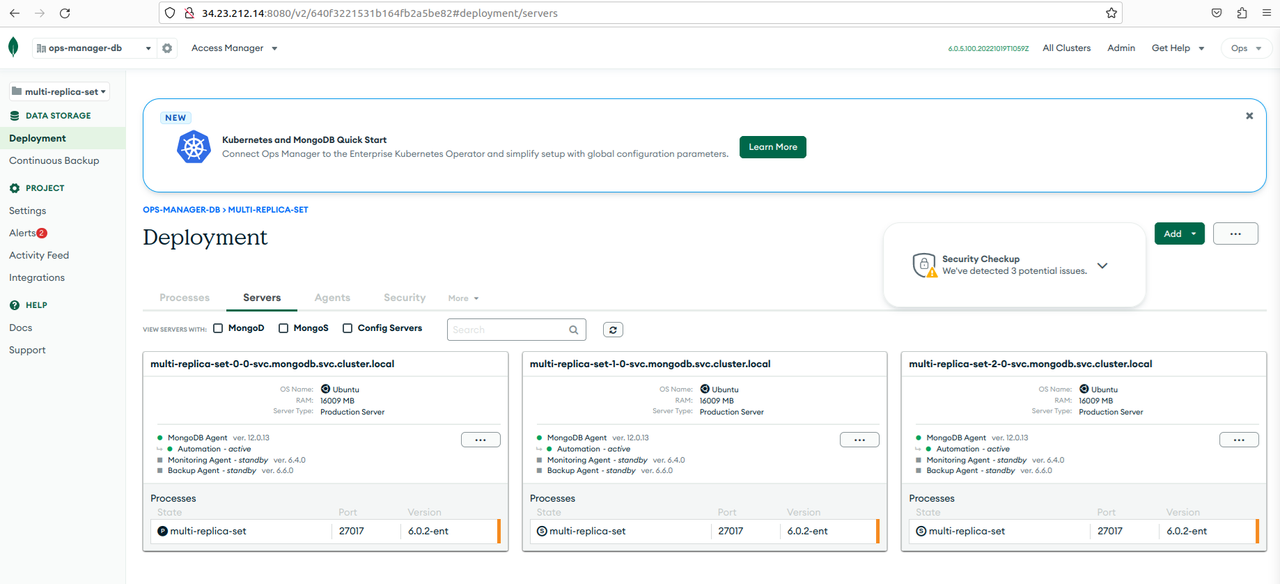
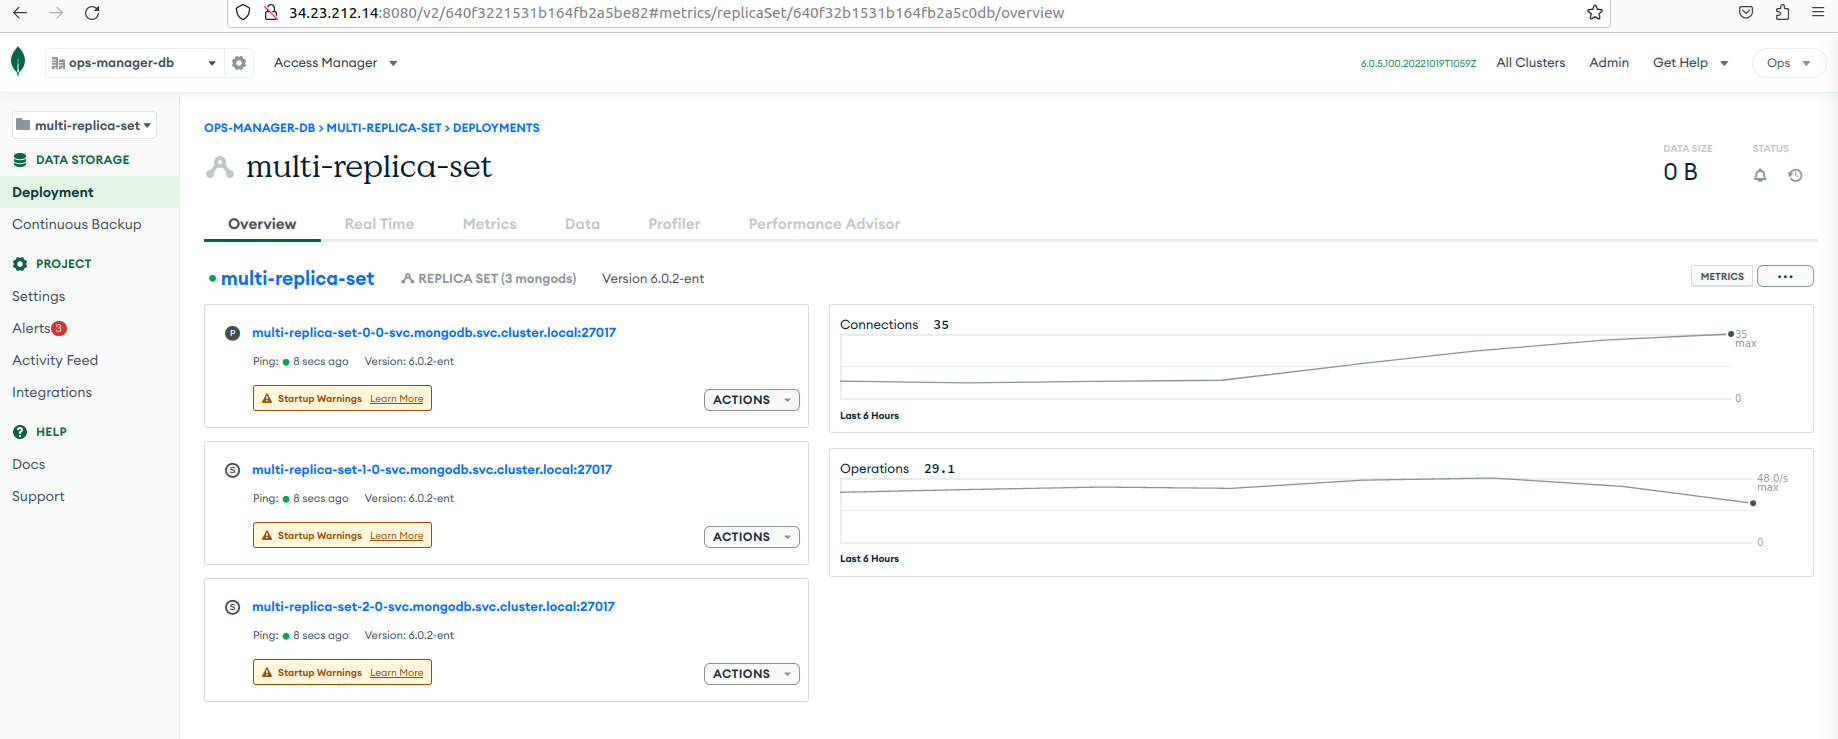
Go the Ops Manager console and verify the multi replica set.
-
Go to the ops-manager-db project and select multi-replica-set from the drop down list, and go to Deployments.
-
Verify each multi-replica-set that you created.
-