Slice Operations
An application slice is a logical grouping of Kubernetes namespaces across multiple clusters. It provides a way to manage the lifecycle of a set of related microservices or applications deployed on multiple clusters as a single entity.
With application slices, you can deploy and manage your applications consistently across multiple clusters, and perform operations such as scaling, monitoring, and upgrading as a group. The slice abstraction allows you to maintain a consistent view of your applications and their dependencies across clusters, regardless of the underlying infrastructure or deployment details.
Create a Slice
Limit the cluster name and slice name to 15 characters or fewer, as exceeding the limit results in a service export error.
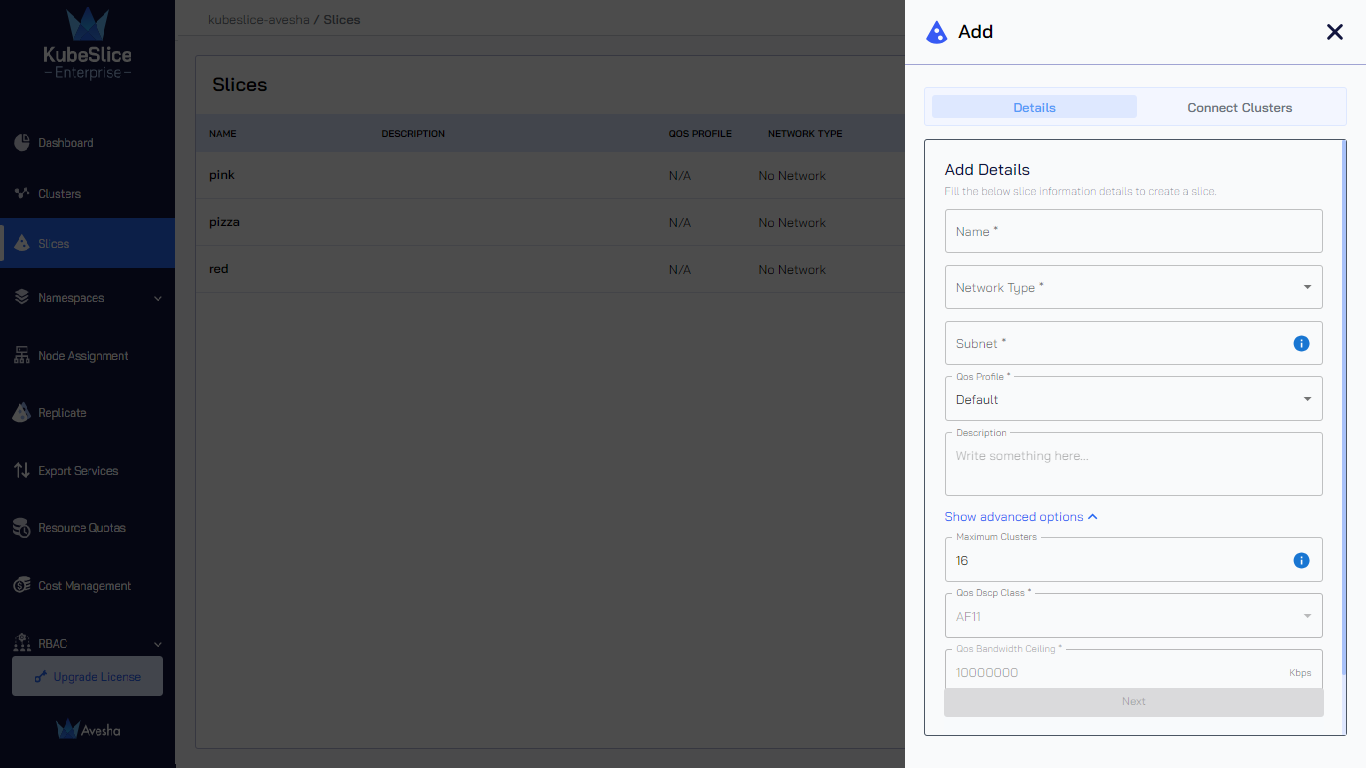
Add Slice
To create a slice:
-
Go to Slices on the left sidebar.
-
On the Slices page, click the Add Slice button.
-
In the Details section, enter the following information:
-
Enter the name of the slice only in lowercase in the Name text box. The value is case-sensitive.
-
Select the slice overlay network type from the Network Type text box. The available network types are:
- Single Network: Select this option if your applications benefit from communication through a dedicated overlay network
- Multi Network: Select this option if your applications are distributed and require the ability to communicate, but do not have need of a dedicated overlay.
- No Network: Select this option if your distributed applications do not require extended-cluster communication.
To know more on the network types for a slice, see slice overlay deployment network mode.
-
Enter the slice subnet in the Subnet text box. This parameter is unavailable if you select No Network in the Network Type text box.
-
Select the QoS profile from the drop-down list. For Default QoS, the QoS Dscp Class is AF11, and the QoS Bandwidth ceiling is 10000000 Kbps (10Gbps). The default values are not editable. For Custom QoS, you must enter the QoS Dscp Class and QoS Bandwidth ceiling values in the Show advanced options section.
This parameter is unavailable if you select No Network in the Network Type text box.
-
Add the description to define the slice in the Description text box.
-
-
In the Show advanced options section, enter the following information:
-
Enter the maximum number of clusters to connect to this slice in the Maximum Clusters text box. The minimum value is 2, and the maximum value is 32. The default value is 16.
-
For Custom QoS, enter DSCP class for the slice traffic in the QoS Dscp Class text box. This parameter is unavailable if you select No Network in the Network Type text box.
-
For Custom QoS, enter the maximum bandwidth in Kbps allowed for the slice traffic in the QoS Bandwidth ceiling text box. This parameter is unavailable if you select No Network in the Network Type text box.
-
OpenVPN is the default gateway type in the Gateway Type text box. This parameter is unavailable if you select No Network in the Network Type text box.
-
-
Click Next to choose the clusters that will connect to the slice.
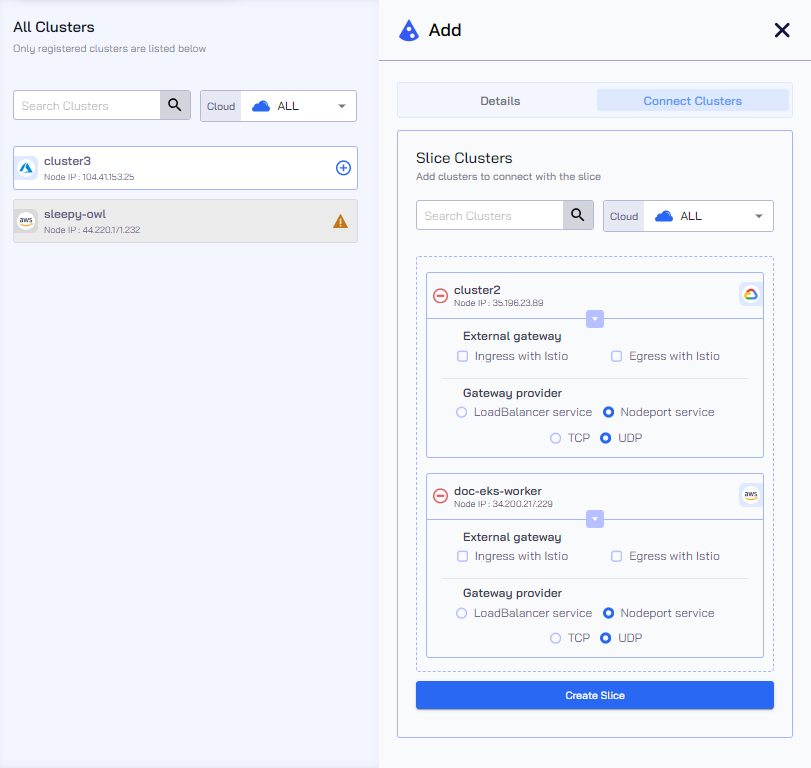
Choose Clusters to Connect
-
Under All Clusters, click the plus icon next to each worker cluster in the list to connect to the slice. You can also search for the available worker clusters in the search box.

-
Under Slice Clusters, you see the list of selected clusters that will be part of a slice. Expand the menu for each cluster.
-
Under External Gateway, you can enable ingress and egress external gateways if Istio is already installed on your worker cluster. To install Istio, see Install Istio.
-
(Optional) Under Gateway provider, you can select the gateway provider, the default value is Nodeport service. You can select LoadBalancer service if you want the connect clusters from private VPCs to the slice.
-
(Optional) Select the TCP or UDP gateway protocol. The default protocol is UDP.
cautionAfter the slice creation, the LoadBalancer service gateway provider and the TCP or UDP gateway protocol are immutable.
However, you can change the gateway provider and protocol after detaching a cluster and reconnecting the same cluster to the slice. To know more, see edit the gateway provider.
-
Click Create Slice.
After slice creation is completed, the slice is listed on the Slices page. The following figure illustrates the Slice creation process is in progress.

View a Slice
To view a slice:
-
On the Slices page, click the arrow icon to the right of the slice.
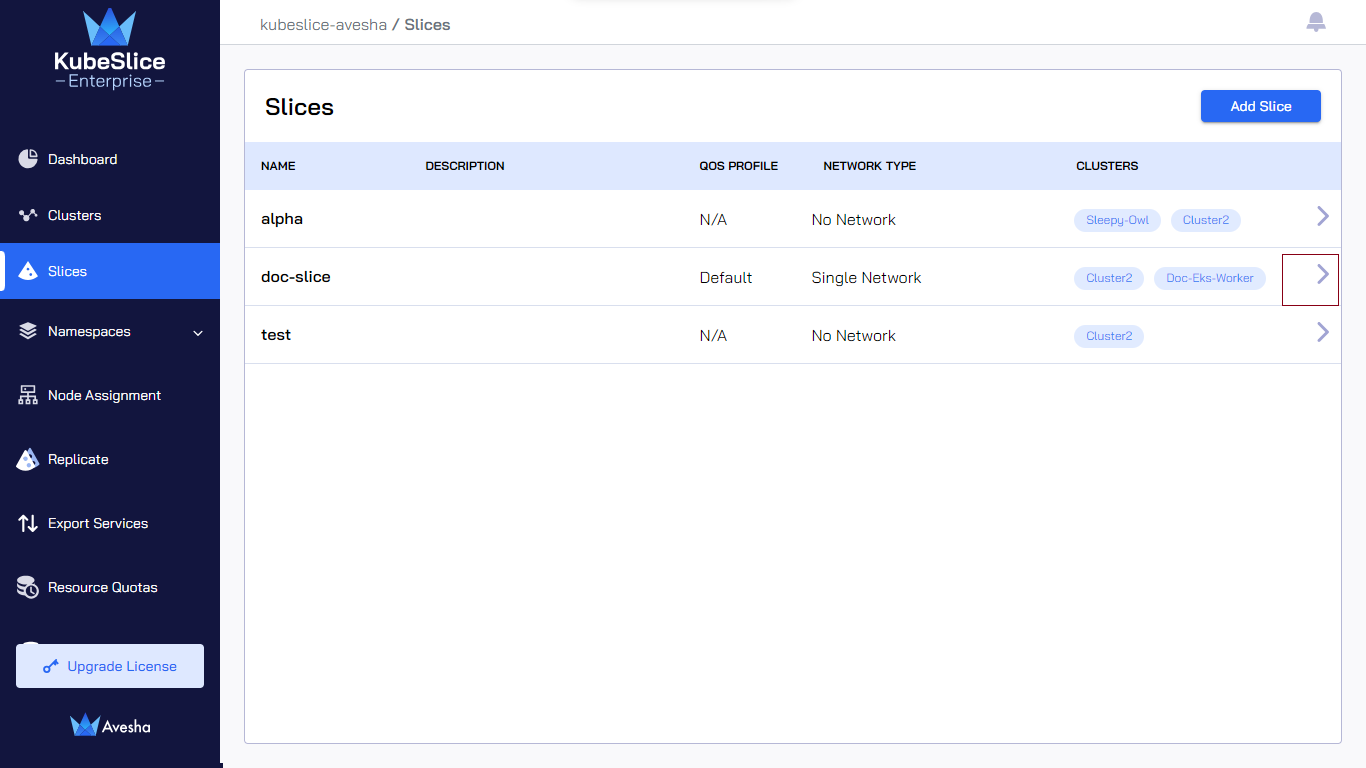
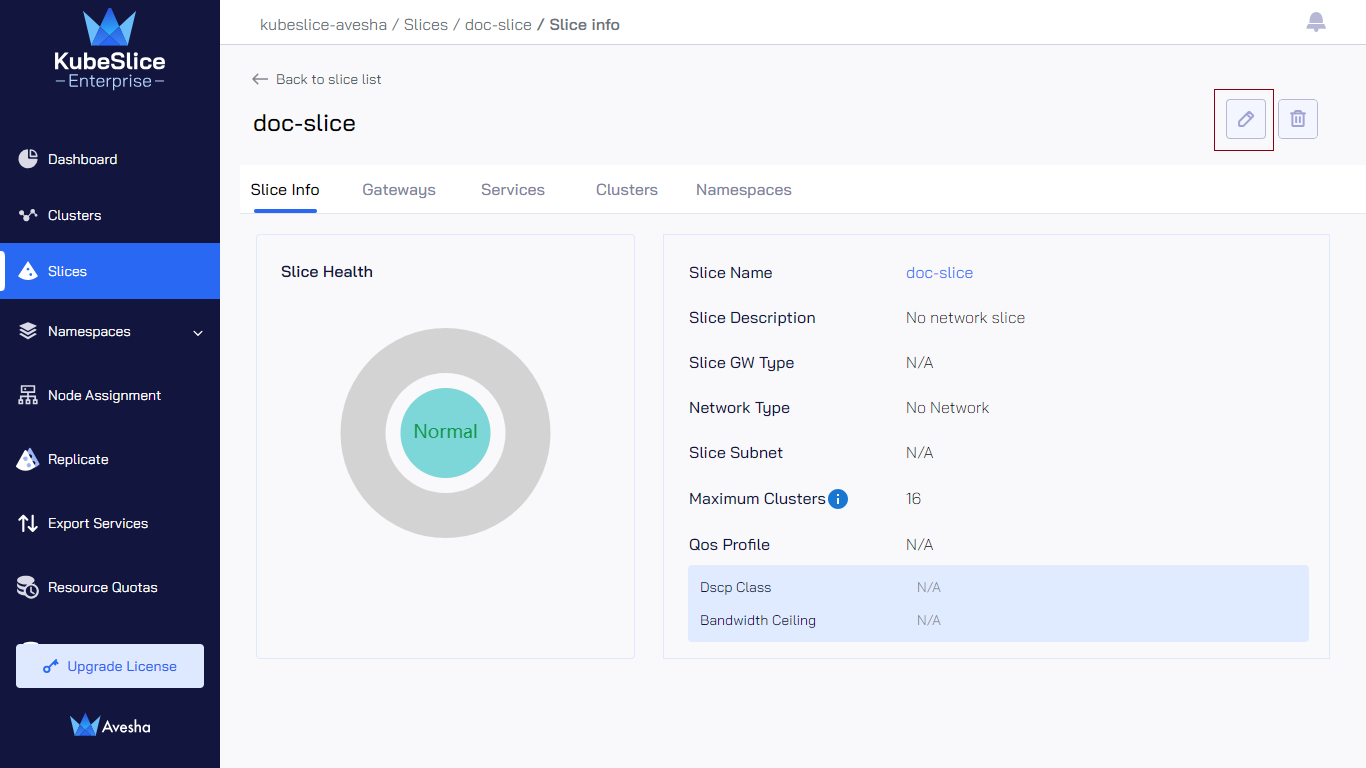
Slice Configuration
-
The Slice Info tab shows the slice information and health of the slice components.
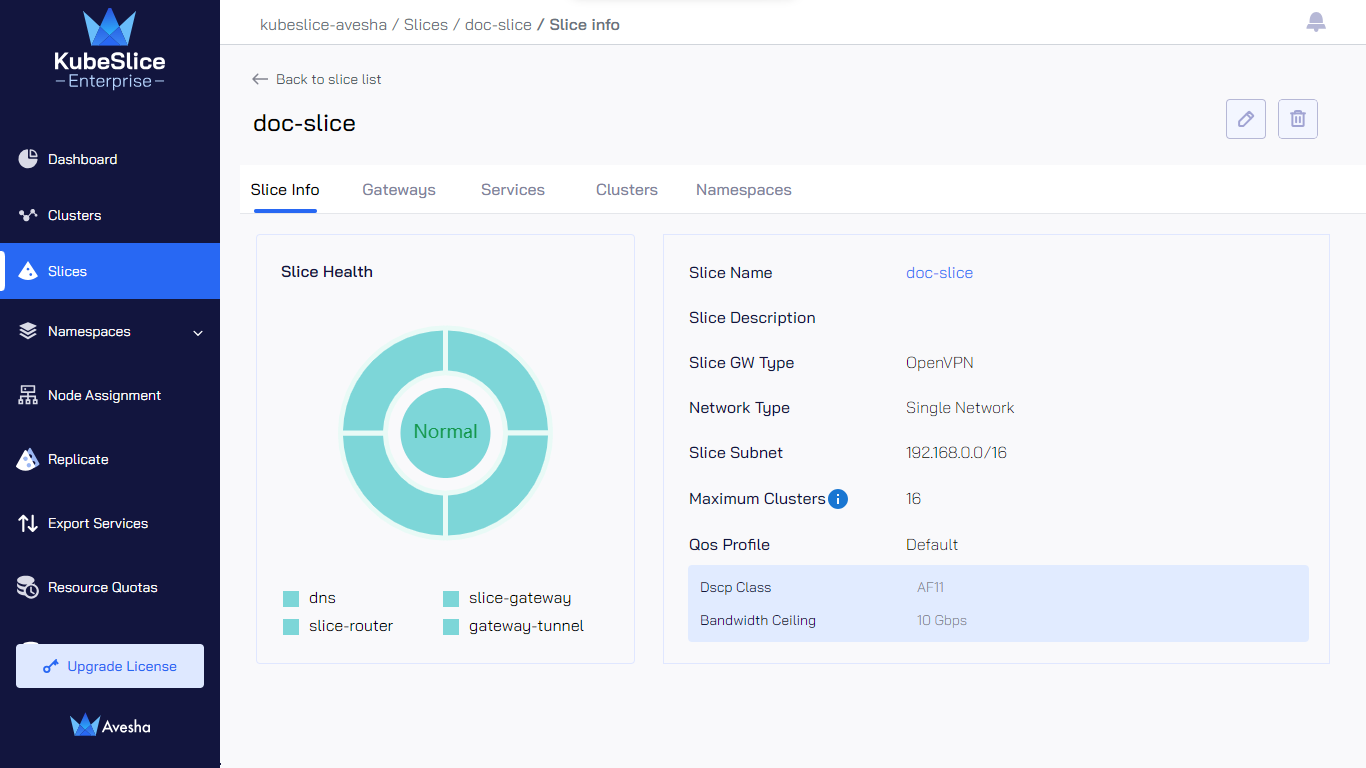
The slice health details are available as pie charts with equally distributed segments representing components. To the right, you see the slice information. For more information on components, see KubeSlice Components.
The equally-distributed segments that represent network components are unavailable for a no-network slice.
To the right, you see the slice information. For more, information on components, see KubeSlice Components.
For a no-network slice, the Slice GW Type, Slice Subnet, and Qos Profile parameters contain N/A.
The following components affect the slice health:
- DNS
- Slice Router
- Slice VPN Gateway
- Ingress (Istio)
- Egress (Istio)
- Gateway Tunnel
When all of the components are operational, the corresponding pie chart shows that the health is Normal. If the slice components are not operational, the corresponding pie chart displays a Warning. To fix the issue in each component, see slice and cluster health issues.
-
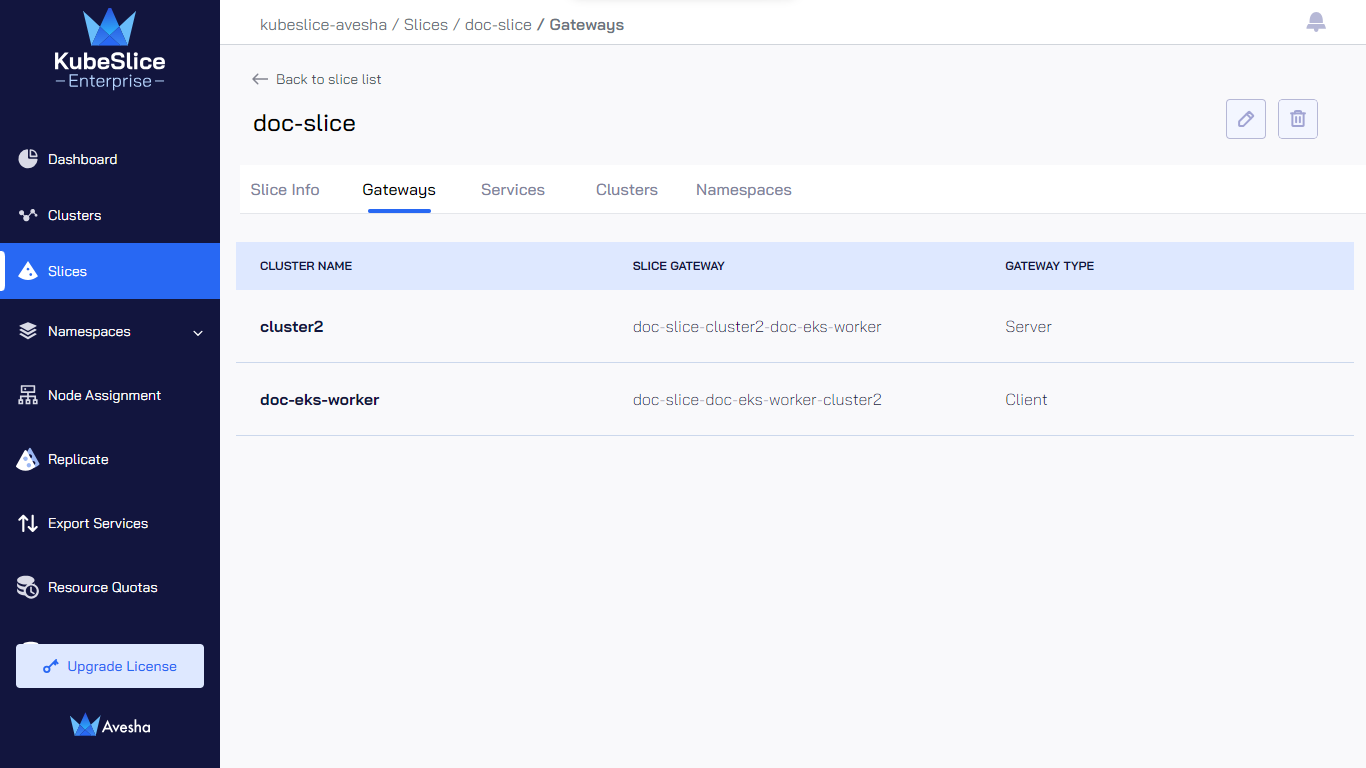
Go to the Gateways tab to view the slice VPN gateways information.
-
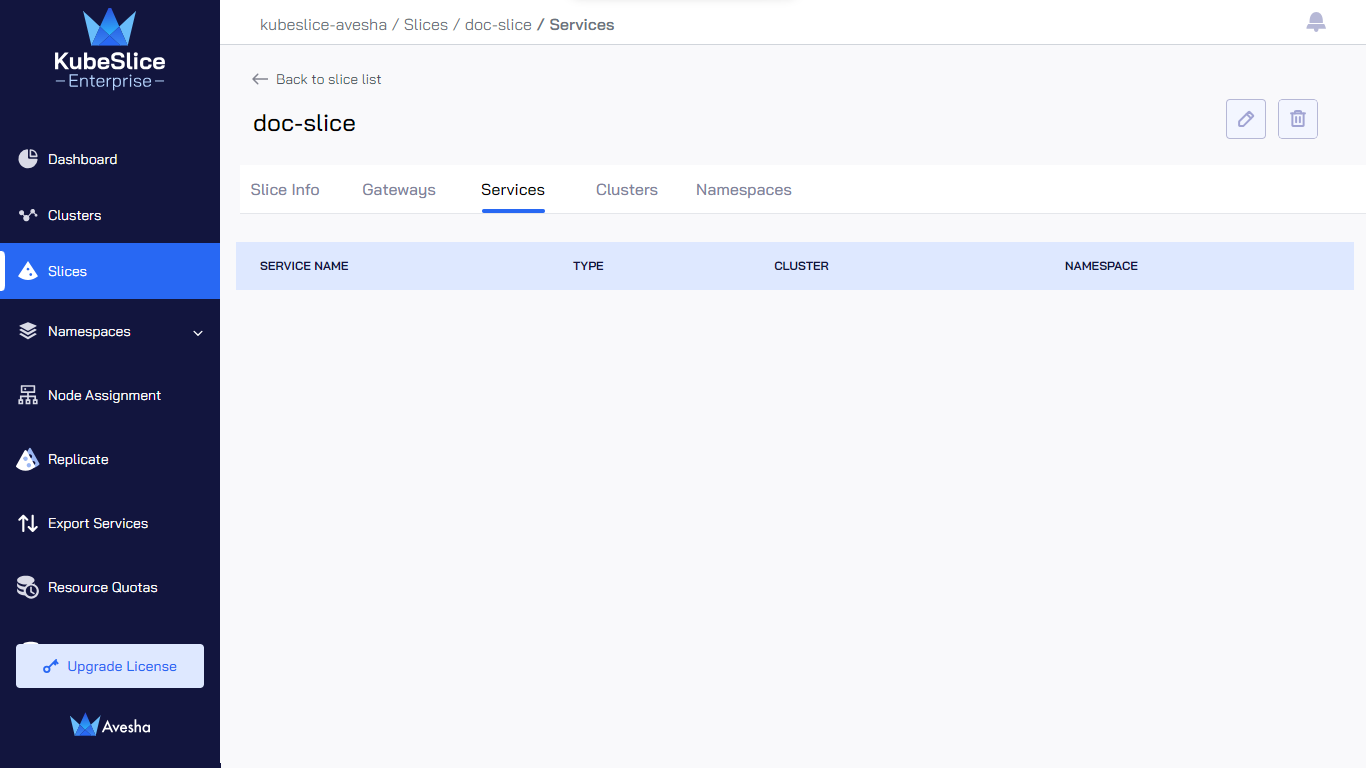
Go to the Services tab to view the service exports or imports on the worker clusters. To configure service export using YAML, see Manage Service Exports.
-
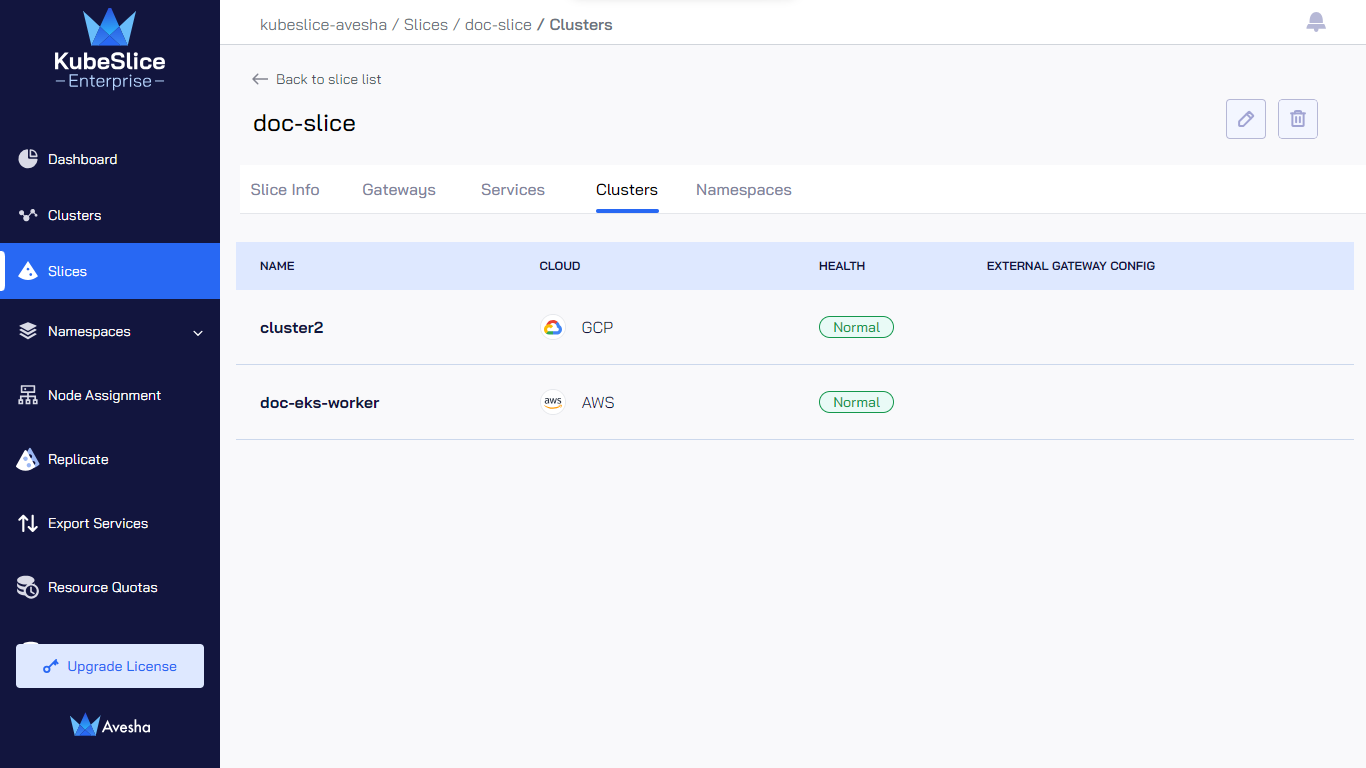
Go to the Clusters tab to view the clusters that are connected to a slice.
-
Go to the Namespaces tab to view the onboarded namespaces. To onboard namespaces, see Manage Namespaces.

Edit a Slice
To edit a slice:
-
On the Slices page, click the arrow icon at the right for the slice to edit.
-
Click the edit icon on the top right.
-
In the Details section, you can only edit the QoS profile for all network type slices, and network type (only for a no-network slice). For the Custom profile, edit the values for QoS Dscp Class and QoS Bandwidth Ceiling in the Show advanced options section.
infoYou can only switch from no-network type to single-network or multi-network type. However, you cannot switch single-network or multi-network type to no-network type. To know more, see switch the overlay network deployment mode.
-
Click the Edit Slice button.
-
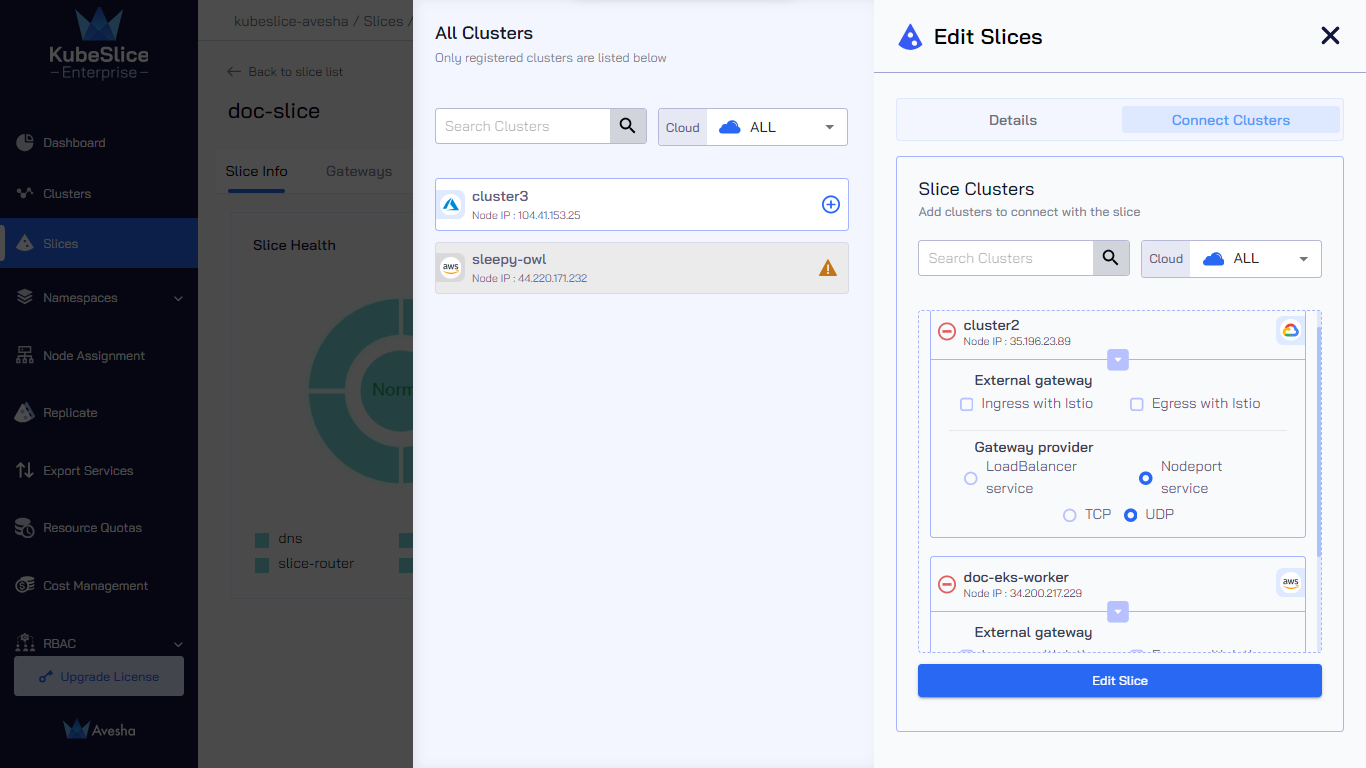
In the Connect Clusters tab, you can perform the following:
-
Under All Clusters, to connect more clusters to the slice, click the plus icon next to each worker cluster in the list.
-
Under Slice Clusters, select or unselect the external gateway configuration: Ingress with Istio or Egress with Istio for worker clusters.
cautionThe LoadBalancer Service gateway provider and the TCP or UDP gateway protocol are immutable after configuration.
However, you can change the gateway provider and protocol after detaching a cluster and reconnecting the same cluster to the slice. To know more, see edit the gateway provider.
-
Under Slice Clusters, unselect the cluster to detach it from the slice. Click the minus icon against a worker cluster to detach it from the slice, enter the text DETACH to confirm, and click the Detach Cluster button.
-
-
Click the Edit Slice button to save the changes.
Edit the Gateway Provider and Protocol
When the Gateway provider is set to Load Balancer and the protocol is set to TCP or UDP, they become immutable. However, you can change the gateway provider and the protocol by performing these steps:
- Detach the cluster from the slice.
- Connect the cluster again to the slice during which you can set the gateway provider and the protocol.
Switch the Slice Overlay Network Deployment Mode
You can only switch from a no-network slice to single/multi-network slice but not vice versa.
Ensure that all the participating clusters on a slice contain KubeSlice Networking enabled for successfully switching it to single/multi-network slice. To check if KubeSlice Networking is enabled on a participating cluster, go to Clusters main landing page. A tick mark indicates against the cluster indicates that KubeSlice Networking is enabled on that cluster.

To switch the network type:
-
On the Slices page, click the arrow icon at the right for the no network slice whose network type you want to switch.
-
On the Slice Info tab, click the edit icon.
-
On the Edit Slices pane, under Edit Details, in the Network Type text box, select
Single NetworkorMulti Networkdepending on what network type you want to switch to. -
Change the content in the Description text box to reflect it as a regular slice.
-
Add the subnet value in the Subnet text box.
-
Select custom from the QoS Profile text box.
-
Click Show advanced options.
-
Under the advanced options, set a Qos Dscp Class by selecting it from the drop-down list.
-
Set a bandwidth in the Qos Bandwidth ceiling text box.
-
Gateway type is added by default.
-
Click Edit Slice.
-
In the Connect Clusters tab, add or remove clusters depending on your requirement.
-
Click Edit Slice to convert the network type of this slice.
-
On the Slices page, verify the NETWORK TYPE and QOS PROFILE of the slice whose network type you just switched.
Delete a Slice
To delete a slice:
-
On the Slices page, click the arrow icon at the right for the slice to delete.
-
Click the delete icon on the top right.
-
Enter DELETE to confirm and click the Delete Slice button.
The following figure illustrates that the deletion of slice is in progress. You can
close the window while the deletion is in progress.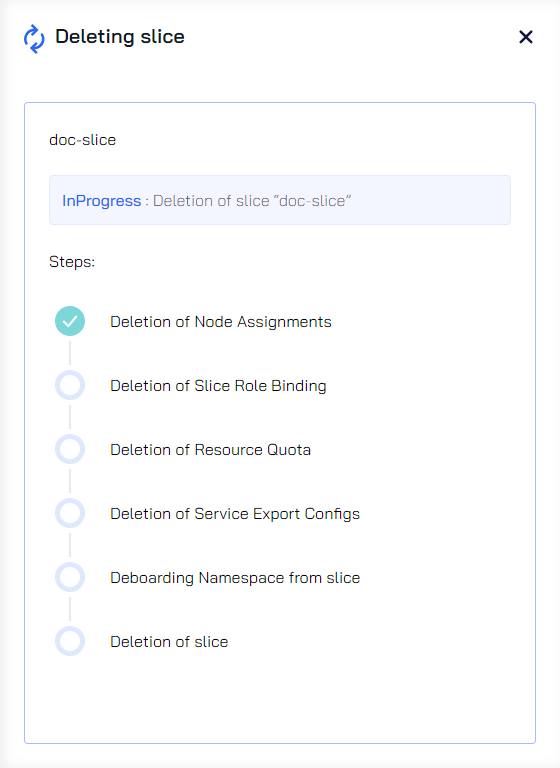
The following figure illustrates that the slice deletion is in progress and that you cannot perform any actions on it.
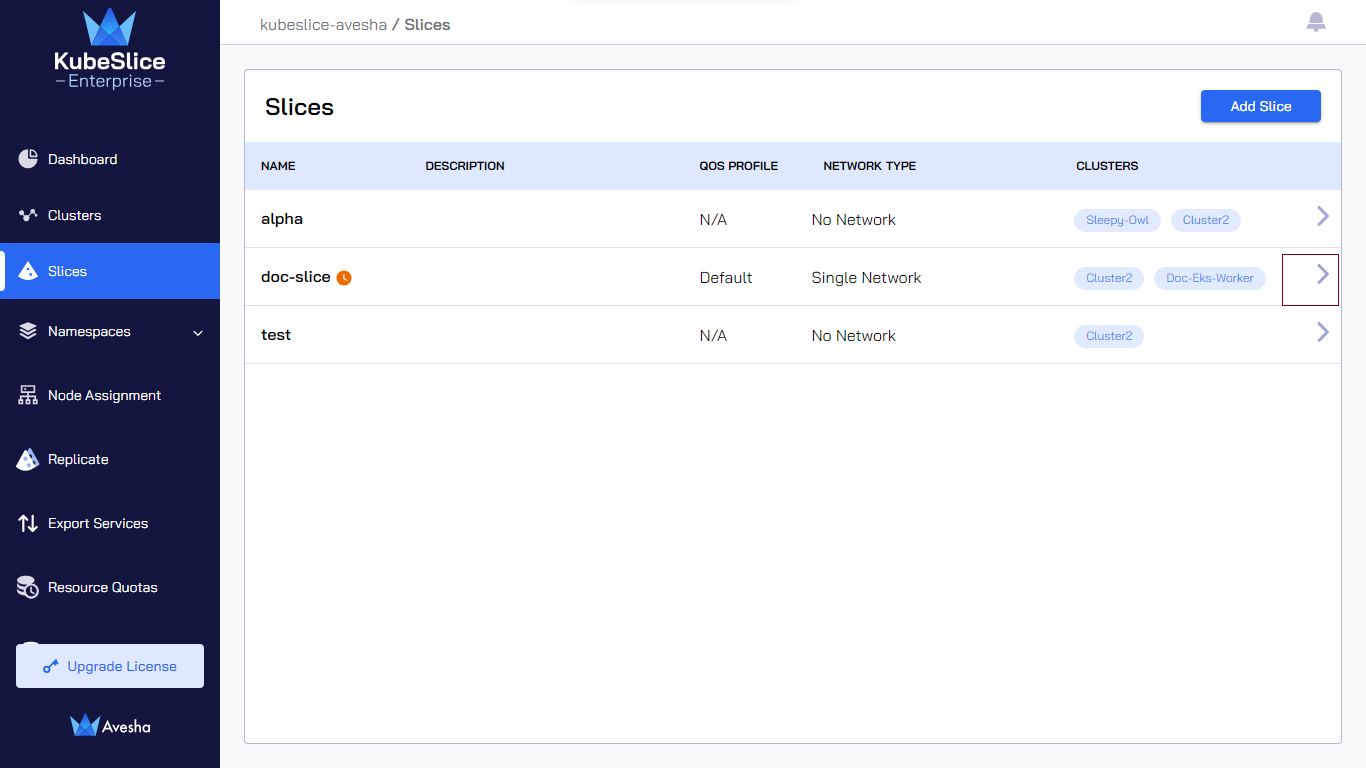
After the slice deletion is completed, on the Slices page, you see that the slice is removed from the list.