Configure Identity Provider
You must integrate KubeSlice with a supported Identity Provider (IdP) to access project resources and enable Slice RBAC. Currently, only OIDC is supported for IdP integration with the KubeSlice Manager. To configure the IdP, you need to provide OpenID configuration parameters.
As a prerequisite, ensure that the clusters are configured with the Identity Provider. IdP must be configured in worker clusters. For more information, see Prerequisites.
Generating IdP Callback URL
To generate the IdP callback URL, you must obtain the hostname of the KubeSlice UI Proxy service running on the Kubeslice Controller.
To get the kubeslice-ui-proxy hostname, use the following command:
kubectl get svc -n kubeslice-controller
Authorizing IdP Callback URL
Your configured IdP settings must authorize the KubeSlice IdP callback URL.
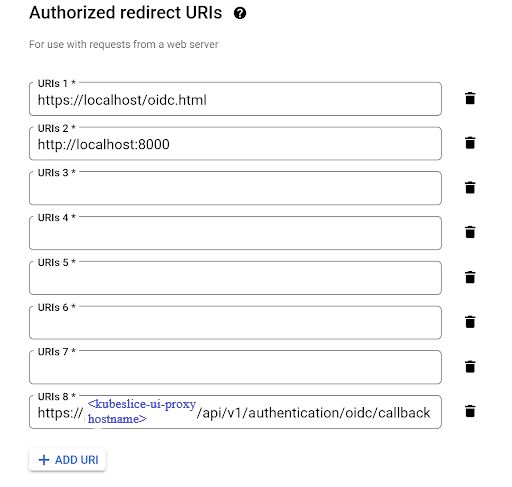
- Create the callback URL by adding
https://<kubeslice-ui-proxy-servicename>prefix and appending the path/api/v1/authentication/oidc/callbackto the hostname. - Configure the IdP to whitelist the callback URL.
Example IdP Callback URL
As an instance, if the hostname of the kubeslice-ui-proxy service is abcd.us-east-1.elb.amazonaws.com, the corresponding callback
URL will be: https://abcd.us-east-1.elb.amazonaws.com/api/v1/authentication/oidc/callback.
IdP Configuration Parameters
The following tables describe the parameters in the configuration file used to create the IdP configuration file.
These parameters are required to configure the IdP configuration YAML file.
| Parameter | Parameter Type | Description | Required |
|---|---|---|---|
| idp | Object | This describes the configuration parameters required to enable the IdP. | Optional |
| Parameter | Parameter Type | Description | Required |
|---|---|---|---|
| type | String | This is the type of the IdP to be configured. For example, oidc can be used for the IdP. | Mandatory |
| name | String | This is the name of the IdP that appears on the login screen. For example, "SIGN WITH GOOGLE" appears if Google IdP is configured. | Mandatory |
| enabled | Boolean | This is the value to enable or disable the IdP configuration. | Mandatory |
| oidc | Object | This includes the OIDC configuration parameters. | Mandatory |
OIDC Configuration Parameters
These parameters are required to configure the OIDC.
| Parameter | Parameter Type | Description | Required |
|---|---|---|---|
| server | AlphaNumeric | This is the OIDC proxy responsible for user authentication and impersonation. | Mandatory |
| discoveryURL | String | This is open-id configuration discovery URL. If discovery URL is not available, then specify issuerMetadata. | Optional |
| issuerMetadata | Object | This includes the Identity Provider metadata configuration parameters. | Optional |
| credentials | Object | This includes the open-id access credentials. | Mandatory |
Issuer Metadata Parameters
These parameters are required to configure the issuer metadata.
| Parameter | Parameter Type | Description | Required |
|---|---|---|---|
| issuer | String | This is the Identity Provider issuer name. | Mandatory |
| authorization_endpoint | String | This is the URL of the OpenID Provider's OAuth 2.0 Authorization Endpoint. | Mandatory |
| token_endpoint | String | This is the URL of the OpenID Provider's OAuth 2.0 Token Endpoint. | Mandatory |
| userinfo_endpoint | String | This is the URL of the OpenID Provider's UserInfo Endpoint. | Mandatory |
| jwks_uri | String | This URL of the OP's JSON Web Key Set JWK document. | Mandatory |
Credentials Parameters
These parameters are required to access the open-id configuration.
| Parameter | Parameter Type | Description | Required |
|---|---|---|---|
| client_id | String | This is the client id. | Mandatory |
| client_secret | String | This is the client secret. | Mandatory |
| response_type | String | This is the type of response generated by IdP. The supported values are id_token or code. | Mandatory |
| scope | String | This is the scope of the attributes to be included in id_token by the IdP. Ensure the scope defined here must contain the claims defined for user and group identification in the Kubernetes cluster's OIDC configuration. | Mandatory |
| state | String | The unmodified state value from the request. This parameter is required for Okta IdP configuration only. | Mandatory |
Create IdP Configuration YAML File
To configure the OpenID provider, you can retrieve its configuration either through the OpenID Issuer Discovery or OpenID Provider Metadata. OpenID Issuer Discovery helps determine the location of the OpenID provider, but this process is optional. To configure Issuer Discovery, use the parameter "discoveryUrl". On the other hand, OpenID Providers have metadata that describes their configuration, which is used by OpenID Connect to retrieve the configuration information. To configure OpenID Provider Metadata, use the parameter "issuerMetadata".
Either discoveryUrl or issuerMetadata must be required. If both are provided, the issuerMetadata takes precedence over the discoveryUrl.
Amazon Cognito IdP Configuration YAML
The following is the Amazon Cognito IdP configuration YAML file.
kubeslice:
  ui:
    # The IdP Configuration for seamless login experience to KubeSlice
    idp:
      # The type of IdP. Currently, only OIDC is supported.
      - type: oidc
        # The name of IdP to show up on Login Screen.
        name: Amazon Cognito
        # Flag to enable or disable the current IdP configuration.
        enabled: "true"
        # The OIDC Configuration
        oidc:
          discoveryUrl: https://cognito-idp.<aws-region>.amazonaws.com/<aws_cognito_pool_id>/.well-known/openid-configuration
          credentials:
            # The client ID
            client_id: <client_id>
            # The client secret
            client_secret: <client_secret>
            # The type of response generated by IdP.
            # Possible values: "id_token", "code"
            response_type: code
            # The scope of the attributes to be included in id_token by the IdP.
            # Please note that the scope defined here must contain the claims defined for user and group
            # identification in the Kubernetes Cluster's OIDC configuration.
            scope: "openid email"
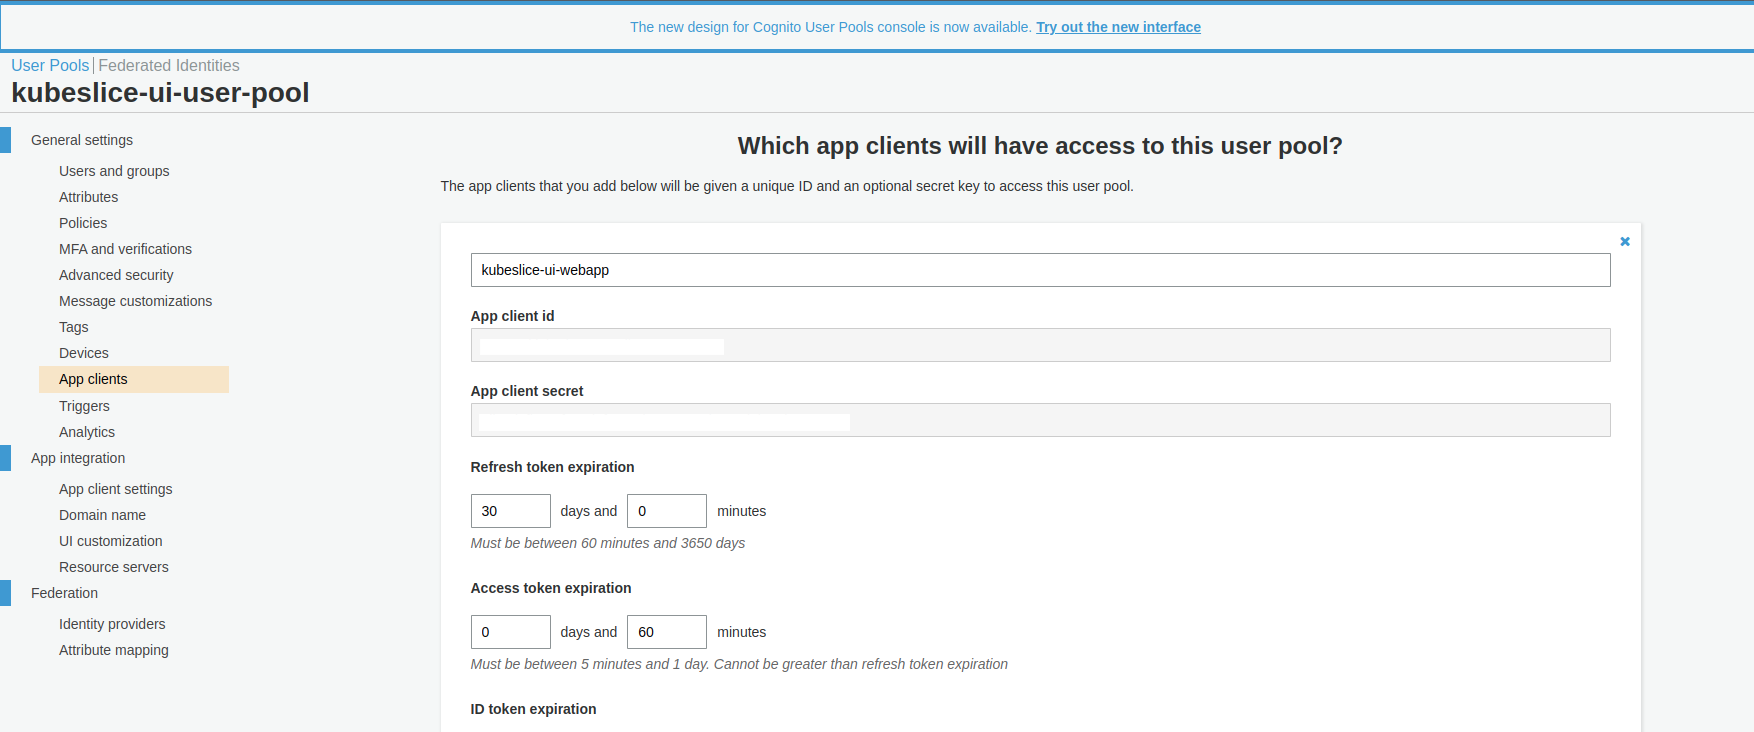
You can find your user pool ID on the General settings tab in the Amazon Cognito console.
Under General settings > App clients, you can find <client_id> and <client_secret>. For more information,
see Amazon Cognito user pools.
Google IdP Configuration YAML
The IdP configuration template is shown below and includes configuration information for Google IdP.
kubeslice:
  ui:
    # The IdP Configuration for seamless login experience to KubeSlice
    idp:
      # The type of IdP. Currently, only OIDC is supported.
      - type: oidc
        # The name of IdP to show up on Login Screen.
        name: Google
        # Flag to enable or disable the current IdP configuration.
        enabled: true
        # The OIDC Configuration
        oidc:
          # The OIDC proxy server, if applicable.
          # Example: GKE creates an OIDC Proxy which is responsible for user auth and impersonation
          # Ref: https://cloud.google.com/kubernetes-engine/docs/how-to/oidc#kubernetes-objects
          # Not applicable if you are using EKS
          server: <Authentication-Proxy-URL>
          # The OIDC Configuration Discovery URL.
          # This is the URL to Well-Known OIDC Configuration.
          # Example: https://accounts.google.com/.well-known/openid-configuration
          discoveryUrl: https://accounts.google.com/.well-known/openid-configuration
          # If discovery URL is not available, the following must be specified
          issuerMetadata:
            issuer: https://accounts.google.com
            authorization_endpoint: https://accounts.google.com/o/oauth2/v2/auth
            token_endpoint: https://oauth2.googleapis.com/token
            userinfo_endpoint: https://openidconnect.googleapis.com/v1/userinfo
            jwks_uri: https://www.googleapis.com/oauth2/v3/certs
          # The OIDC Credentials
          credentials:
            # The client ID
            client_id: <redacted>.apps.googleusercontent.com
            # The client secret
            client_secret: <redacted-secret>
            # The type of response generated by IdP.
            # Possible values: "id_token", "code"
            response_type: code
            # The scope of the attributes to be included in id_token by the IdP.
            # Please note that the scope defined here must contain the claims defined for user and group
            # identification in the Kubernetes Cluster's OIDC configuration.
            scope: "openid email"
The following is the Google IdP configuration YAML file that includes discoveryUrl.
kubeslice:
  ui:
    idp:
      - type: oidc
        name: Google
        enabled: true
        oidc:
          server: <Authentication-Proxy-URL> # Not applicable if you are using EKS
          discoveryUrl: https://accounts.google.com/.well-known/openid-configuration
          credentials:
            client_id: <redacted>.apps.googleusercontent.com
            client_secret: <redacted-secret>
            response_type: code
            scope: "openid email"
The following is the Google IdP configuration YAML file that includes issuerMetadata.
kubeslice:
  ui:
    idp:
      - type: oidc
        name: Google
        enabled: true
        oidc:
          server: <Authentication-Proxy-URL> # Not applicable if you are using EKS
          issuerMetadata:
            issuer: https://accounts.google.com
            authorization_endpoint: https://accounts.google.com/o/oauth2/v2/auth
            token_endpoint: https://oauth2.googleapis.com/token
            userinfo_endpoint: https://openidconnect.googleapis.com/v1/userinfo
            jwks_uri: https://www.googleapis.com/oauth2/v3/certs
          credentials:
            client_id: <redacted>.apps.googleusercontent.com
            client_secret: <redacted-secret>
            response_type: code
            scope: "openid email"
Okta Configuration YAML File
The IdP configuration template is shown below and includes configuration information for Okta IdP.
kubeslice:
  ui:
    # The IdP Configuration for seamless login experience to KubeSlice
    idp:
      # The type of IdP. Currently, only OIDC is supported.
      - type: oidc
        # The name of IdP to show up on Login Screen.
        name: okta
        # Flag to enable or disable the current IdP configuration.
        enabled: "true"
        # The OIDC Configuration
        oidc:
          # The OIDC proxy server, if applicable.
          # Example: GKE creates an OIDC Proxy which is responsible for user auth and impersonation
          # Ref: https://cloud.google.com/kubernetes-engine/docs/how-to/oidc#kubernetes-objects
          # server: https://kubeslice-ui.my-server-name.com
          # The OIDC Configuration Discovery Url.
          discoveryUrl: https://mycomputer.okta.com/oauth2/aus7icww4rHDi6UtT5d7/.well-known/openid-configuration
          # If discovery URL is not available, the following must be specified
          #issuerMetadata:
          #  issuer: https://mycomputer.okta.com/oauth2/aus7icww4rHDi6UtT5d7
          #  authorization_endpoint: https://mycomputer.okta.com/oauth2/aus7icww4rHDi6UtT5d7/v1/authorize
          #  token_endpoint: https://mycomputer.okta.com/oauth2/aus7icww4rHDi6UtT5d7/v1/token
          #  jwks_uri: https://mycomputer.okta.com/oauth2/aus7icww4rHDi6UtT5d7/v1/keys
          # The OIDC Credentials
          credentials:
            client_id: <client_id>
            client_secret: <client_secret>
            response_type: code
            scope: "openid email offline_access"
            state: "<state-value>"
GitHub Configuration YAML
The IdP configuration template is shown below and includes configuration information for GitHub IdP.
kubeslice:
  ui:
    idp:
      - type: oidc
        name: Github
        enabled: true
        oidc:
          discoveryUrl: https://dex.server.kubeslice.com/.well-known/openid-configuration
          credentials:
            client_id: your-cluster-client-id
            client_secret: your-cluster-client-secret
            response_type: code
            scope: "openid email groups"
            state: "<state-value>"
Apply IdP Configuration YAML File
The idp-configuration.yaml file needs to be applied on the controller cluster using the following command:
helm upgrade kubeslice-ui kubeslice/kubeslice-ui -f <idp-configuration.yaml> -n kubeslice-controller
Role Assignment Configuration Parameters
These parameters are required to assign a predefined role to a project users or group of project users. They are configured in the Role Assignment configuration YAML.
| Parameter | Parameter Type | Description | Required |
|---|---|---|---|
| apiversion | String | The RBAC API version. The value must be rbac.authorization.k8s.io/v1. | Mandatory |
| kind | String | The name of a Mandatory particular object schema. The value must be RoleBinding. | Mandatory |
| metadata | Object | The metadata describes the parameters (names and types) and attributes that have been applied. | Mandatory |
| roleRefs | Object | This a reference to the role being granted. | Mandatory |
| subjects | Object | This holds the list of subjects (users, groups, or service accounts). | Mandatory |
Metadata Parameters
These parameters are required to assign the roles.
| Parameter | Parameter Type | Description | Required |
|---|---|---|---|
| name | String | The name of the role to be assigned to the project user or group of project users. | Mandatory |
| namespace | String | The project namespace that the user or group has access to. | Mandatory |
Role Reference Parameters
These parameters are required to assign the predefined role to the OIDC group or a project user.
| Parameter | Parameter Type | Description | Required |
|---|---|---|---|
| apiGroup | String | The RBAC API version. The value must be rbac.authorization.k8s.io. | Mandatory |
| kind | String | The name of a Mandatory particular object schema. The value must be Role. | Mandatory |
| name | String | The predefined role names. For example, kubeslice-read-write and kubeslice-read-only are the predefined roles in KubeSlice. |
Subject Parameters
These parameters are required to provide the OIDC group name and/or the individual user email address.
| Parameter | Parameter Type | Description | Required |
|---|---|---|---|
| apiGroup | String | The RBAC API version. The value must be rbac.authorization.k8s.io. | Mandatory |
| kind | String | The name of a Mandatory particular object schema. The value can be Group, User, or both. | Mandatory |
| name | String | This is the OIDC group name, individual user's email address, or both. | Mandatory |
Assigning a Role to Project Users
You must assign role permissions to the project users for them to access the project resources.
By assigning a role, you grant the permissions defined in the role to project users or groups of project users, who login to KubeSlice Manager
through IdP. A user must have role permissions to access project resources. You can use the kubeslice-read-write and
kubeslice-read-only predefined roles.
Grant the group access or user-based access to the project depending on your requirements.
Create Role Assignment Configuration YAML
To understand more about the parameters, see Role Assignment Configuration Parameters.
apiVersion: rbac.authorization.k8s.io/v1
kind: RoleBinding
metadata:
  name: <relevant-role-assignment-name>
  namespace: <project-namespace>
roleRef:
  apiGroup: rbac.authorization.k8s.io
  kind: Role
  name: <role-name> # e.g: kubeslice-read-write or kubeslice-read-only
subjects:
  - apiGroup: rbac.authorization.k8s.io
    kind: Group
    name: <group-prefix>:<group-name> # This will grant Role access to all users in the group. Make sure that group claim is enabled with IdP.
  - apiGroup: rbac.authorization.k8s.io
    kind: User
    name: <user-email> # Make sure that you have email claim is enabled with IdP.
Example Role Assignment YAML
apiVersion: rbac.authorization.k8s.io/v1
kind: RoleBinding
metadata:
  name: rbac-oidc-group-aveshasystems-com
  namespace: kubeslice-avesha
roleRef:
  apiGroup: rbac.authorization.k8s.io
  kind: Role
  name: kubeslice-read-write
subjects:
- apiGroup: rbac.authorization.k8s.io
  kind: Group
  name: oidc-group:myenterprise.com # This will grant read-write assess to all users in the group `myenterprise.com`.
- apiGroup: rbac.authorization.k8s.io
  kind: User
  name: kubernetes-user@myenterprise.com
Example OKTA Role Assignment YAML
apiVersion: rbac.authorization.k8s.io/v1
kind: RoleBinding
metadata:
  name: rbac-oidc-group-aveshasystems-com
  namespace: kubeslice-avesha
roleRef:
  apiGroup: rbac.authorization.k8s.io
  kind: Role
  name: kubeslice-read-write
subjects:
- apiGroup: rbac.authorization.k8s.io
  kind: Group
  name: kubeslice-okta-group
Apply YAML File
The following information is required to apply the YAML.
| Parameter | Description |
|---|---|
<project namespace> | The project namespace. For example, kubeslice-avesha is a project namespace. |
Use the roleassignment-configuration.yaml file that you have created and apply it on the project namespace.
Use the following command to apply the YAML file:
kubectl apply -f roleassignment-configuration.yaml -n kubeslice-<project-namespace>
Sign In with your Identity Provider
After successfully integrating the identity provider with KubeSlice, you can sign-in with the identity provider using Kubeslice Mananager. Follow the instructions in KubeSlice Manager.
The login screen displays the identity provider name you provided in the IdP configuration YAML file.
Rancher Integration
KubeSlice supports GitHub and Rancher as auth providers for authenticating Rancher clusters to log into the KubeSlice Manager, a user interface to manage slices, namespaces and worker clusters. This topic describes how to authenticate GitHub and Rancher to enable logging into the KubeSlice Manager.
Prerequisites
Before you begin, ensure to meet these prerequisites:
- You are a local user on the Rancher-managed clusters and have the Rancher admin privileges.
Configure Rancher as an Auth Provider
You must create project/namespace roles and assign them to users on Rancher. You must also create projects on the Rancher-managed controller cluster and authorize users to access the KubeSlice Manager.
Create Roles
A Rancher admin can create a project and enable Rancher as the auth provider. For other users, create roles using YAML as described below.
Creating roles is only required if you need access to create a project.
If you are a Rancher admin, skip this step to create projects on the controller cluster.
Create Roles through the YAML File
To create roles from the kubectl shell terminal:
-
From the global menu, go to the controller cluster and click the kubectl shell.

-
On the terminal, run the following command to create the KubeSlice Manager role.
cat <<EOF | kubectl apply -f -
apiVersion: management.cattle.io/v3
kind: RoleTemplate
metadata:
  name: kubeslice-ui-manager
administrative: false
builtin: false
clusterCreatorDefault: false
context: project
description: RoleTemplate to grant minimum required privileges to access KubeSlice UI Manager through Kube-Proxy
displayName: KubeSlice UI Manager
external: false
hidden: false
projectCreatorDefault: false
rules:
  - apiGroups:
      - ""
    resources:
      - Services
    verbs:
      - get
      - list
  - apiGroups:
      - ""
    resources:
      - services/proxy
    verbs:
      - create
      - delete
      - get
      - list
      - patch
      - update
      - watch
EOF -
Press the Enter key to execute the command.
-
Run the following command to create the KubeSlice Read Write role.
cat <<EOF | kubectl apply -f -
apiVersion: management.cattle.io/v3
kind: RoleTemplate
metadata:
  name: kubeslice-read-write
administrative: false
builtin: false
clusterCreatorDefault: false
context: project
description: RoleTemplate to grant minimum required privileges to perform KubeSlice Read-Write Operations
displayName: KubeSlice Read Write
external: false
hidden: false
locked: false
projectCreatorDefault: false
rules:
  - apiGroups:
      - controller.kubeslice.io
    resources:
      - clusters
    verbs:
      - create
      - delete
      - update
      - patch
      - get
      - list
      - watch
  - apiGroups:
      - controller.kubeslice.io
    resources:
      - sliceconfigs
    verbs:
      - create
      - delete
      - update
      - patch
      - get
      - list
      - watch
  - apiGroups:
      - controller.kubeslice.io
    resources:
      - serviceexportconfigs
    verbs:
      - create
      - delete
      - update
      - patch
      - get
      - list
      - watch
  - apiGroups:
      - worker.kubeslice.io
    resources:
      - workersliceconfigs
    verbs:
      - get
      - list
      - watch
  - apiGroups:
      - worker.kubeslice.io
    resources:
      - workerslicegateways
    verbs:
      - get
      - list
      - watch
  - apiGroups:
      - worker.kubeslice.io
    resources:
      - workerserviceimports
    verbs:
      - get
      - list
      - watch
  - apiGroups:
      - controller.kubeslice.io
    resources:
      - clusters/status
    verbs:
      - update
      - patch
      - get
  - apiGroups:
      - controller.kubeslice.io
    resources:
      - sliceconfigs/status
    verbs:
      - update
      - patch
      - get
  - apiGroups:
      - controller.kubeslice.io
    resources:
      - serviceexportconfigs/status
    verbs:
      - update
      - patch
      - get
  - apiGroups:
      - worker.kubeslice.io
    resources:
      - workersliceconfigs/status
    verbs:
      - update
      - patch
      - get
  - apiGroups:
      - worker.kubeslice.io
    resources:
      - workerslicegateways/status
    verbs:
      - update
      - patch
      - get
  - apiGroups:
      - worker.kubeslice.io
    resources:
      - workerserviceimports/status
    verbs:
      - update
      - patch
      - get
  - apiGroups:
      - ""
    resources:
      - secrets
    verbs:
      - get
      - list
      - watch
EOF -
Press the Enter key to execute the command.
-
Navigate to the global menu > User Authentication > Roles.
-
On the Roles page, under the Project/Namespaces, the newly created roles are listed.
Create Projects and Authenticating Users
You must create the project namespaces and authenticate users.
Creating projects is mandatory and common for adding any auth provider on Rancher. If you are not a Rancher admin, then you need to create two roles and get them assigned to you.
Currently, KubeSlice supports GitHub as the external auth provider on Rancher.
To create projects and authorize Rancher users:
-
Go back to the Global View and go to the controller cluster.
-
On the controller cluster page, click Projects/Namespaces. You must tie each of the two roles separately to a project. Click Create Project.
-
On the Project: Create page, for Name, add a name and click Create.
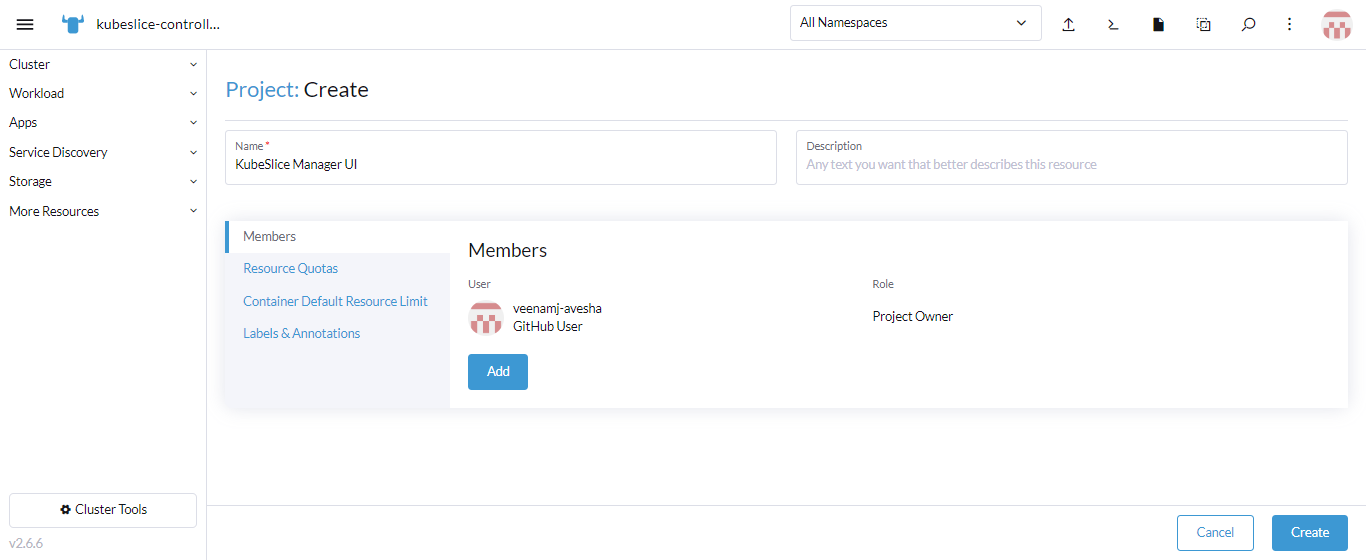
-
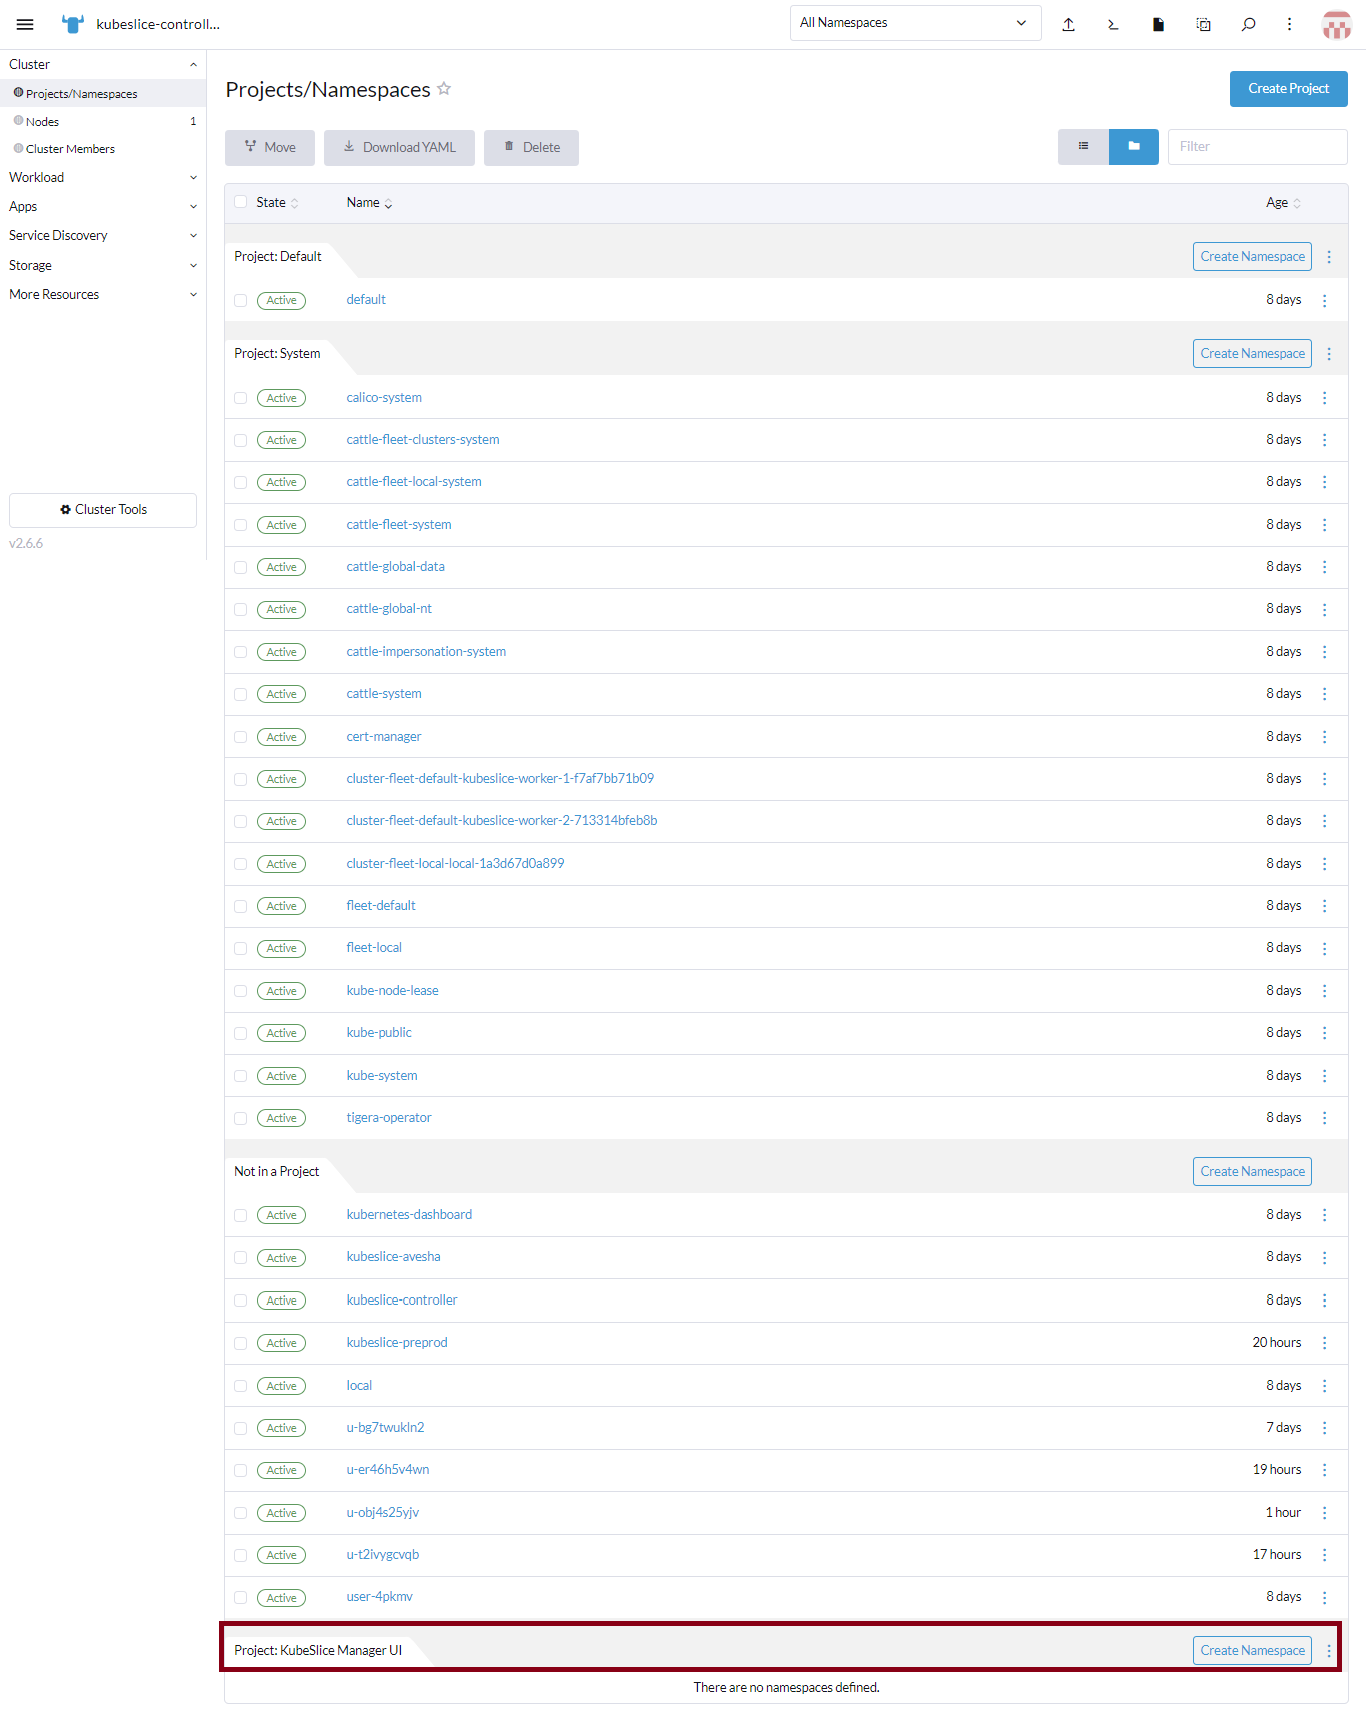
A project, KubeSlice Manager UI is created without namespaces in it.
infoYou must add namespaces to the project to provide granular access to members.
-
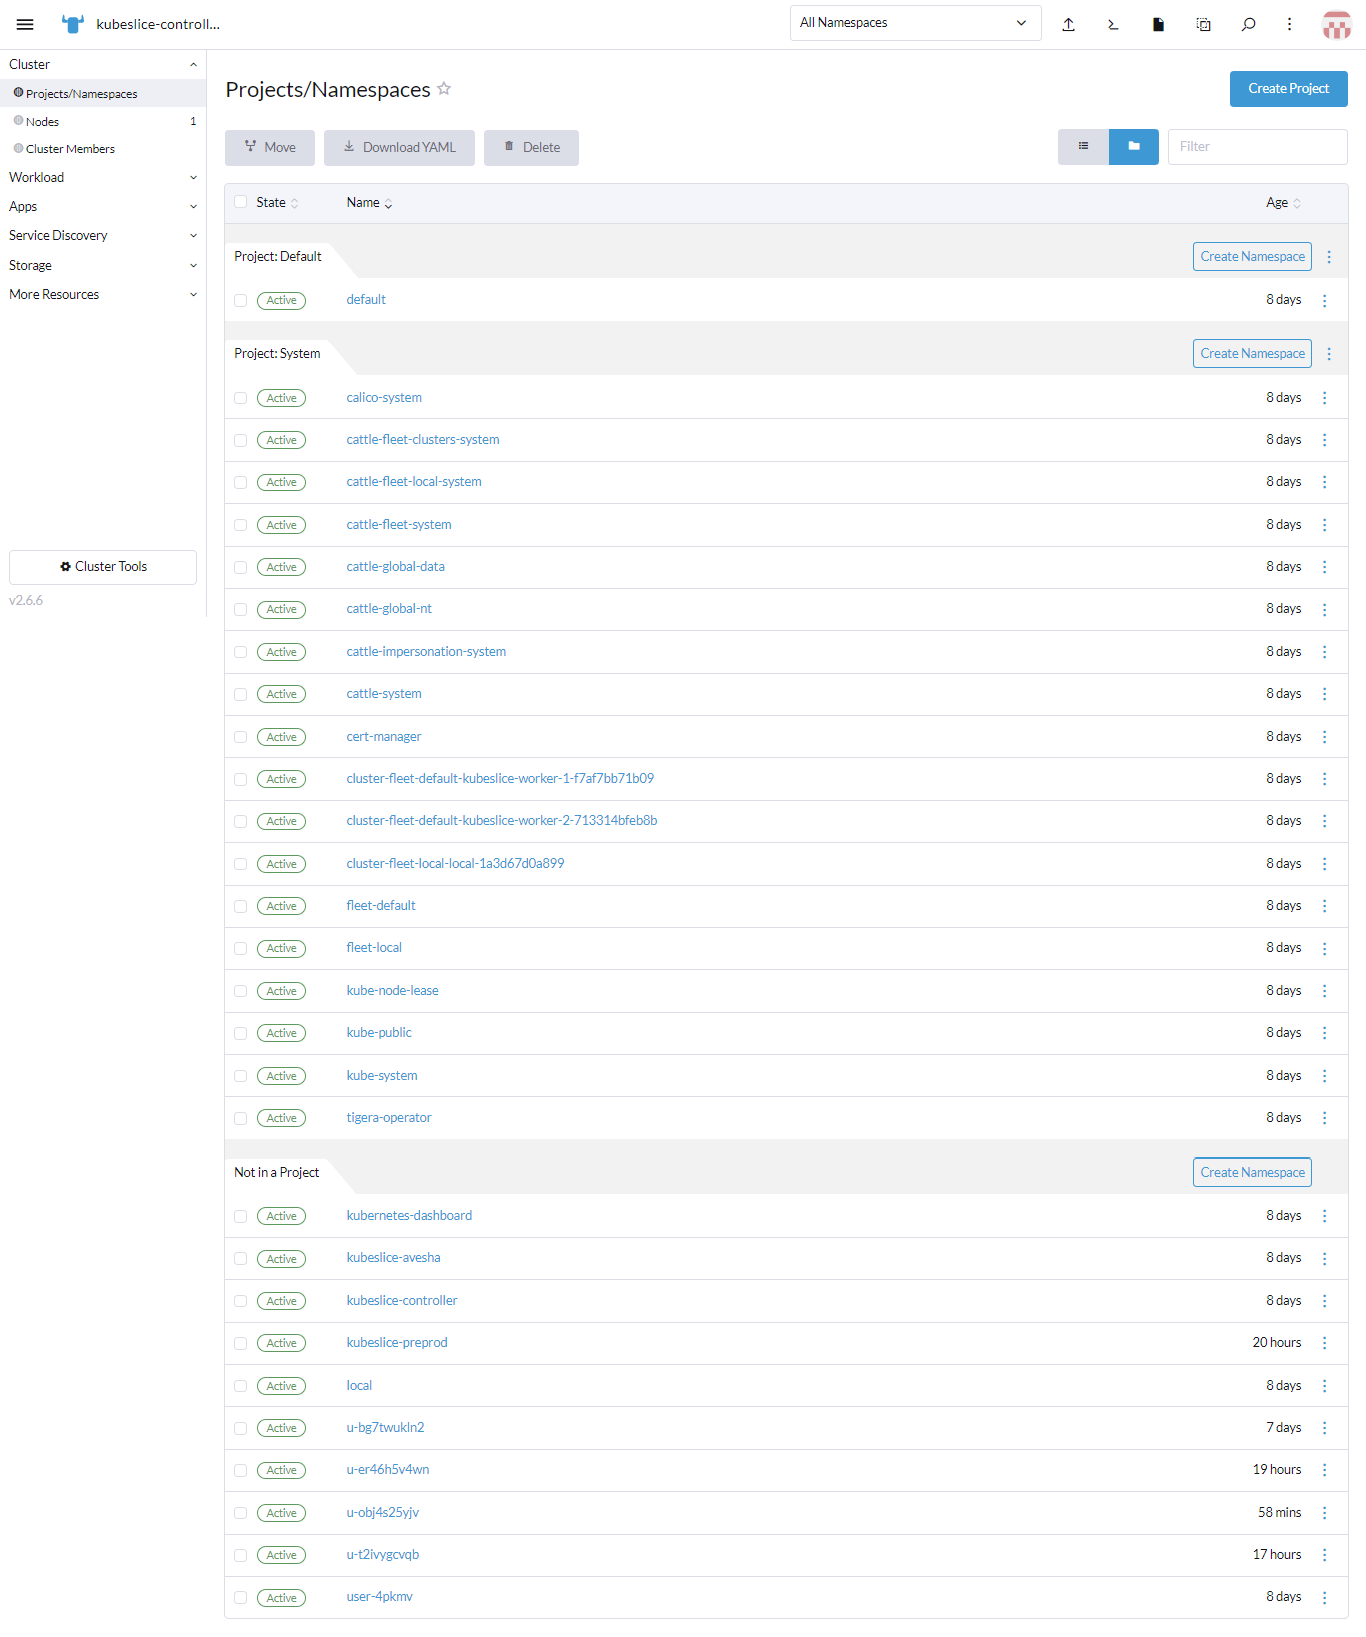
Under Not in a Project, for kubeslice-controller namespace, click the vertical ellipsis, and click Move.
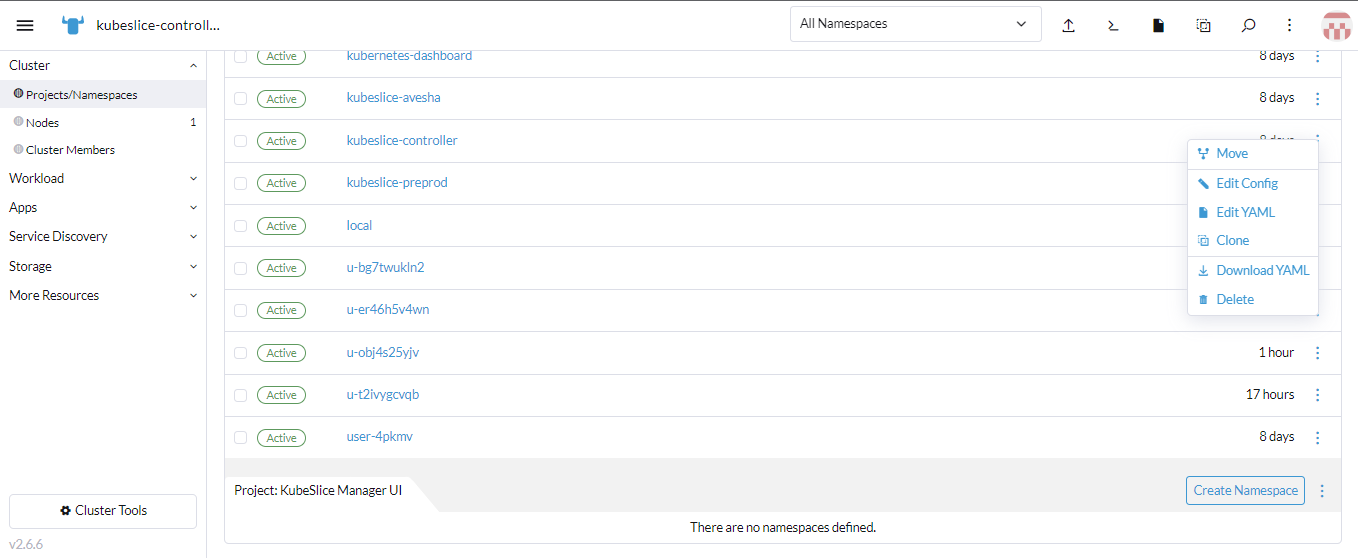
-
Select the target project and move the namespace to the newly created project.

-
Create another project called KubeSlice Preprod and onboard the kubeslice-preprod namespace (your project namespace) that is under Not in a Project as you did in the above steps.
infoWe are moving the kubeslice-preprod (your project namespace) namespace into the Rancher project called KubeSlice Preprod.
-
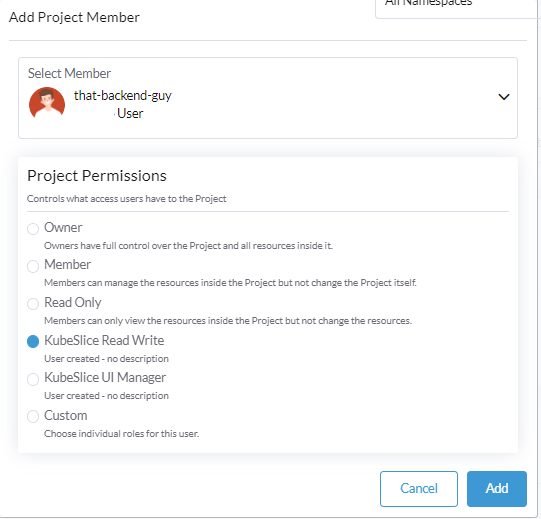
After adding the namespaces, to grant the project access to other users, for each project, click the vertical ellipsis and click Edit Config.
-
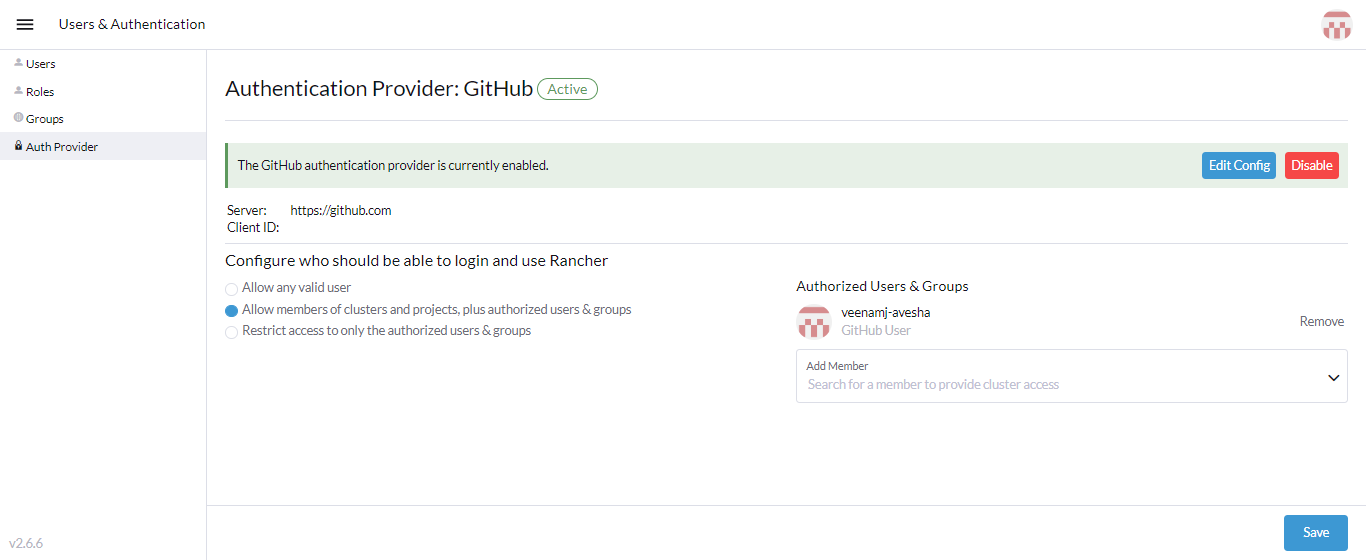
On the Project page, click Add to add the users. You can add a Rancher or GitHub user to grant access.
infoYou can add a Rancher user by default. To add GitHub users, you must first configure GitHub as an auth provider.

-
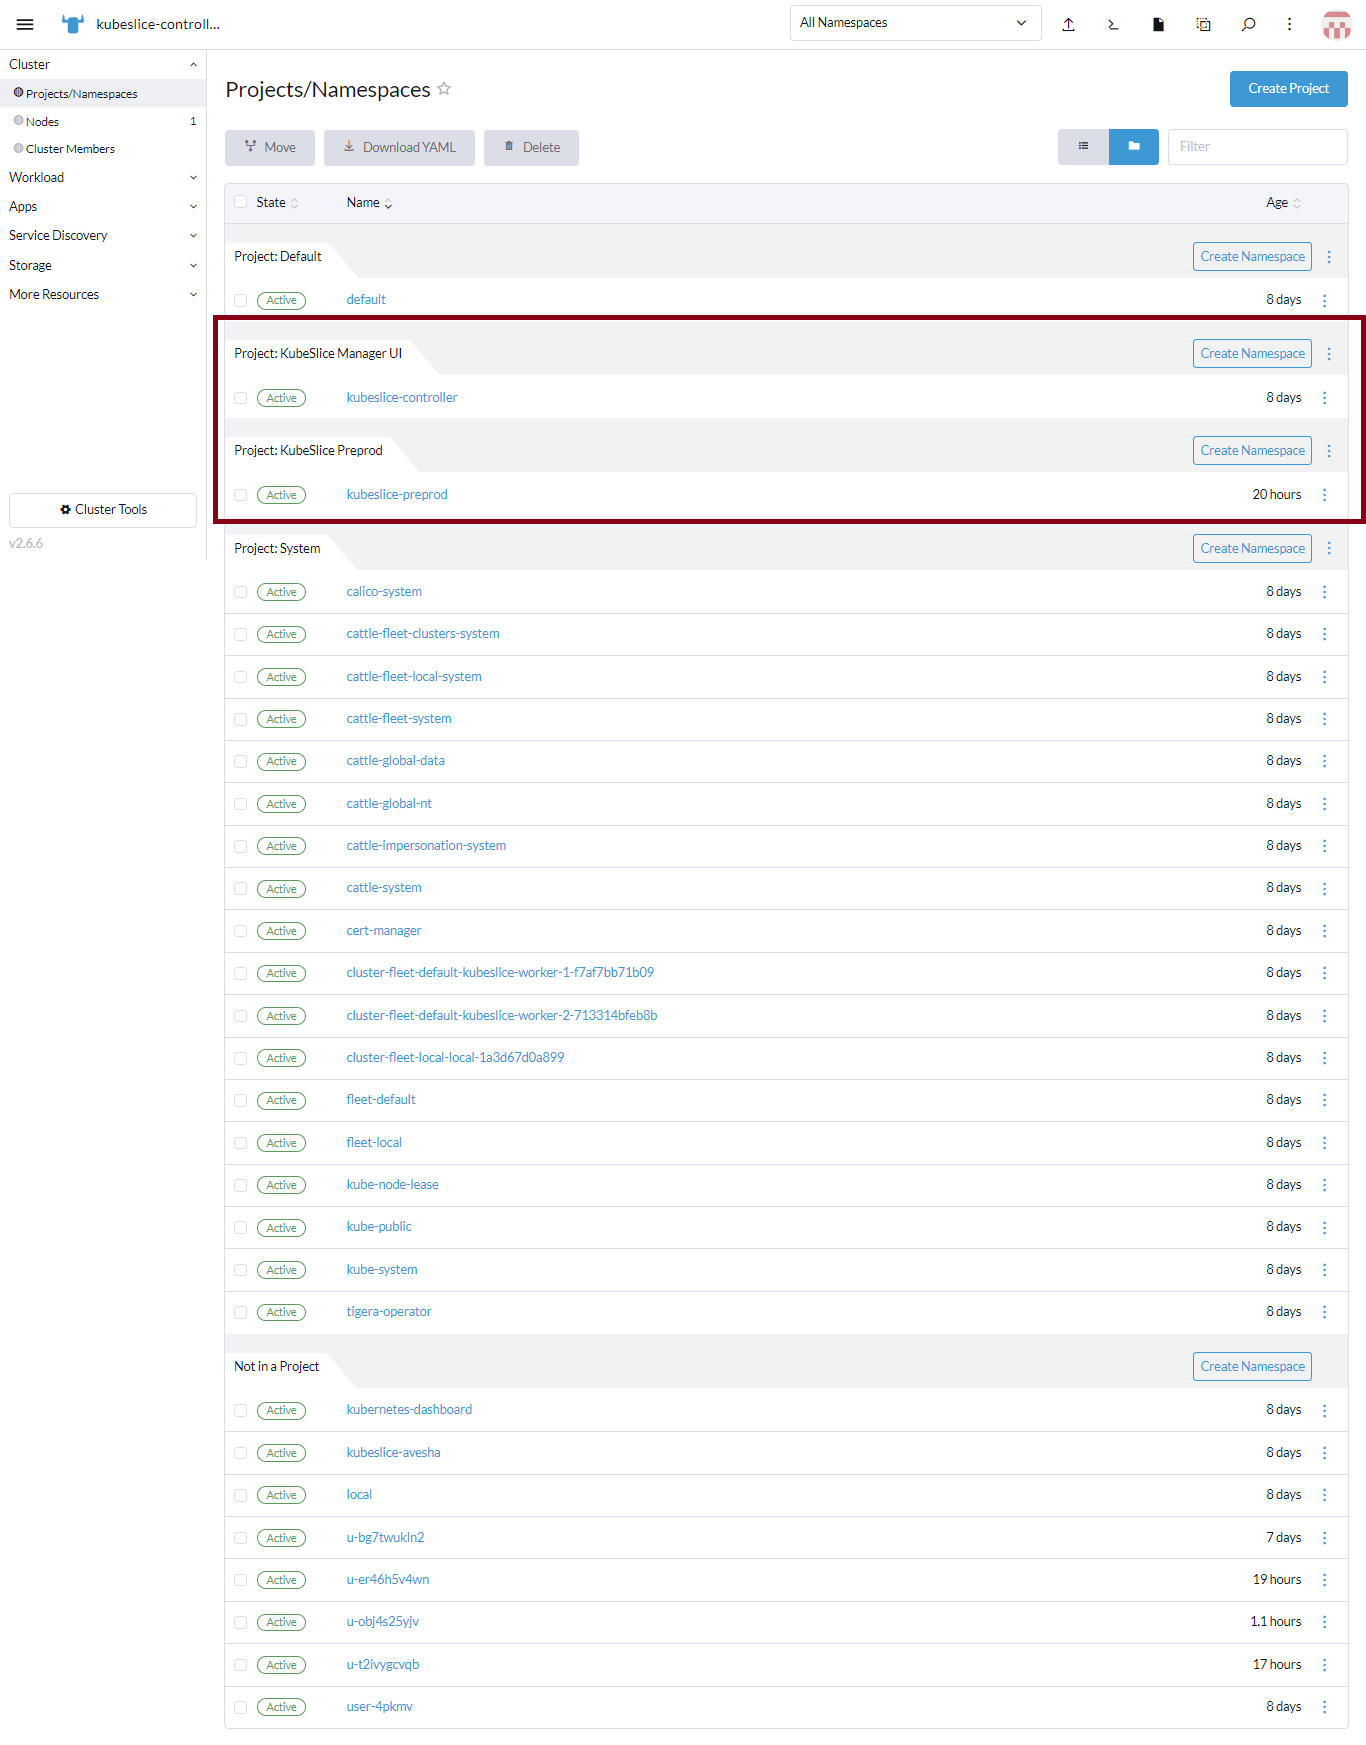
Repeat the same steps and grant access to the KubeSlice Preprod project.
-
After the namespaces are onboarded, the projects are listed under the cluster's Projects/Namespaces.
Configure Rancher GitHub Auth Provider
You can also configure Rancher to use GitHub as auth provider to log into the KubeSlice Manager .
Prerequisites
Before you begin, ensure that you meet the following prerequisites:
- You are a local user on the Rancher-managed clusters and have the admin privileges.
- You are a valid GitHub user with admin privileges to enable GitHub as an auth provider.
Configure GitHub
-
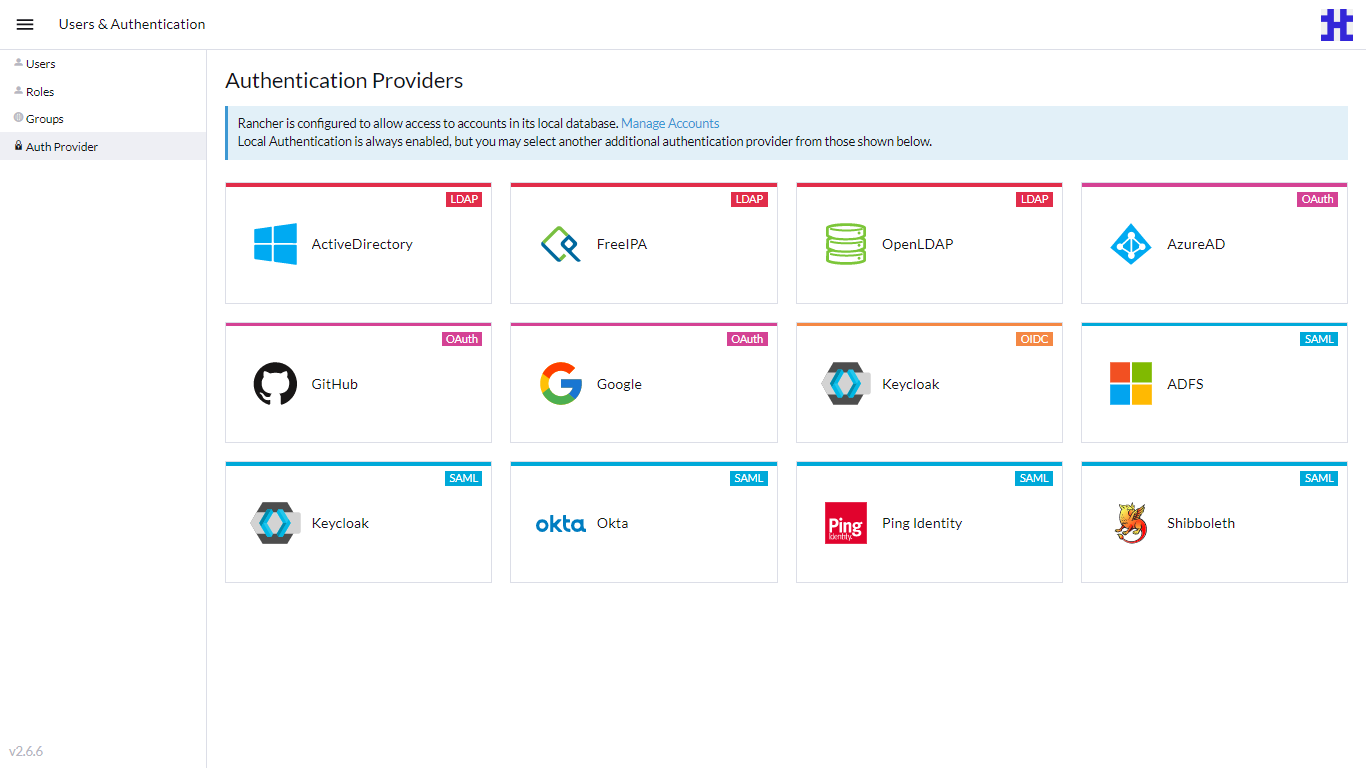
Log in to Rancher. From the Global View, select CONFIGURATION > Users & Authentication from the sidebar.
-
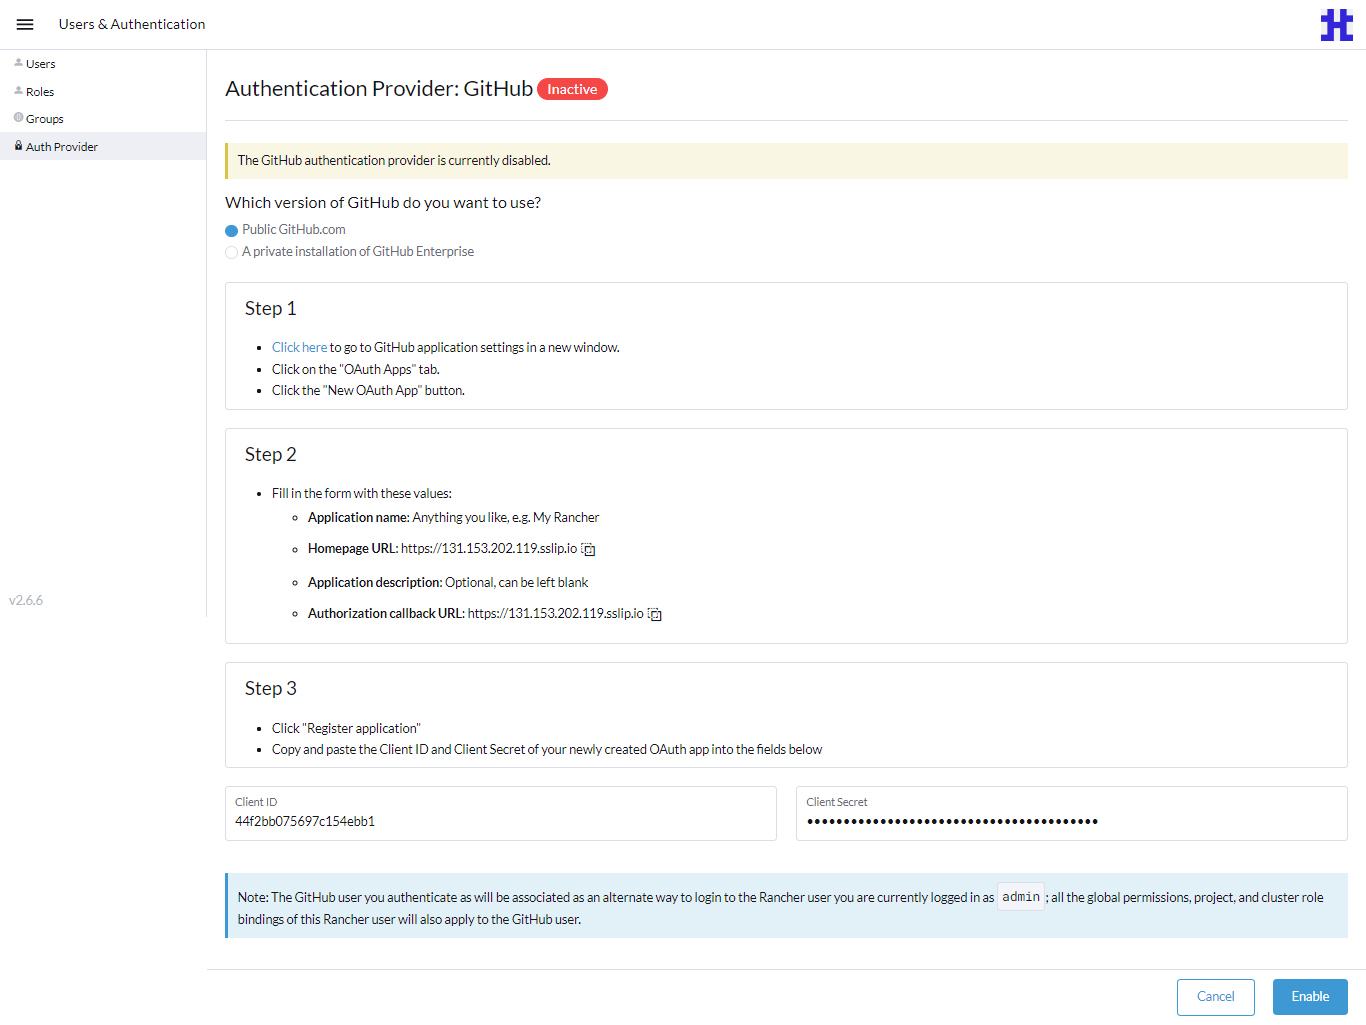
Under Users & Authentication, click Auth Provider.
-
On the Authentication Providers page, click GitHub.
-
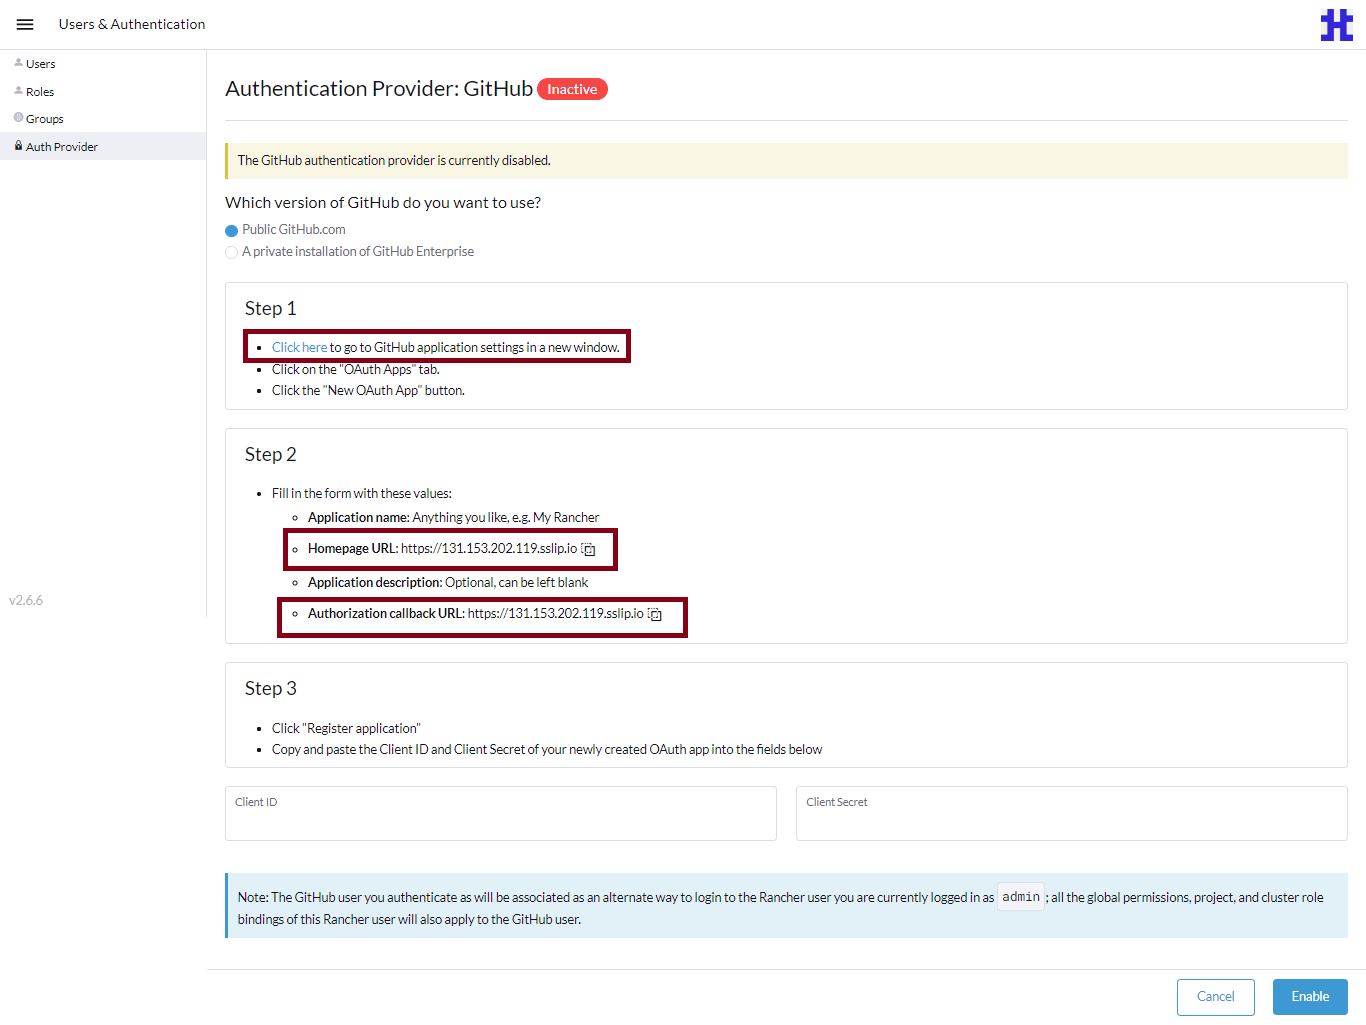
On the Authentication Provider: GitHub page, under Step 2 copy the Homepage URL and Authorization Callback URL to configure them on GitHub. Under Step 1, click the Click here link to go to GitHub.
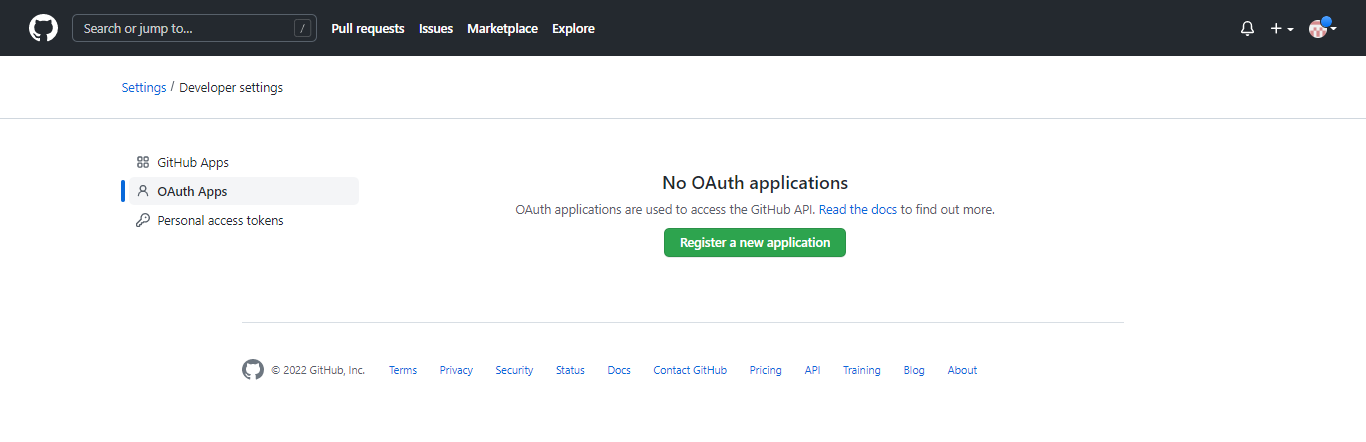
-
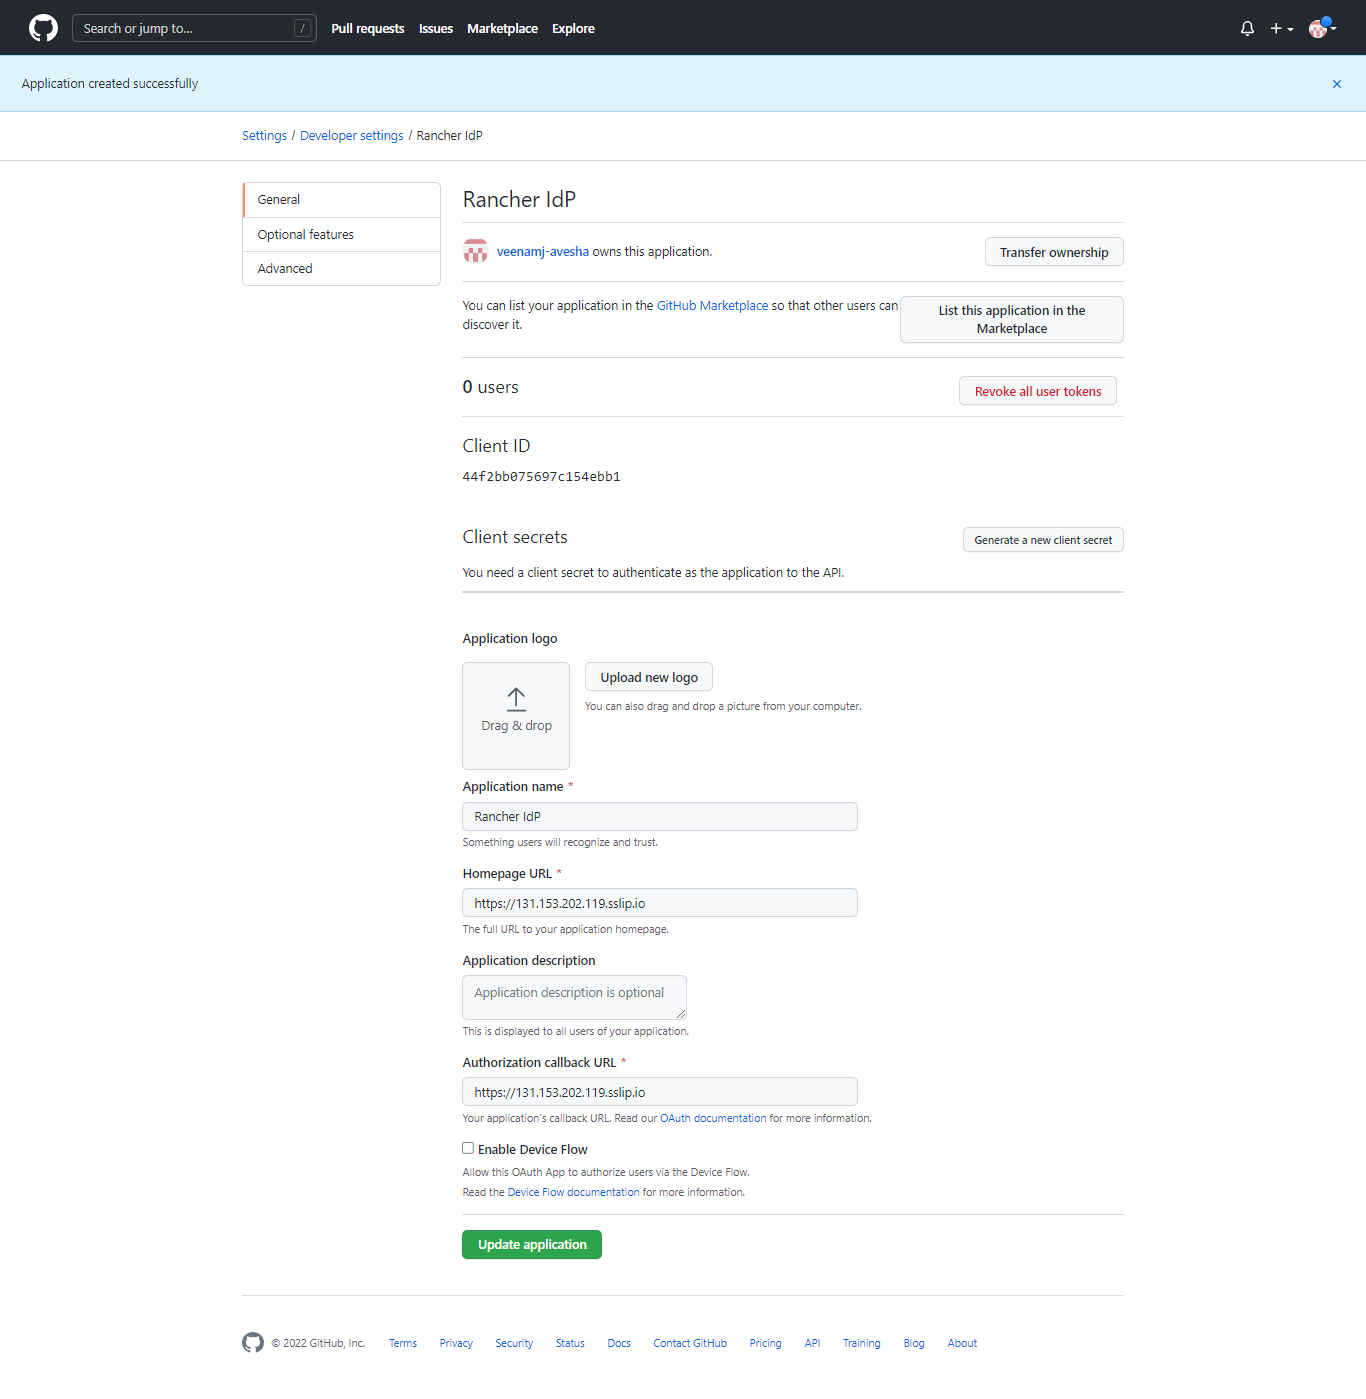
On the GitHub page, for OAuth Apps, click Register a new application.
-
On the Register a new OAuth application page, enter these mandatory values:
-
For Application name, enter a name.
-
For Homepage URL, enter the homepage URL copied on the Rancher's authentication provider page.
-
For Authorization Callback URL, enter the callback URL that you copied on the Rancher's authentication provider page.
-
-
Click Register Application.
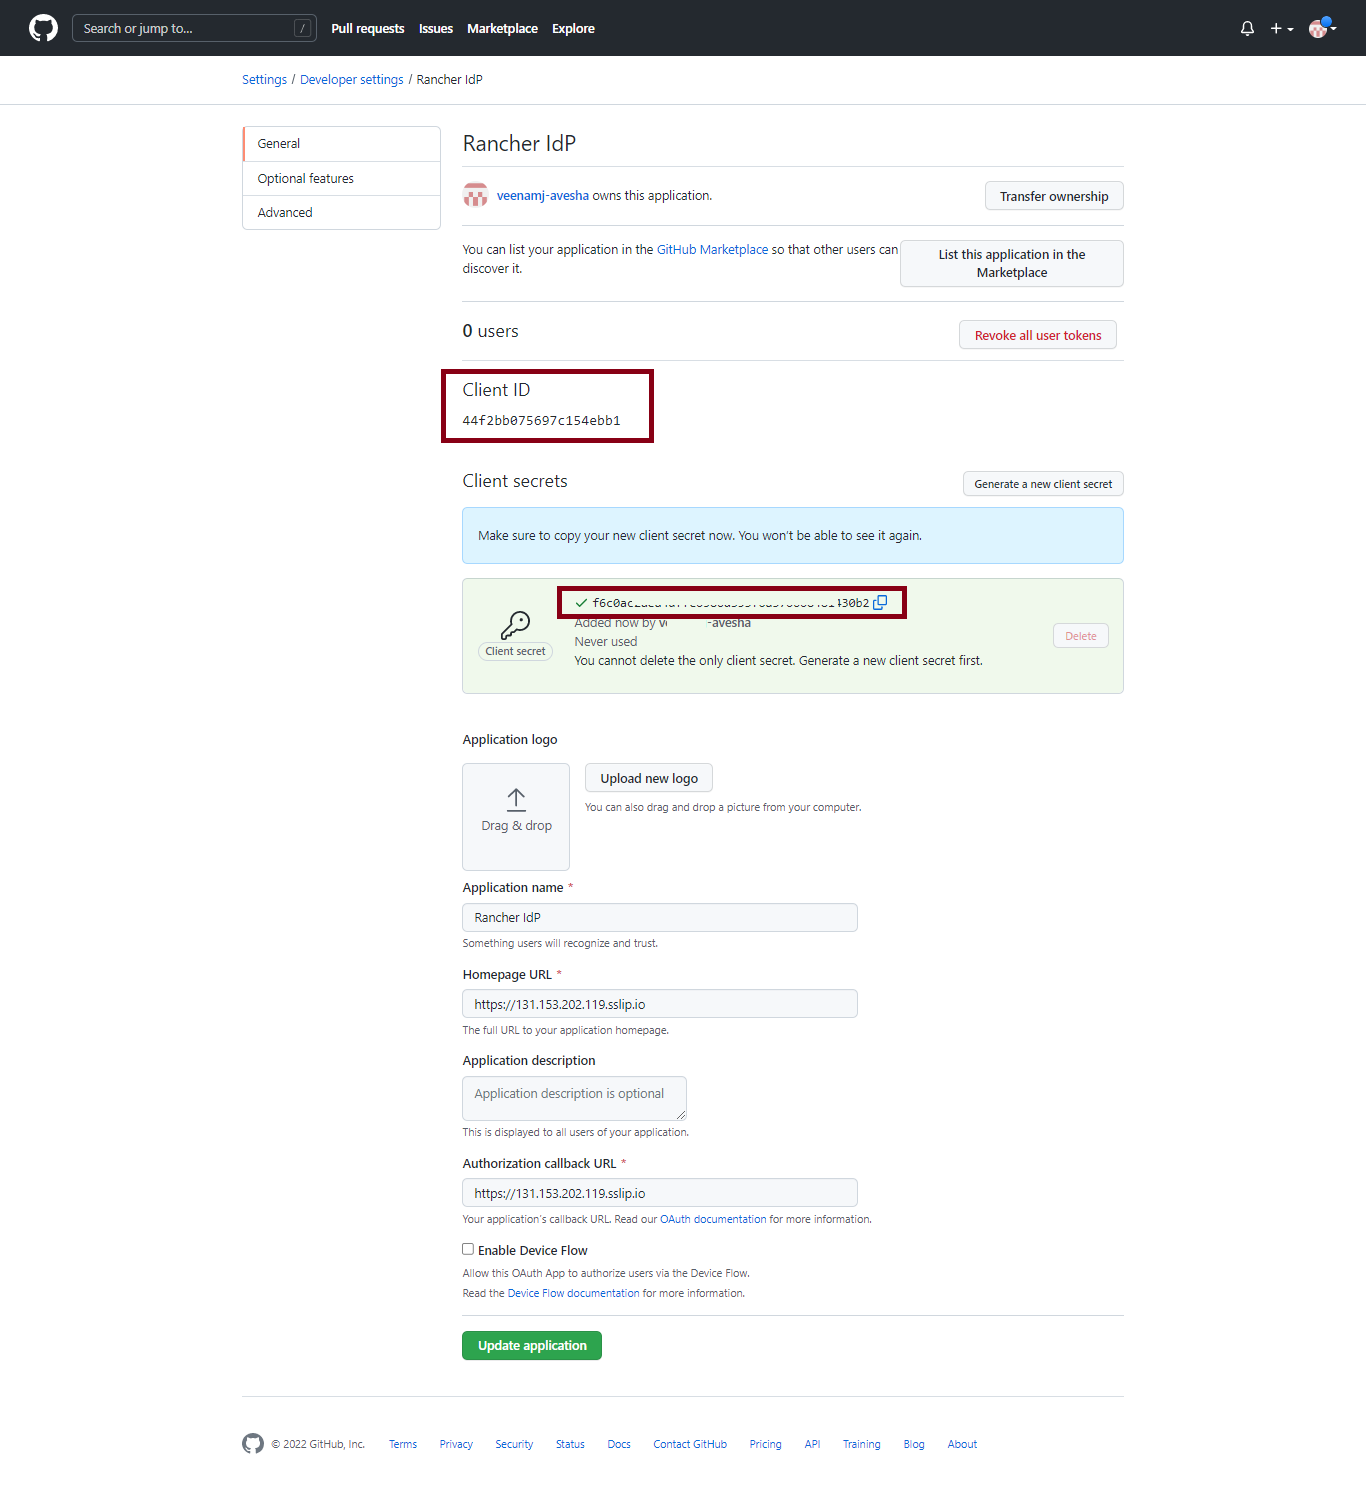
-
On the registered application page, against Client secrets, click Generate a new client secret.
-
Copy the generated client ID and client secret to add them on the Rancher authentication provider page.
-
Go back to the Authentication Provider: GitHub page, and under Step 3, add the client ID and client secret.
-
Click Enable for enabling GitHub as an auth provider.
-
After enabling GitHub, you must authorize the GitHub user. Click Authorize
<githubuser>.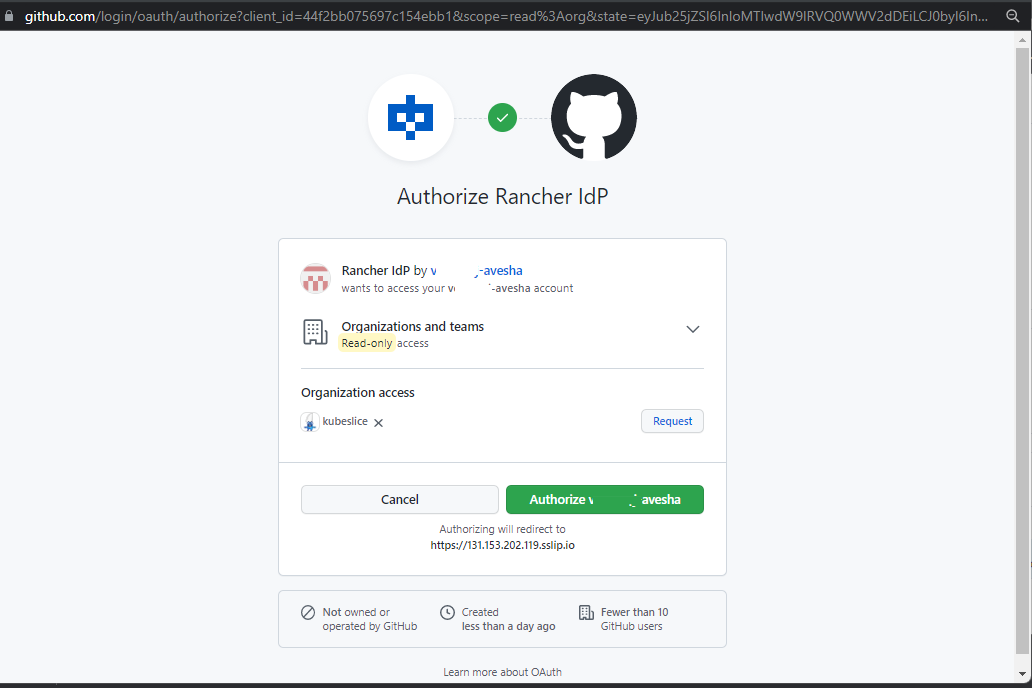
-
You are redirected to the Rancher's User & Authentication. On the Authentication Provider: GitHub page, choose the Allow members of Clusters, Projects, plus Authorized Users and Organizations option for better security and accessibility.
-
Click Save.