Cluster Authentication
To register your worker clusters with the KubeSlice Controller, you must get the authentication token for a kubernetes cluster. To accomplish this, run the commands below to retrieve the relevant kubeconfig file and add it to your default kubeconfig path.
Azure Kubernetes Service (AKS)
For information on prerequisites and authentication, see Microsoft AKS Docs.
The following information is required to retrieve your Microsoft Azure
Kubernetes Service (AKS) kubeconfig.
| Variable | Description |
|---|---|
| <resource group name> | The name of the resource group the cluster belongs to. |
| <cluster name> | The name of the cluster you would like to get credentials for. |
The following command retrieves your AKS cluster kubeconfig and add it to your default kubeconfig path. Complete this step for each
AKS cluster in the configuration.
az aks get-credentials --resource-group <resource group name> --name <cluster name>
AWS Elastic Kubernetes Service (EKS)
For information on prerequisites and other required details, see the Amazon EKS documentation.
The following information is required to retrieve your Elastic Kubernetes
Service (EKS) kubeconfig.
| Variable | Description |
|---|---|
| <cluster name> | The name of the cluster you want to get credentials for. |
| <cluster region> | The AWS region the cluster belongs to. |
The following command retrieves your EKS cluster kubeconfig and adds
it to your default kubeconfig path. Complete this step for each EKS
cluster in the configuration.
aws eks update-kubeconfig --name <cluster-name> --region <cluster-region>
Google Kubernetes Engine (GKE)
For information on the prerequisites and other required details, see Google Cloud CLI Docs.
The following information is required to retrieve your Google Kubernetes
Engine (GKE) kubeconfig.
| Variable | Description |
|---|---|
| <cluster name> | The name of the cluster you want to get credentials for. |
| <region> | The region the cluster belongs to. |
| <project id> | The project ID that the cluster belongs to. |
The following command retrieves your GKE cluster kubeconfig and adds
it to your default kubeconfig path. Complete this step for each GKE
cluster in the configuration.
gcloud container clusters get-credentials <cluster name> --region <region> --project <project id>
Expected Output
Fetching cluster endpoint and auth data.
kubeconfig entry generated for <cluster name>
OpenShift Cluster Authentication
You can access Red Hat OpenShift on IBM Cloud using the IBM Cloud CLI or the IBM Cloud console. After you login to the cluster, you can generate the kubeconfg file using the shell script. The kubeconfig file is used to authenticate the cluster to perform Kubernetes operations.
Access the OpenShift Terminal using the IBM Cloud CLI
To log in to cluster using the CLI:
-
Download the IBM Cloud CLI binary.
-
Use the following command on macOS:
curl -fsSL https://clis.cloud.ibm.com/install/osx | sh -
Use the following command on Linux:
curl -fsSL https://clis.cloud.ibm.com/install/linux | sh
-
-
Install the IBM plugins.
ibmcloud plugin install container-registry
ibmcloud plugin install container-service -
Log in to IBM Cloud.
-
If you do not have any environment variables set, then the command will prompt for an IBM Cloud username and password to log in.
ibmcloud login -r <region>Example:
ibmcloud login -r us-south -
You can also use an API key to log in to IBM Cloud. Export your API key for the below environment variables.
export IBMCLOUD_API_KEY=<api-key-value>
export IC_API_KEY=<api-key-value>
ibmcloud login -r <region>
Example Output
After a successful login, you will get the below message.
API endpoint: https://cloud.ibm.com
Logging in with API key from environment variable...
Authenticating...
OK
-
-
Select the target resource group.
ibmcloud target -g Default -
Use the following command to access the cluster:
ibmcloud ks cluster config -c <cluster-name> --adminExample
ibmcloud ks cluster config -c avesha-openshift-1 --adminExample Output
OK
The configuration for avesha-openshift-1 was downloaded successfully.

Added context for avesha-openshift-1 to the current kubeconfig file.
You can now execute 'kubectl' commands against your cluster. For example, run 'kubectl get nodes'.
Now the current context is set to the openshift cluster -
Use the following command to verify the current cluster context:
Example
KubectxExample Output
avesha-openshift-1/cje6fcgd0k11m6n97dtg/admin -
Use the following command to verify the cluster access:
Example
kubectl get nodesExample Output
NAME            STATUS   ROLES           AGE   VERSION
10.187.90.210   Ready    master,worker   8d    v1.25.11+1485cc9
10.187.90.211   Ready    master,worker   8d    v1.25.11+1485cc9
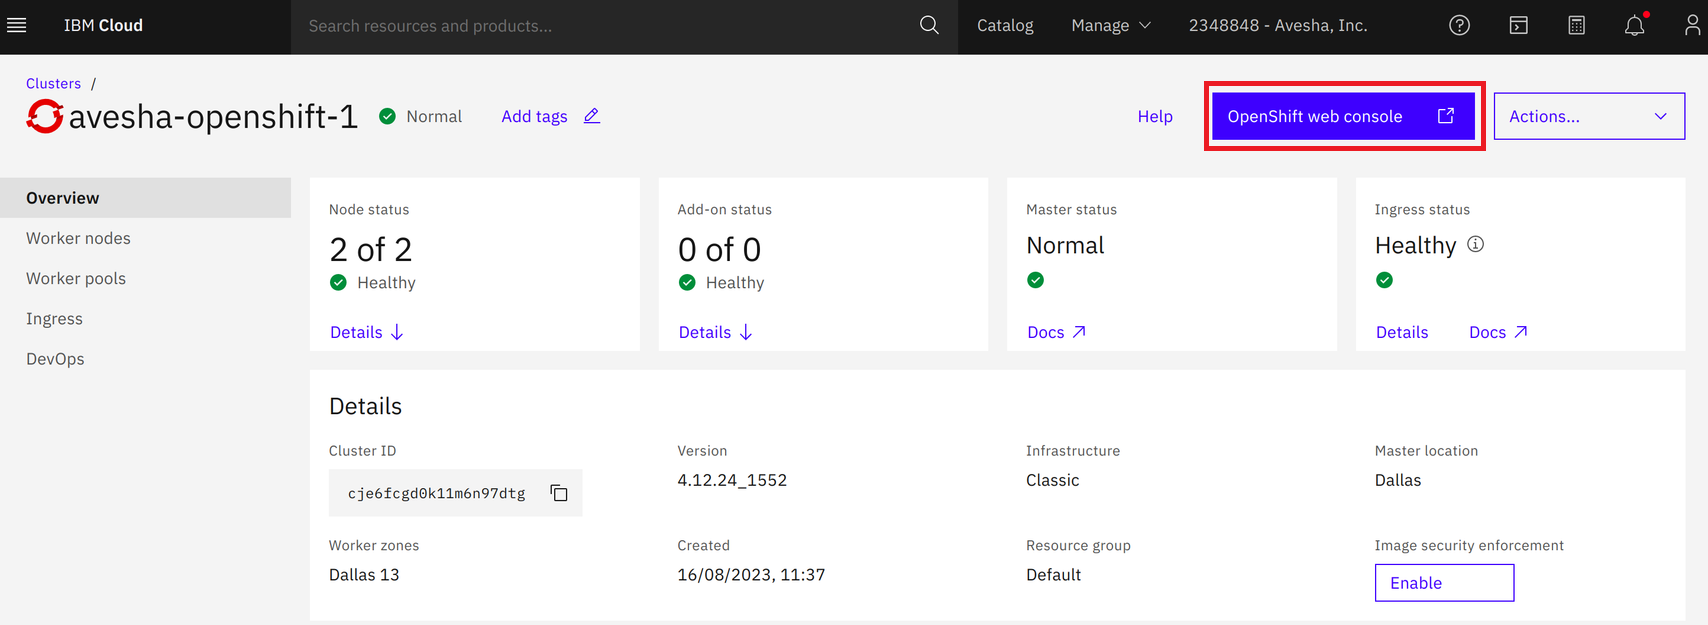
Access the OpenShift Terminal using the IBM Cloud Console
To log in to the cluster using the IBM Cloud Console:
-
Log in to the IBM Cloud Console using the credentials.
-
On the top right, click the OpenShift Web Console.
 note
noteFor on-premises OpenShift clusters, on the Red Hat account portal's cluster section, you will see the OpenShift Console tab, which will take you to the OpenShift Console. You will be prompted to enter the login username and password you obtained after creating a cluster.
-
On the OpenShift Console, select Copy login command from the drop-down list to copy the
oc logincommand.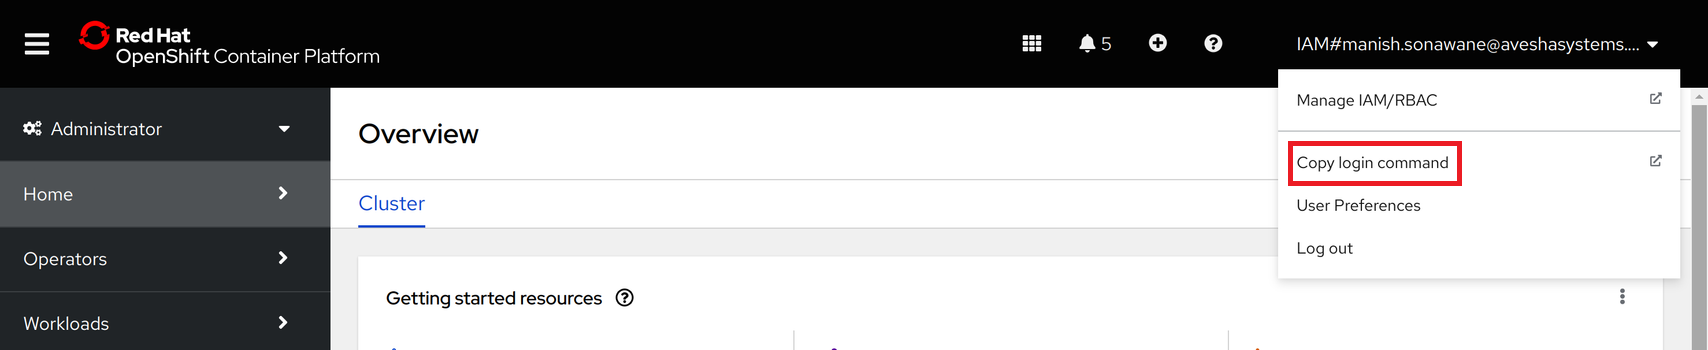
-
Use the
oc logincommand on the terminal to access the cluster through command line:oc login --token=<token> --server=<cluster-endpoint>Example
oc login --token=sha256~hqRpZnnj-T0LR_ds --server=https://c107-e.us-south.containers.cloud.ibm.com:31786 -
Use the following command to verify the current cluster context:
Example
kubectxExample Output
default/c107-e-us-south-containers-cloud-ibm-com:31786/IAM#aveshasystems.com -
Use the following command to verify the cluster access:
Example
kubectl get nodesExample Output
NAME            STATUS   ROLES           AGE   VERSION
10.187.90.210   Ready    master,worker   8d    v1.25.11+1485cc9
10.187.90.211   Ready    master,worker   8d    v1.25.11+1485cc9
Generate the kubeconfig File
After you have access to the OpenShift cloud clusters or on-premises clusters, you can generate the kubeconfig file.
The following is the shell script to generate the kubeconfig file from the OpenShift cluster. Copy the script to a file
and name it as generate-kubeconfig.sh.
- Open the vi editor:
vi generate-kubeconfig.sh
- Copy the following script to the
generate.kubeconfig.shfile.
#!/bin/bash
# set -e
# set -o pipefail

if [ $# -eq 0 ]; then
  echo "usage: ./generate-kubeconfig.sh [context]"
  exit 1
fi

kubectl config use-context $1

kubectl -n kube-system create serviceaccount cluster-service-admin

kubectl create clusterrolebinding add-on-cluster-admin --clusterrole=cluster-admin --serviceaccount=kube-system:cluster-service-admin

# USER_TOKEN_NAME=$(kubectl -n kube-system get serviceaccount cluster-service-admin -o=jsonpath='{.secrets[0].name}')
USER_TOKEN_NAME=$(kubectl -n kube-system get secret | grep -i cluster-service-admin-token | awk '{print $1}')
if [ ! -z "${USER_TOKEN_NAME}" ]
then
USER_TOKEN_VALUE=$(kubectl -n kube-system get secret/${USER_TOKEN_NAME} -o=go-template='{{.data.token}}'| base64 --decode)
else
kubectl create -f - <<EOF
apiVersion: v1
kind: Secret
type: kubernetes.io/service-account-token
metadata:
  name: cluster-service-admin
  namespace: kube-system
  annotations:
    kubernetes.io/service-account.name: "cluster-service-admin"
EOF
while [ -z "$(kubectl -n kube-system get secret cluster-service-admin -o=go-template='{{.data.token}}' | base64 --decode)" ]; do
  sleep 1
done
USER_TOKEN_VALUE=$(kubectl -n kube-system get secret cluster-service-admin -o=go-template='{{.data.token}}' | base64 --decode)
fi
CURRENT_CONTEXT=$(kubectl config current-context)
CURRENT_CLUSTER=$(kubectl config view --raw -o=go-template='{{range .contexts}}{{if eq .name "'''${CURRENT_CONTEXT}'''"}}{{ index .context "cluster" }}{{end}}{{end}}')
CLUSTER_CA=$(kubectl config view --raw -o=go-template='{{range .clusters}}{{if eq .name "'''${CURRENT_CLUSTER}'''"}}"{{with index .cluster "certificate-authority-data" }}{{.}}{{end}}"{{ end }}{{ end }}')
CLUSTER_SERVER=$(kubectl config view --raw -o=go-template='{{range .clusters}}{{if eq .name "'''${CURRENT_CLUSTER}'''"}}{{ .cluster.server }}{{end}}{{ end }}')

echo "
---
apiVersion: v1
kind: Config
current-context: ${CURRENT_CONTEXT}
contexts:
- name: ${CURRENT_CONTEXT}
  context:
    cluster: ${CURRENT_CONTEXT}
    user: ${CURRENT_CONTEXT}
    namespace: kube-system
clusters:
- name: ${CURRENT_CONTEXT}
  cluster:
    certificate-authority-data: ${CLUSTER_CA}
    server: ${CLUSTER_SERVER}
users:
- name: ${CURRENT_CONTEXT}
  user:
    token: ${USER_TOKEN_VALUE}
" > openshift-cluster-kubeconfig.yaml
-
Save the file and exit.
-
Use the following command to change the
generate-kubeconfig.shfile permissions:chmod 777 generate-kubeconfig.sh -
Use the following to verify the cluster context:
kubectxExample Output
default/c107-e-us-south-containers-cloud-ibm-com:31786/IAM#aveshasystems.com -
Use the following command to generate the
kubeconfigfile:./generate-kubeconfig.sh default/c107-e-us-south-containers-cloud-ibm-com:31786/IAM#aveshasystems.comExpected Output
Your kubeconfg file got created , Now you use this kubeconfig to access the cluster -
Use the following command to view the kubeconfig file:
cat openshift-cluster-kubeconfig.yaml -
Export the kubeconfig file:
export KUBECONFIG=openshift-cluster-kubeconfig.yaml -
Use the following command to verify the cluster access:
kubectl get nodesExample Output
NAME            STATUS   ROLES           AGE   VERSION
10.187.90.210   Ready    master,worker   8d    v1.25.11+1485cc9
10.187.90.211   Ready    master,worker   8d    v1.25.11+1485cc9