Rancher KubeSlice Installation
This topic describes installing KubeSlice using the Rancher User Interface.
Install the KubeSlice Controller through the Rancher User Interface
To install the KubeSlice Controller on the controller cluster:
-
On the Rancher user interface, click the controller cluster that you have created.
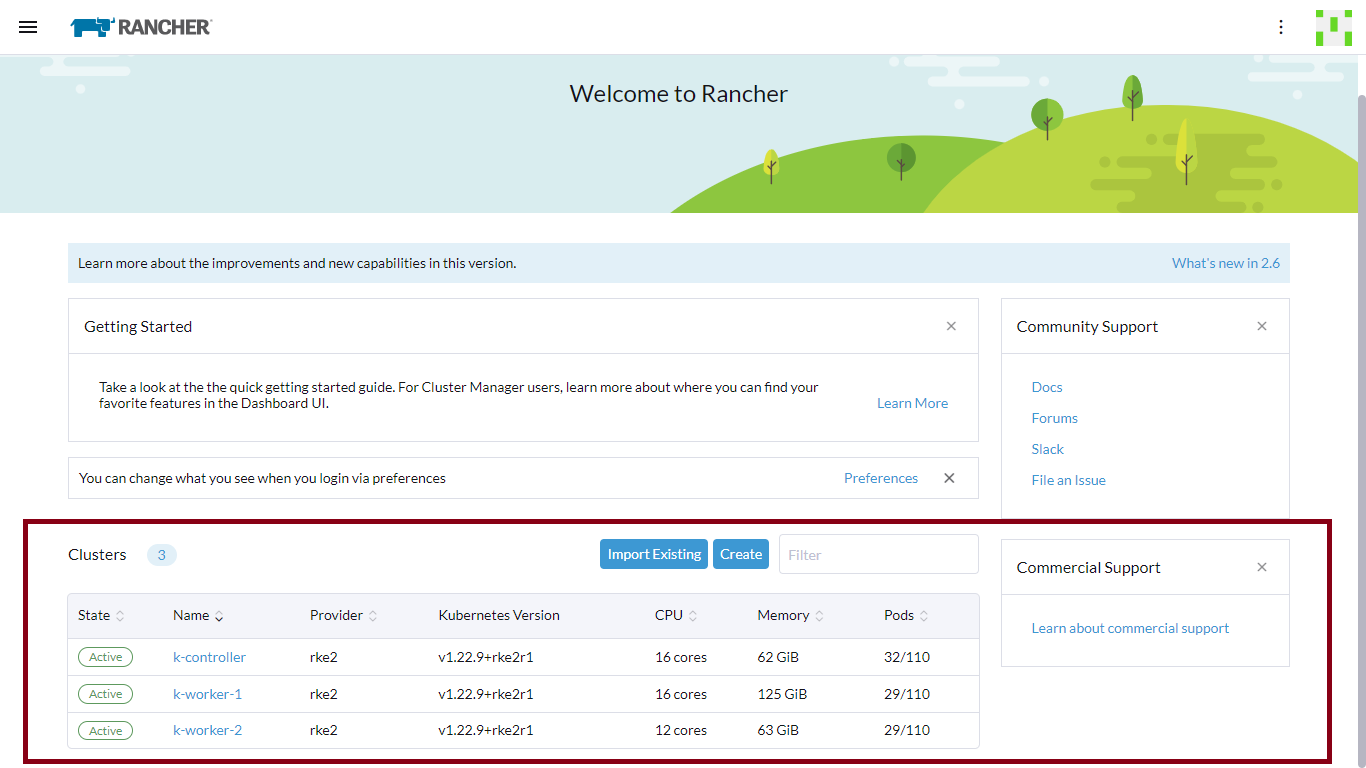
Ensure that the ACE endpoint is enabled with the TCP port 6443 opened for inter cluster communication.
-
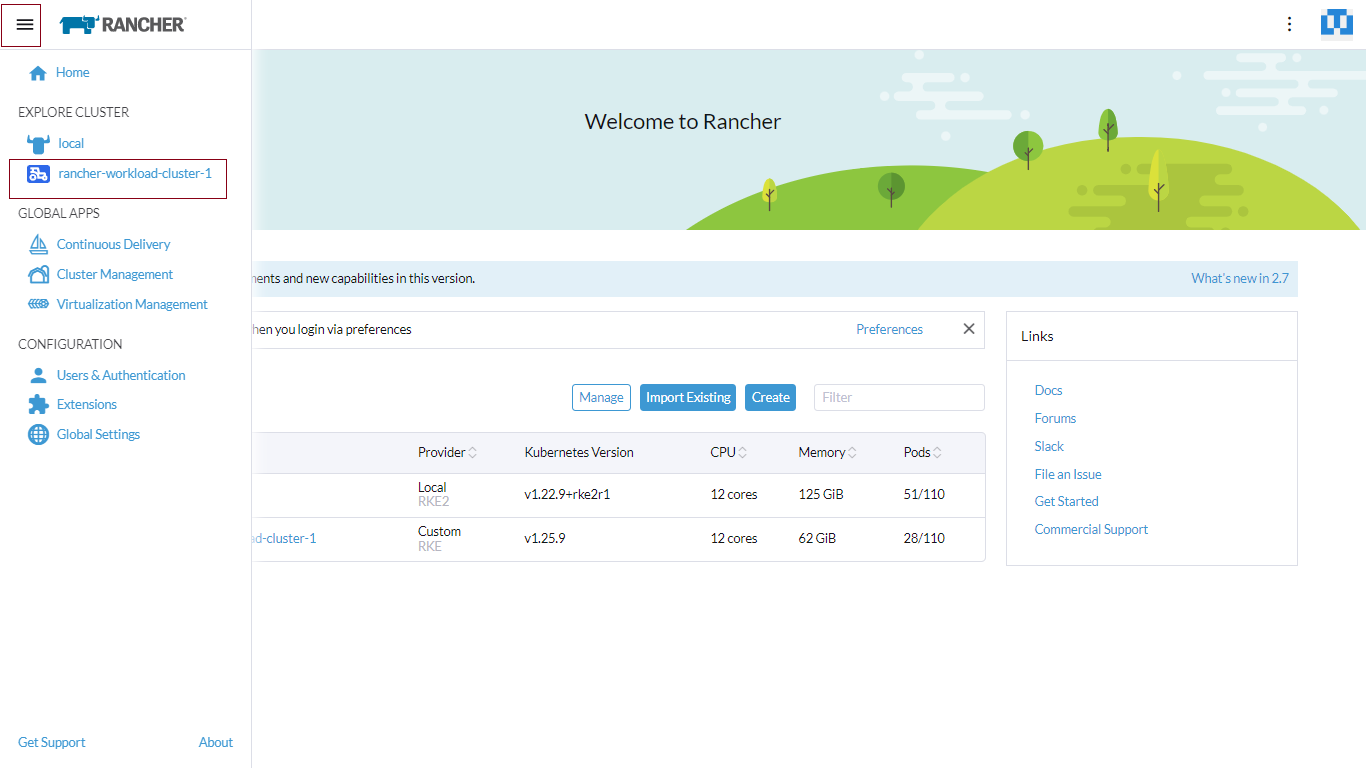
On the controller Clusters page, navigate to the top-left Global View and click Apps.
-
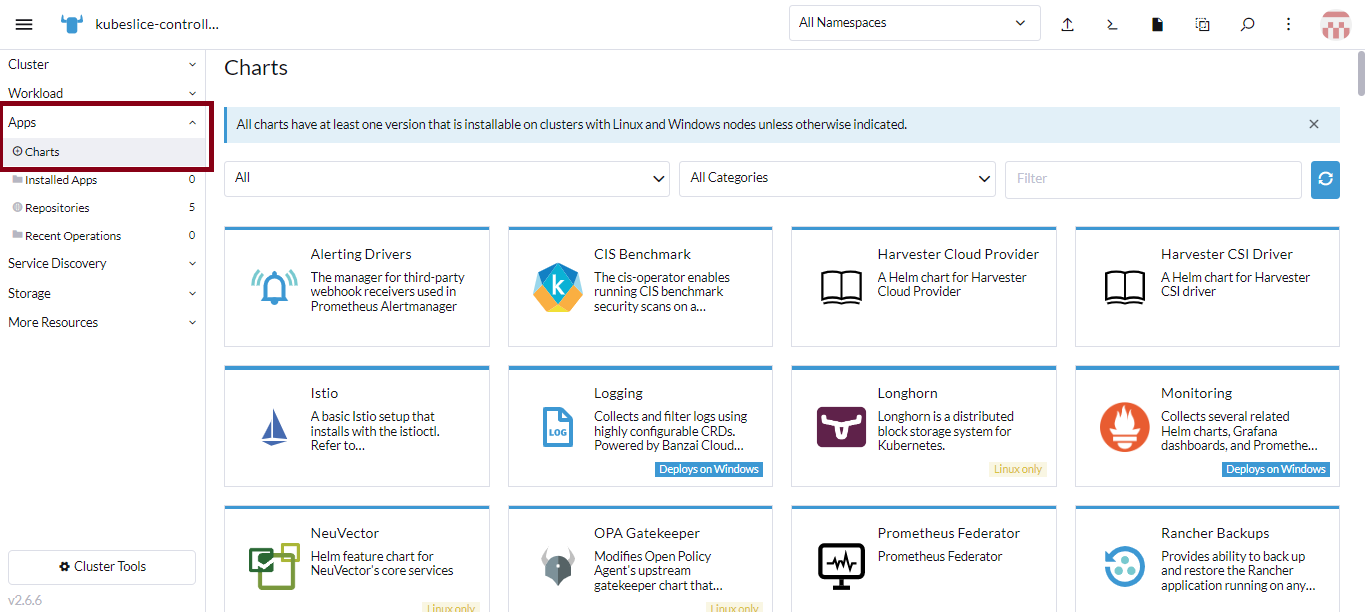
Click Apps or expand the Apps menu, and click Charts.
-
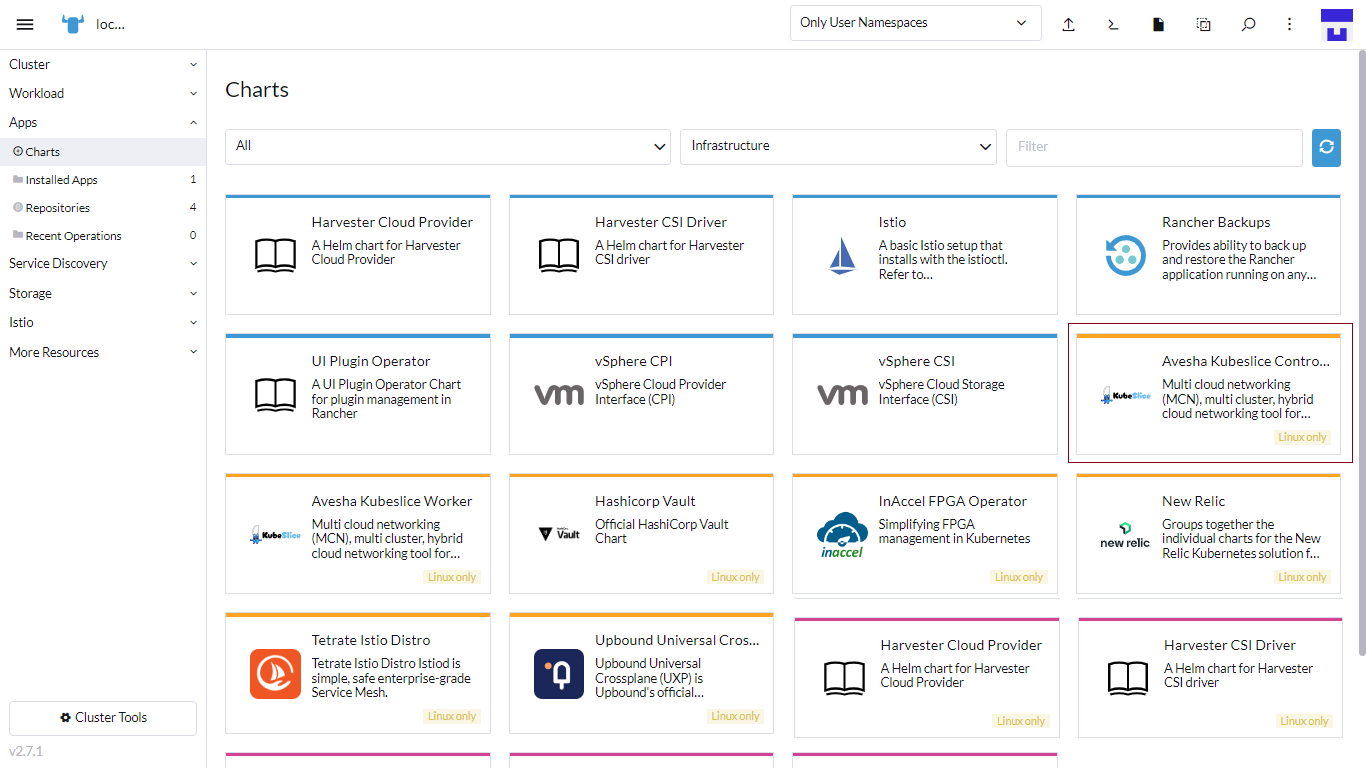
On the Charts page, look for KubeSlice in the Security category. KubeSlice Controller is also listed under the Infrastructure category.
-
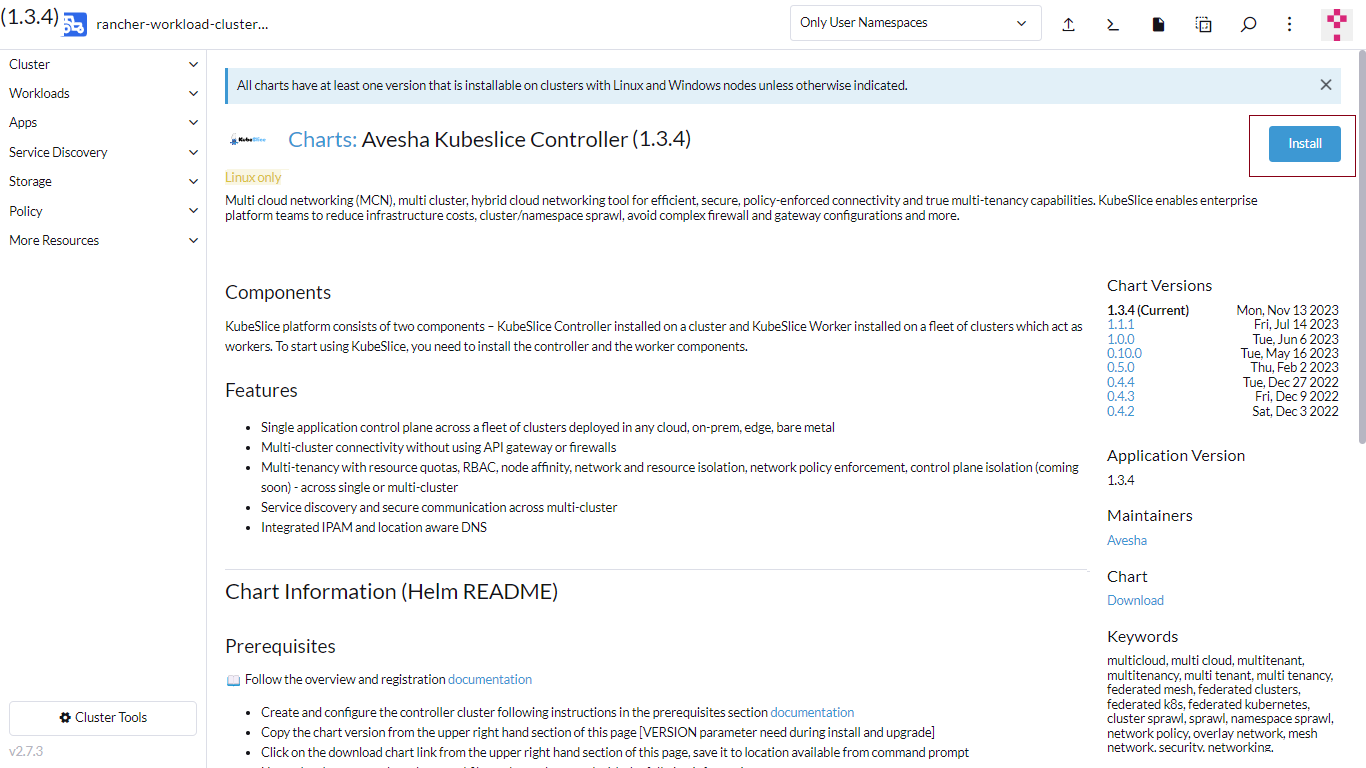
Click the KubeSlice Controller chart, and click Install.
-
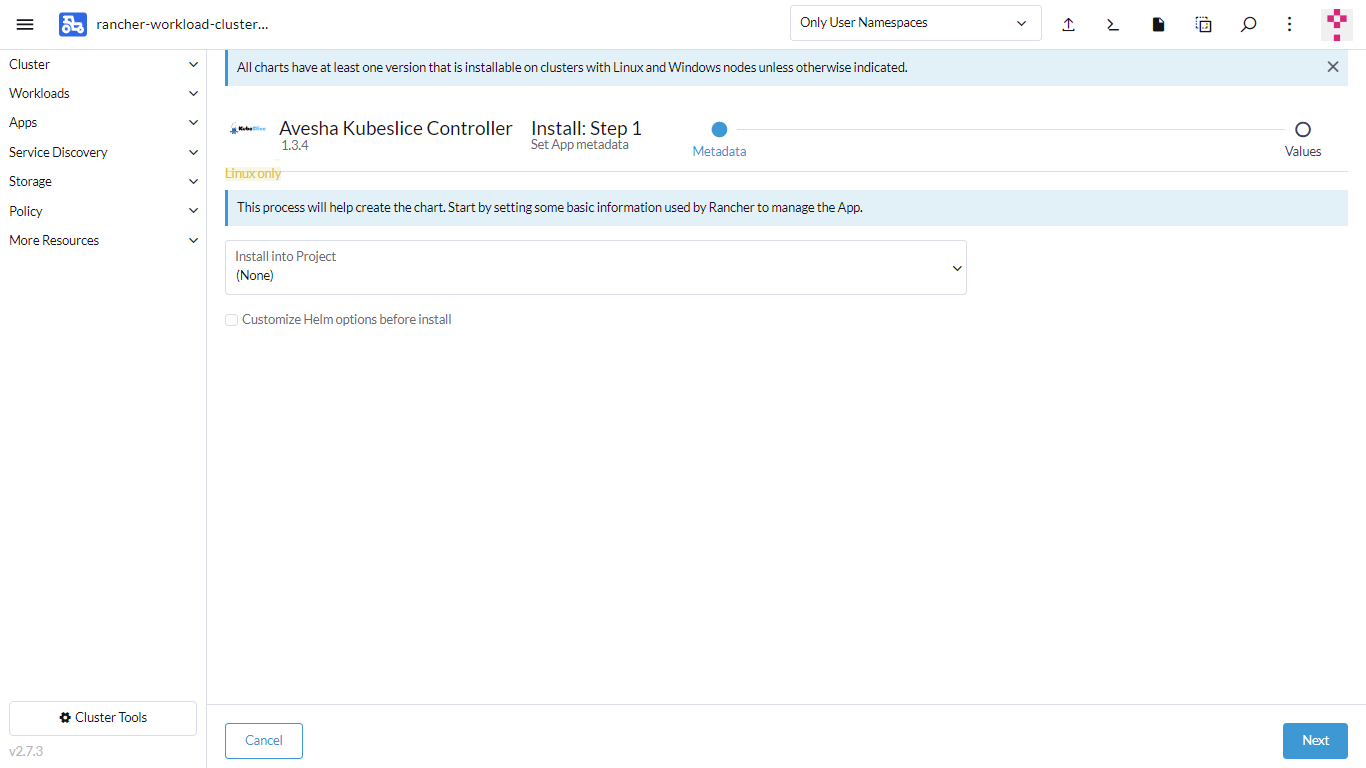
On the KubeSlice Controller Install: Step 1 page, for Install Into Project, choose None from the menu.
cautionEnsure that Custom Helm Options before Install is not not selected.
-
Click Next.
-
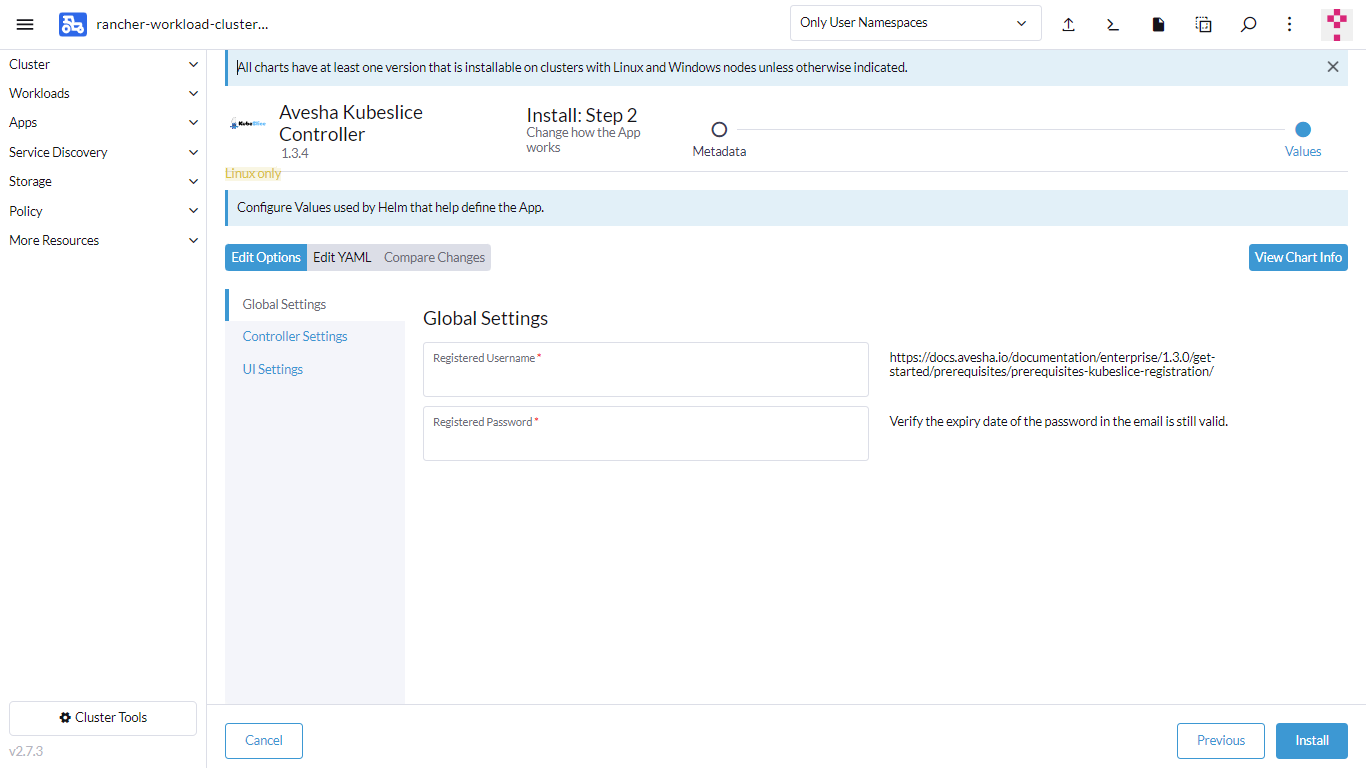
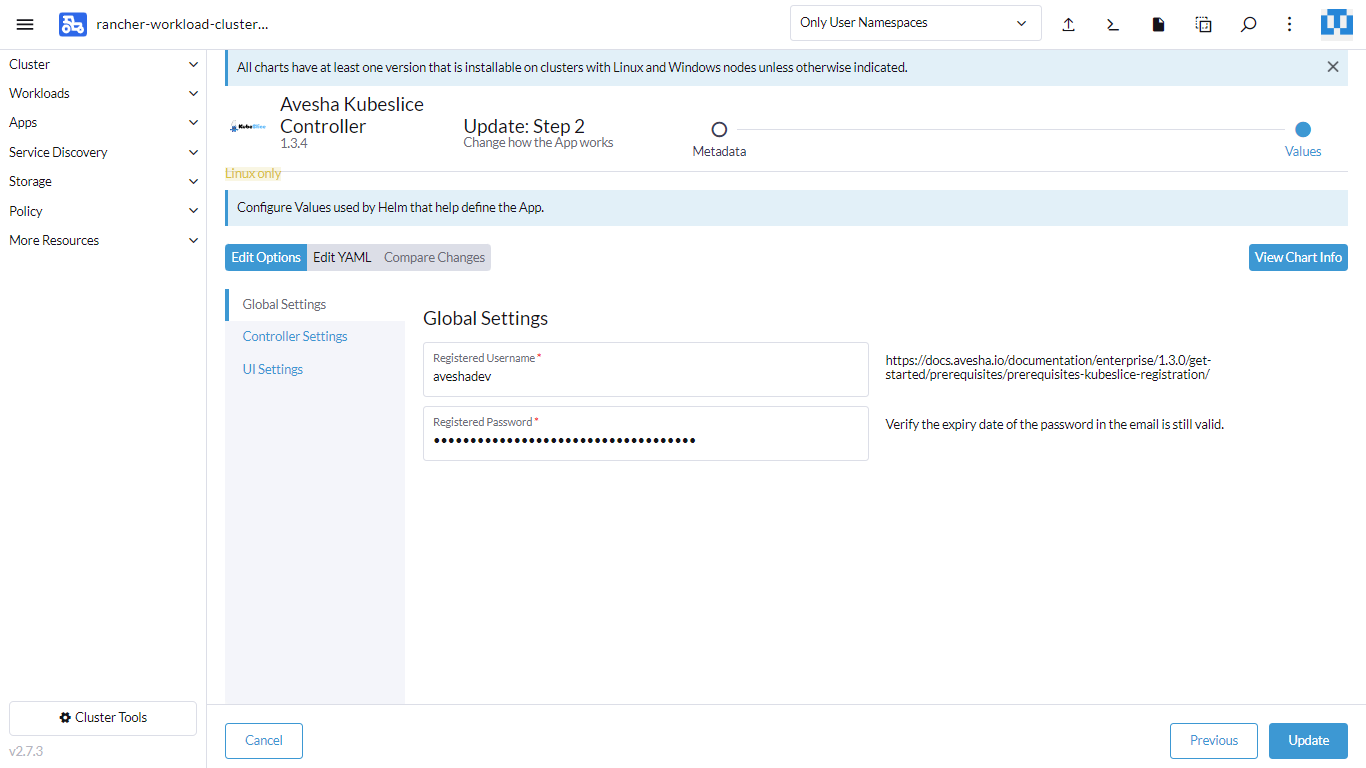
On the KubeSlice Controller Install: Step 2 page, under Global Settings, click the registration link, https://avesha.io/kubeslice-registration/ provided on the right side of the tab. Fill the information on that registration form and submit to get the username and password.
infoYou must register to get your username and password.
For Registered Username, enter your username.
-
For Registered Password, enter your password.
-
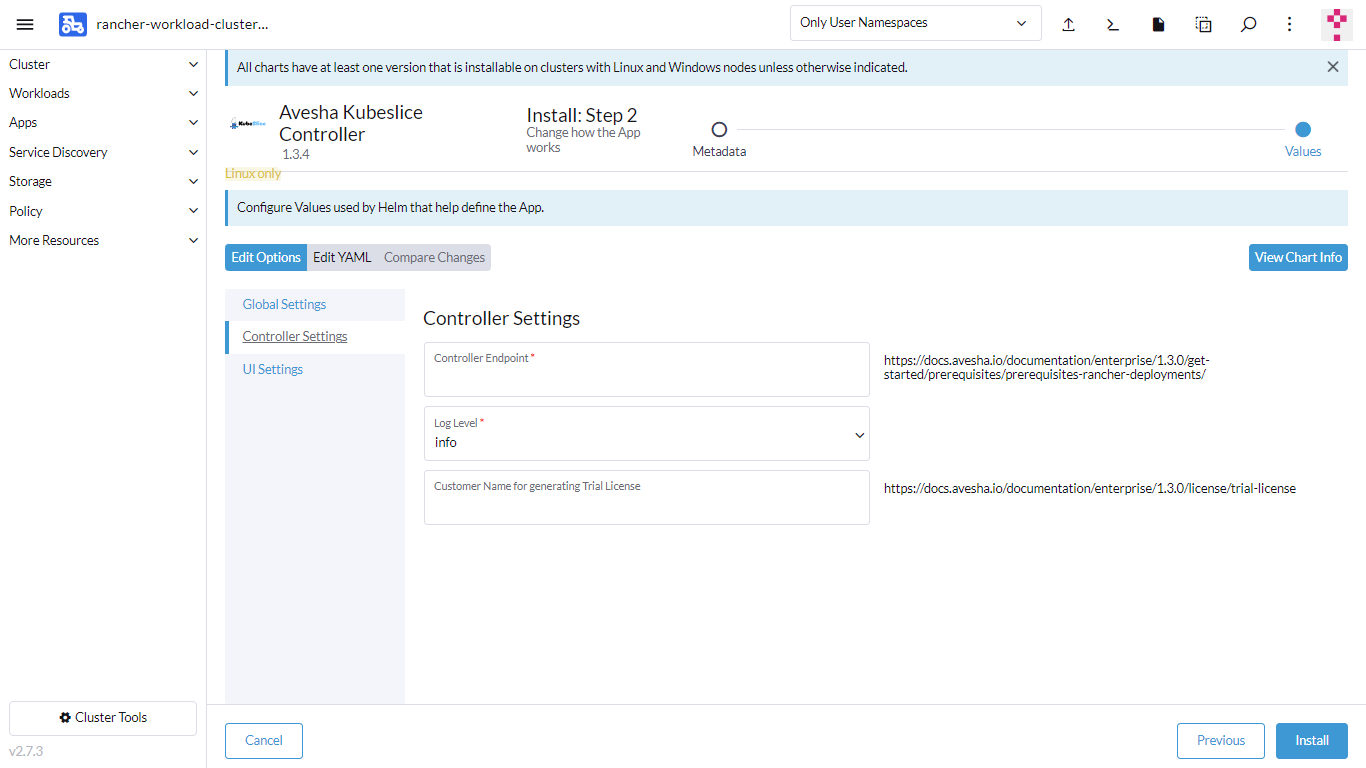
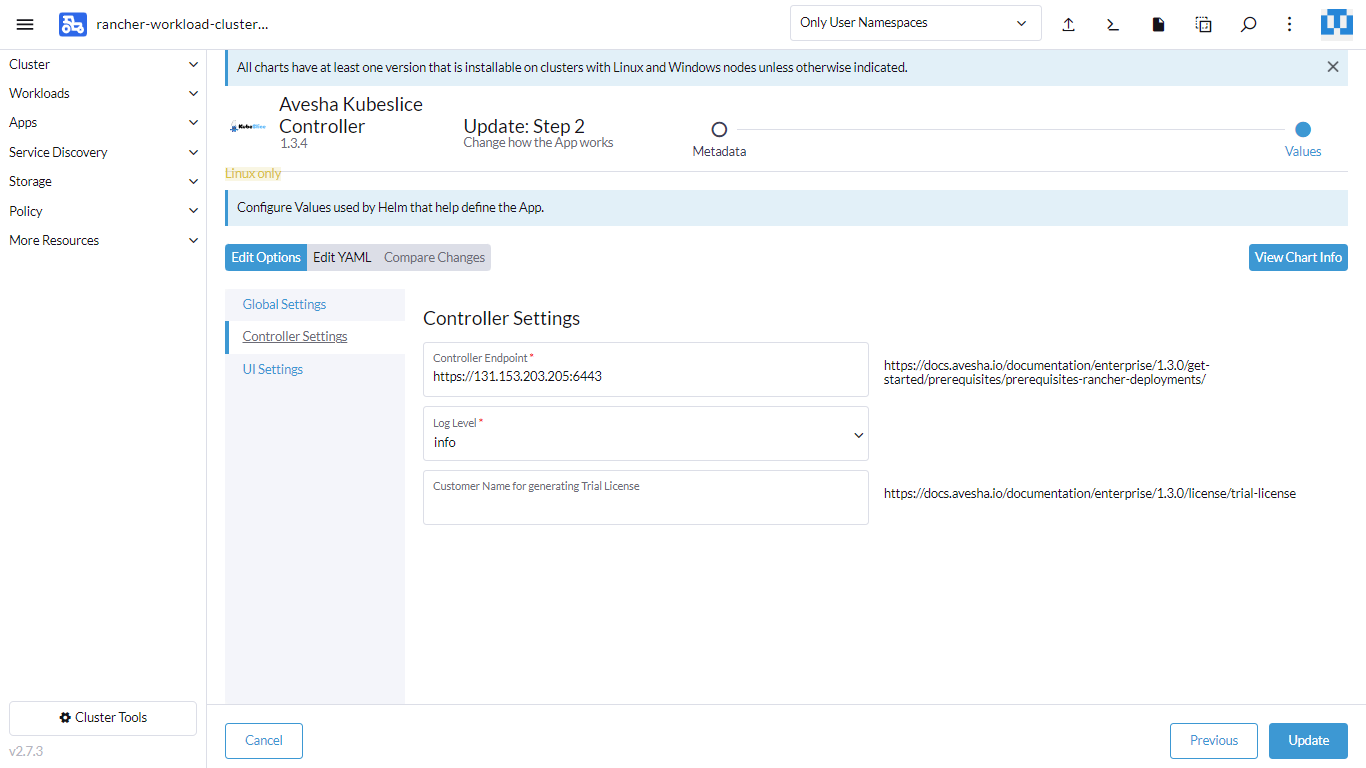
On the KubeSlice Controller Install: Step 2 page, go to the Controller Settings tab.
-
Under Controller Settings, for Controller endpoint, enter the controller cluster endpoint.
Get the controller cluster endpoint (URL and port) using the appropriate options of the
kubectl proxycommand. To know more, see kubectl proxy.infoEnsure that the port of the controller cluster that you add in the endpoint is open.
-
For Log Level, the default is info. You can change the log level from the drop-down list.
-
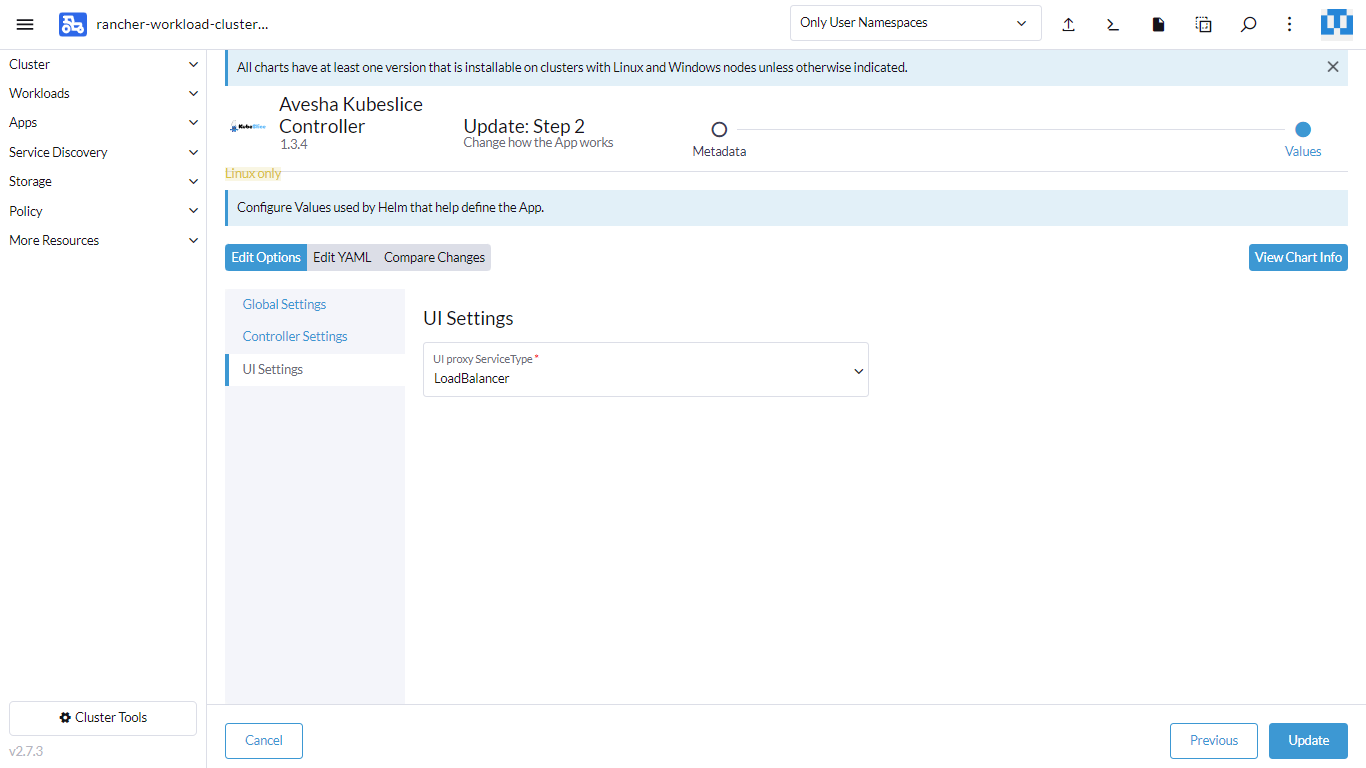
On the KubeSlice Controller Install: Step 2 page, go to the UI Settings tab.
-
Under UI Settings, for UI proxy ServiceType, select LoadBalancer from the drop-down list.
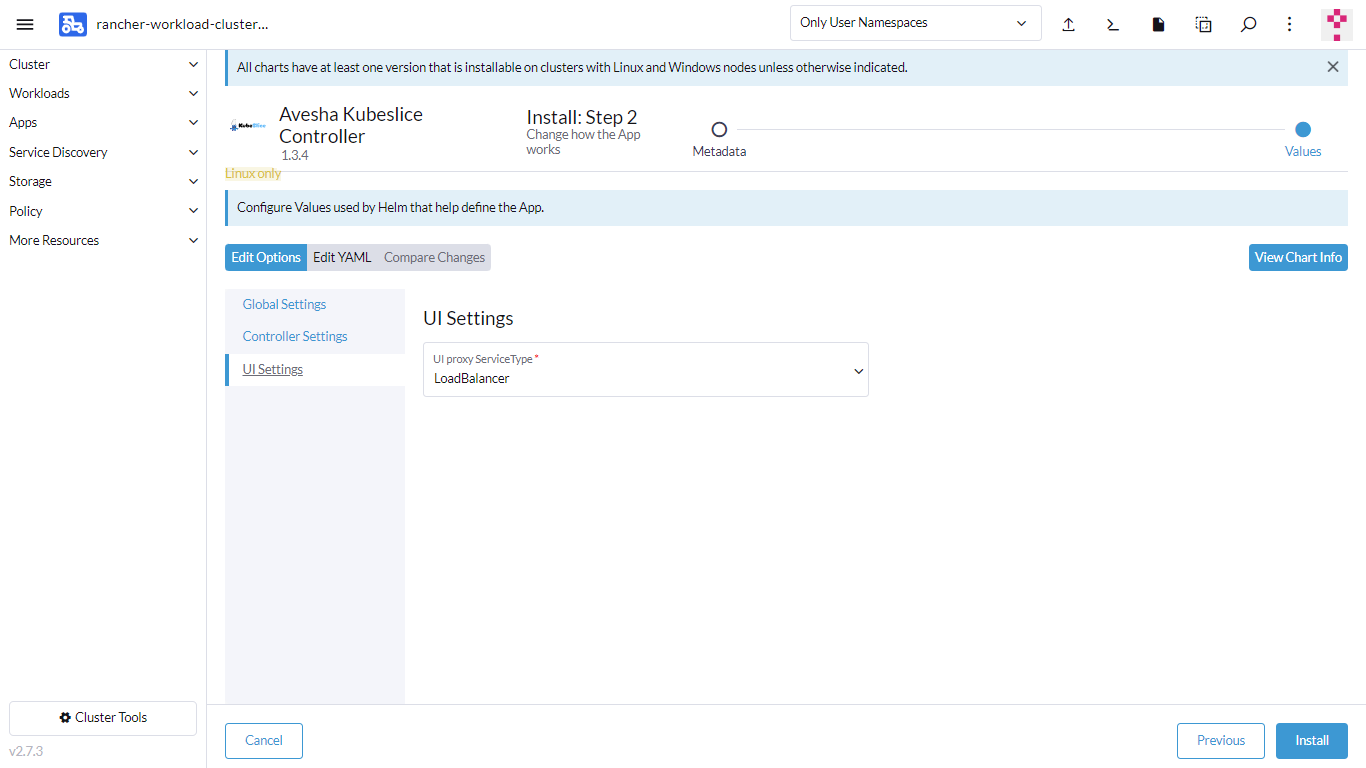
-
Click Install. The KubeSlice Controller is installed successfully.
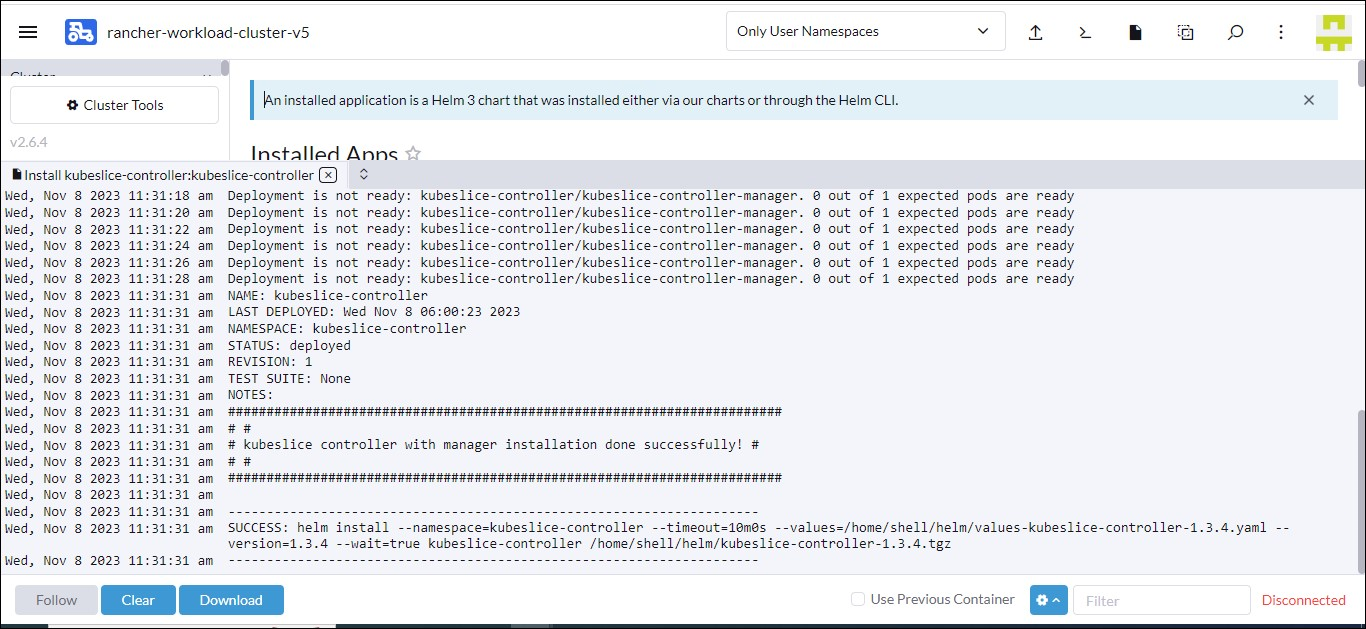
You have successfully installed the KubeSlice Controller! Installing the KubeSlice Controller installs the KubeSlice Manager, which is a user interface to register clusters, manage slices, and namespaces on a slice.
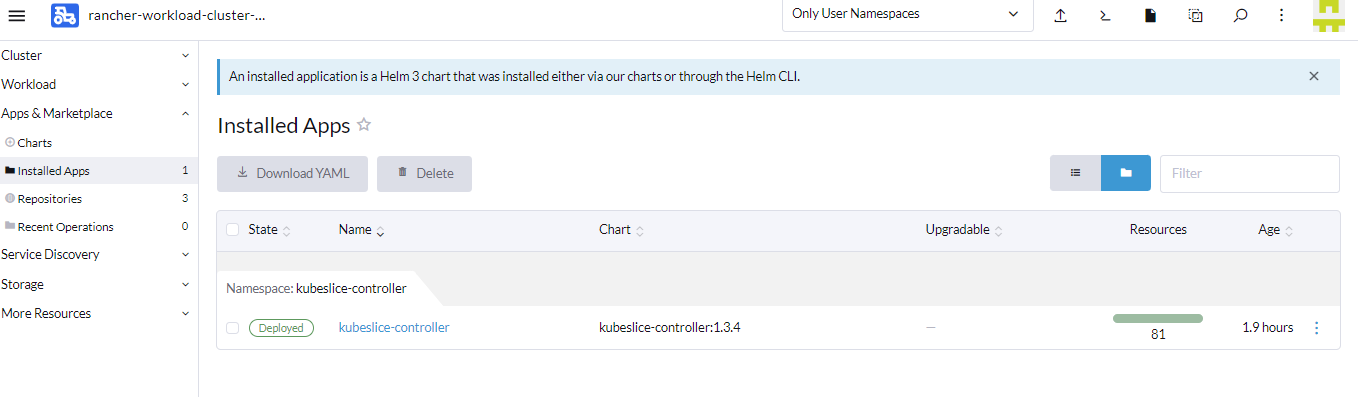
Validate the KubeSlice Controller Installation
On the Rancher user interface, validate the KubeSlice Controller by checking the installed apps. On the sidebar, click Apps, and click Installed Apps to check the KubeSlice Controller that you have just installed.
Create the Project
To create and manage slices on the worker clusters, you must create a project to associate the slices. In the project, you must also create the service account credentials required to log into the KubeSlice Manager.
Open the terminal that is on the controller cluster page.
![]()
Create a project.yaml file using the following template.
apiVersion: controller.kubeslice.io/v1alpha1
kind: Project
metadata:
  name: avesha
  namespace: kubeslice-controller
spec:
  serviceAccount:
    readWrite:
      - ui-admin
Applying the Project
Apply the project.yaml file to create the project.
| Parameter | Description |
|---|---|
<project name> | The given name of the project YAML file. |
Use the following command to apply the YAML file on the controller terminal of the controller-cluster Rancher user interface:
kubectl apply -f project.yaml -n kubeslice-controller
Validate the Project
Use the following command on the kubeslice-controller namespace to get
the list of the projects:
kubectl get project -n kubeslice-controller
For example:
kubectl get project -n kubeslice-controller
NAME     AGE
avesha   30s
Validate the Service Accounts
To validate the account creation, check the service accounts that belong to the project namespace using the following command:
kubectl get sa -n kubeslice-<project name>
Example:
kubectl get sa -n kubeslice-avesha
Example Output
NAME                              SECRETS   AGE
default                           1         30s
kubeslice-rbac-ro-user1           1         30s
kubeslice-rbac-rw-user2           1         30s
Access the KubeSlice Manager
KubeSlice Manager is a web-based user interface to manage slices, register clusters, and manage namespaces.
KubeSlice Manager supports the following authentication options:
- Service account token
- Auth provider
Use the Service Account Token
Create a kubeconfig file using this script.
Log into the KubeSlice Manager using the kubeconfig file.
To access the KubeSlice Manager:
-
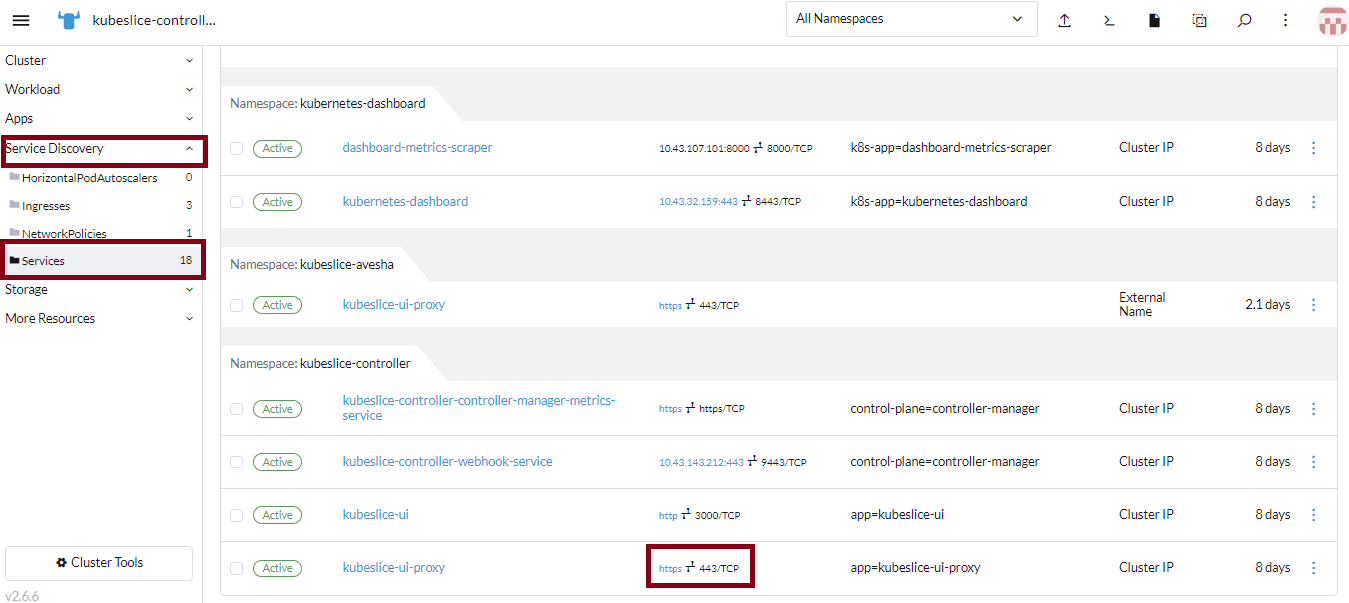
Get the URL to access the KubeSlice Manager from the Rancher-managed controller cluster. To get the access URL of the KubeSlice Manager, go to the controller cluster. On the left sidebar of the cluster page, click Service Discovery and click Services. Click the https link of the kubeslice-ui-proxy.
-
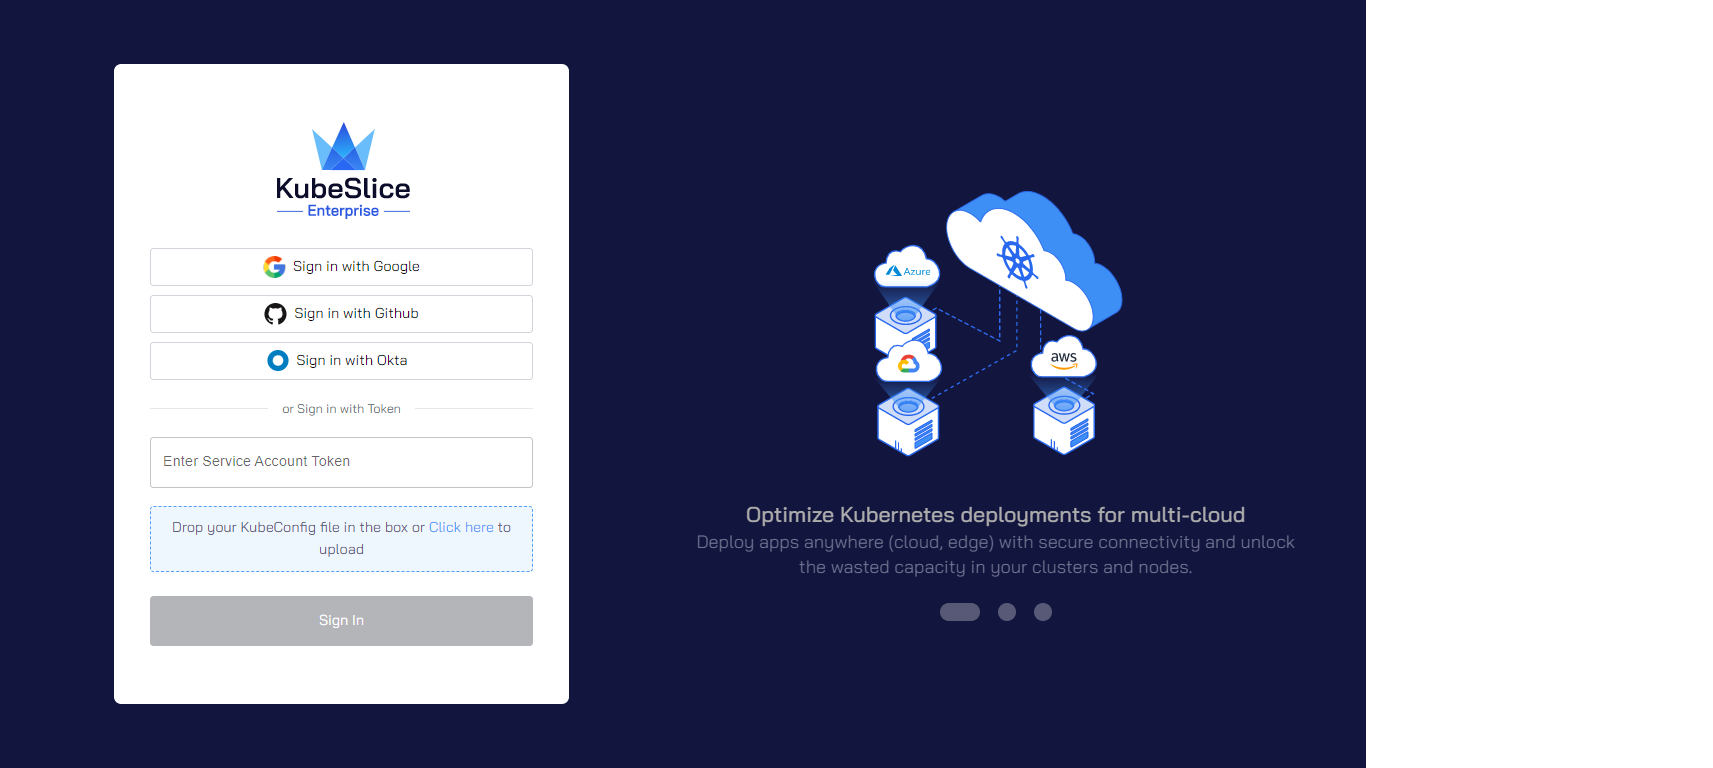
The KubeSlice Manager login page has a link to upload the kubeconfig file to log in.

On the login page, for Enter Service Account Token, copy the token from the kubeconfig file that you have generated from the script and paste the service account token.
Alternatively, drop or upload your kubeconfig file that you have created above in the text box below that states Drop your KubeConfig file in the box or Click here to upload.
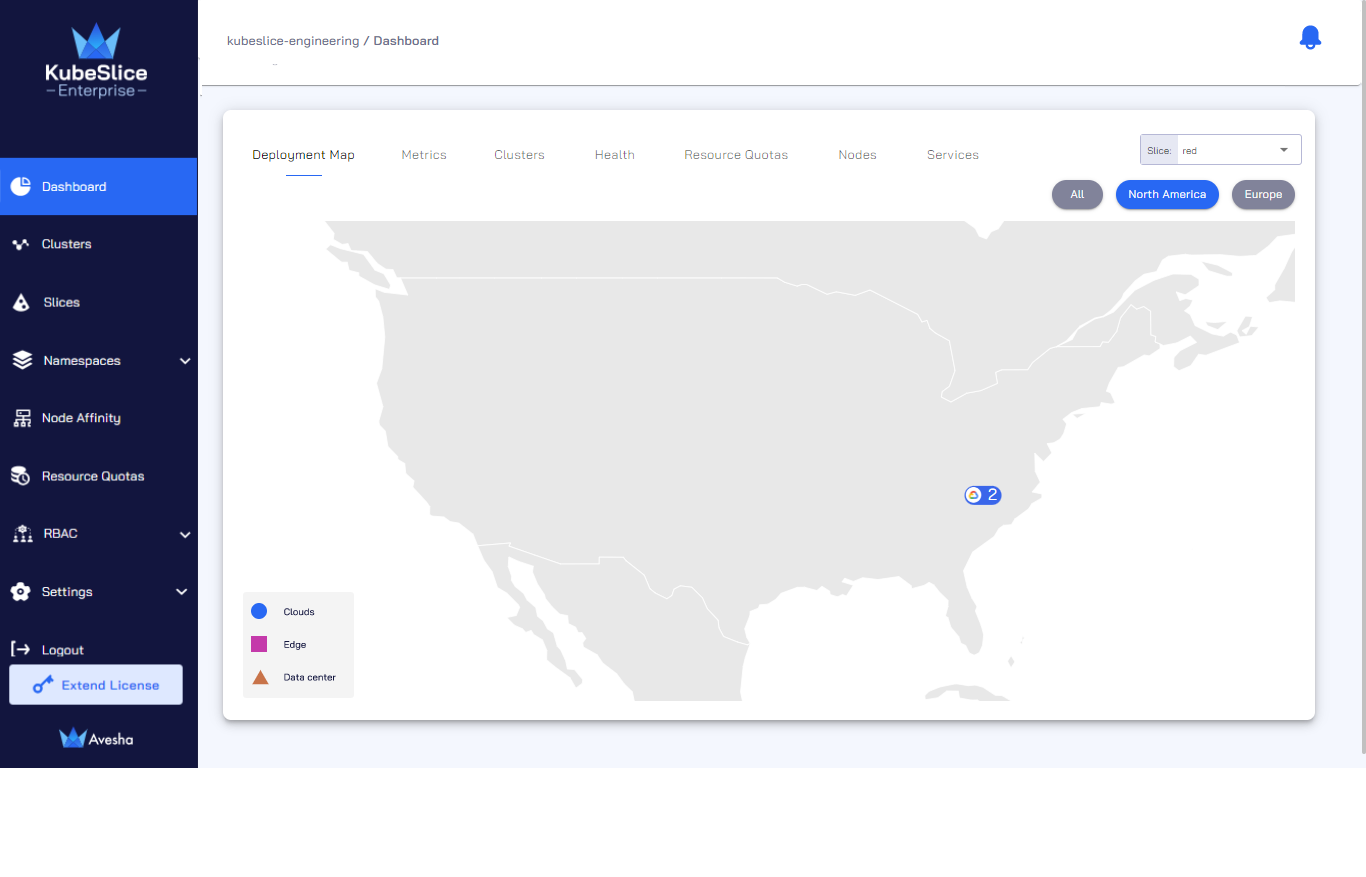
Click SIGN IN. After a successful authentication, you see the dashboard of the KubeSlice Manager as the landing page.
-
The landing page contains the deployment map with no slices selected.
Configure Auth Providers
For information on configuration details, see setting up IdP on Rancher.
To access the KubeSlice Manager:
-
You need the URL to access the KubeSlice Manager from the Rancher-managed controller cluster. To get the access URL of the KubeSlice Manager, go to the controller cluster. On the left sidebar of the cluster page, click Service Discovery and click Services. Click the https link of the kubeslice-ui-proxy.
-
On the login page, click the IdP button.
-
Select the project and click SIGN IN. The KubeSlice Manager authenticates you as you are already authenticated as a Rancher/GitHub user.
-
The landing page contains the deployment map with no slices selected.
Update the KubeSlice Controller
After you have installed the KubeSlice Controller chart, you can update the chart version (if any) or other configuration values.
To update the KubeSlice Controller chart:
-
Go to the controller cluster.
-
On the Cluster page, click Apps on the sidebar.
-
Click Charts.
-
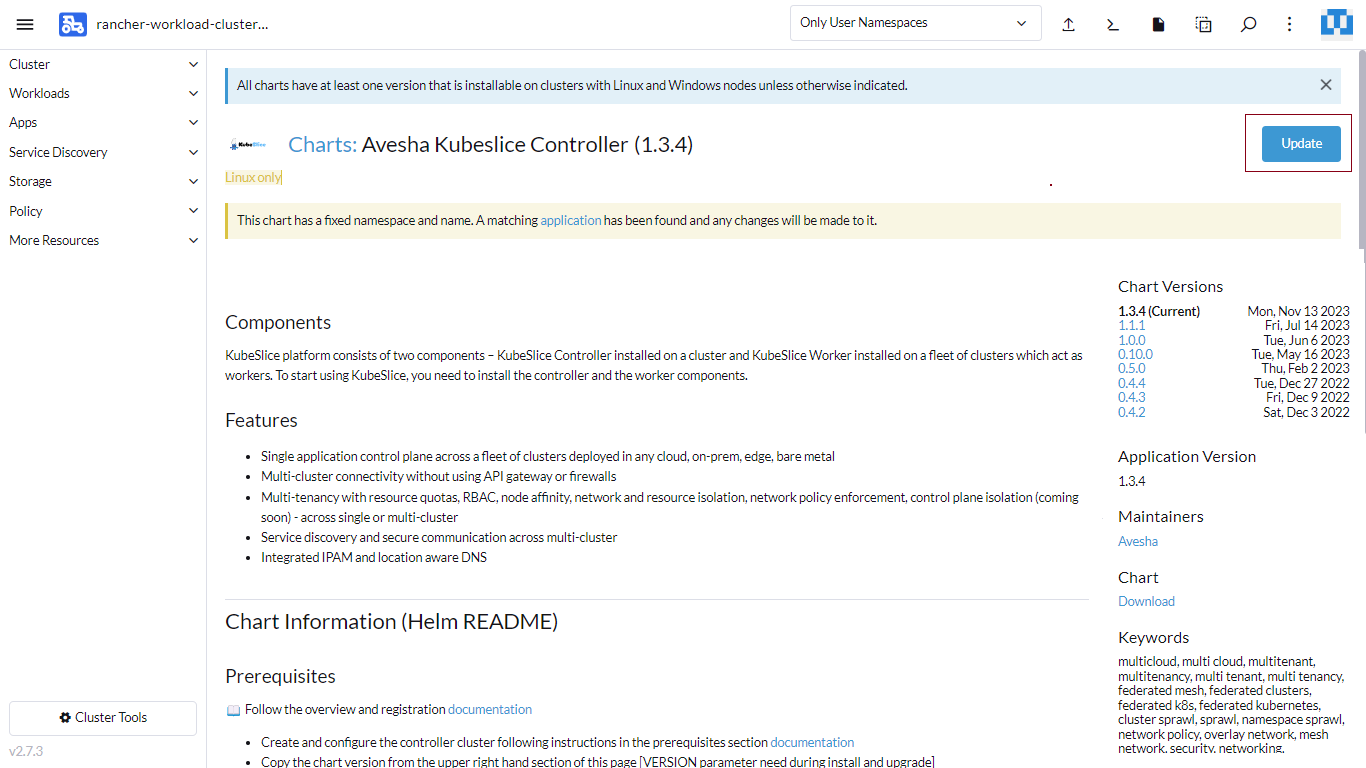
On the Charts page, look for KubeSlice Controller under the Security category.
-
On the Charts: KubeSlice Controller page, click Update.
-
On the Update: Step 1 page, you can select the latest version. If you are on the current version, click Next.
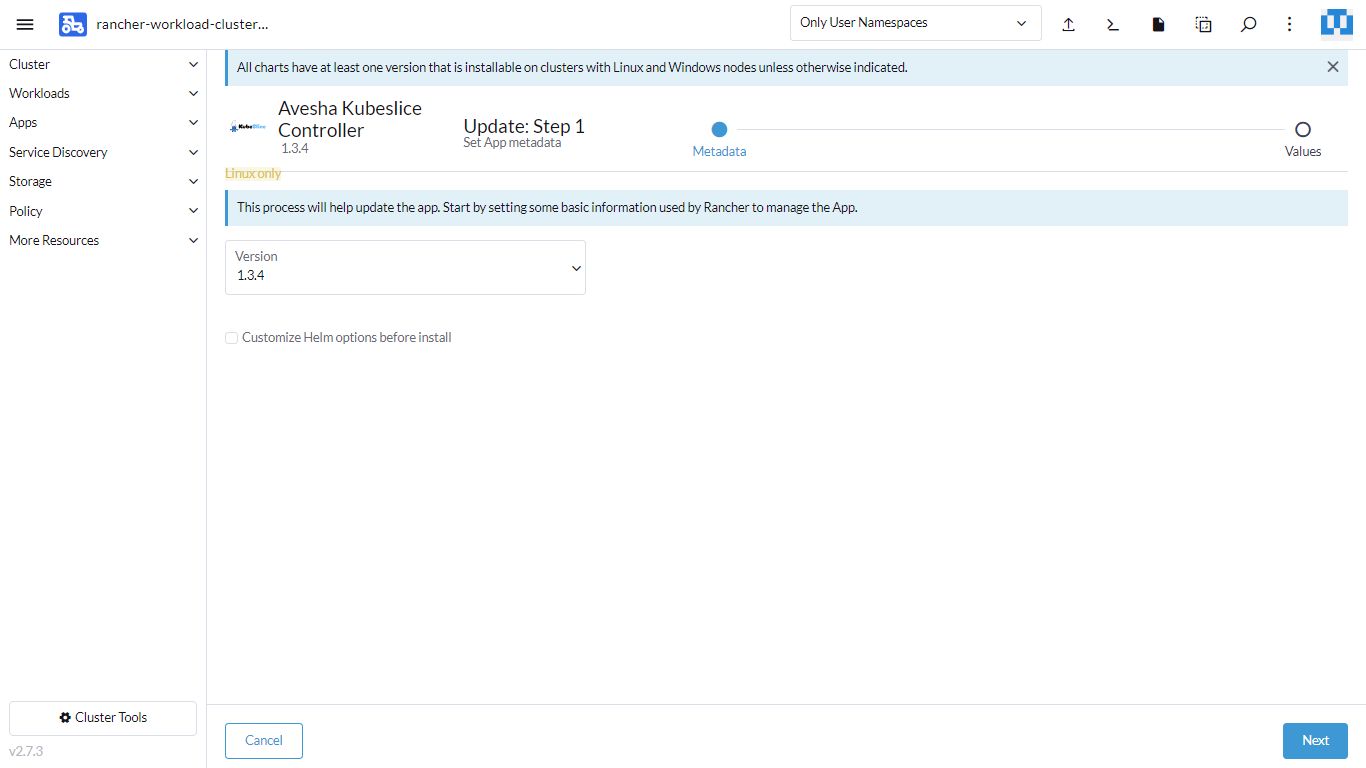
-
On the Update: Step 2 page, click Edit Options, and click Global Settings. Edit the values as necessary.
-
Click Controller Settings and change the values as necessary.
-
Click UI Settings and change the value as necessary. We recommend you to use the LoadBalancer UI proxy service type.
-
Click Update to refresh the configuration.
KubeSlice Worker Clusters
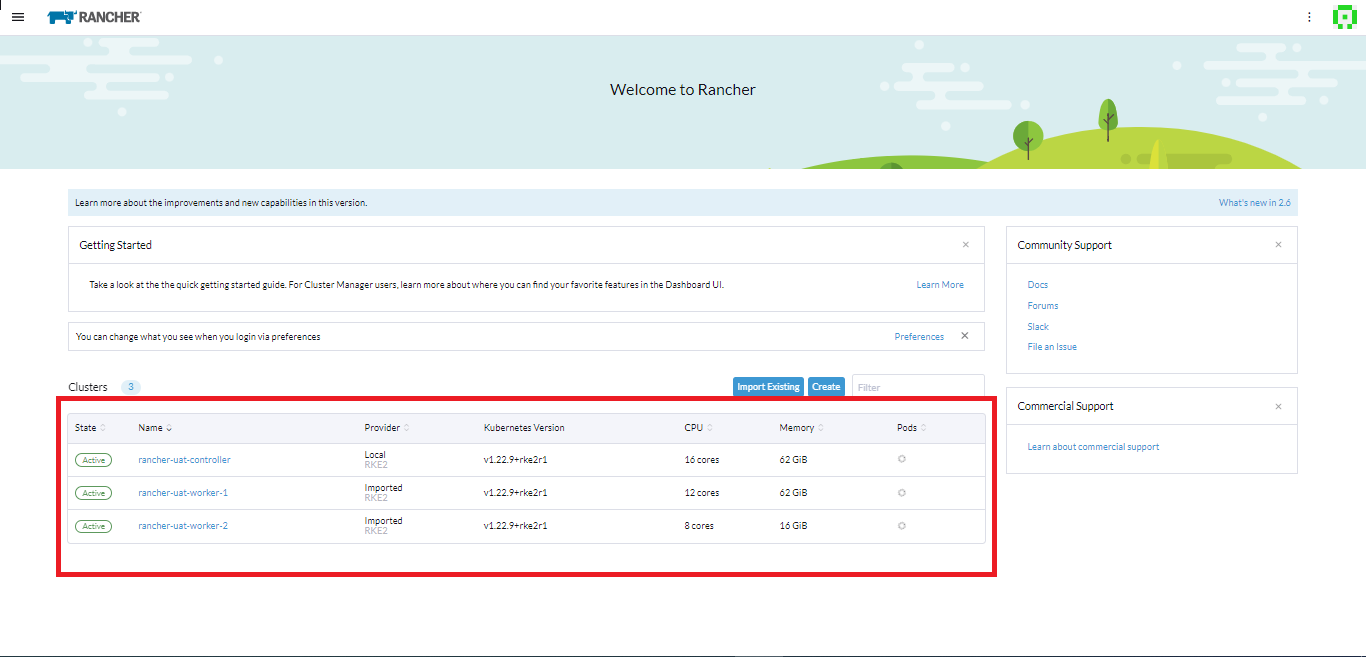
From the Rancher user interface, create 2 or more worker clusters[downstream user cluster] using Rancher Kubernetes Engine (RKE) for installing the KubeSlice worker [referred hence forth as KubeSlice Worker Cluster]
To use a cluster imported from external cloud providers to deploy KubeSlice Controller, contact support@avesha.io
Get the Cluster Endpoint
To get the cluster endpoint:
-
Navigate to the top-left menu, select the worker cluster.
-
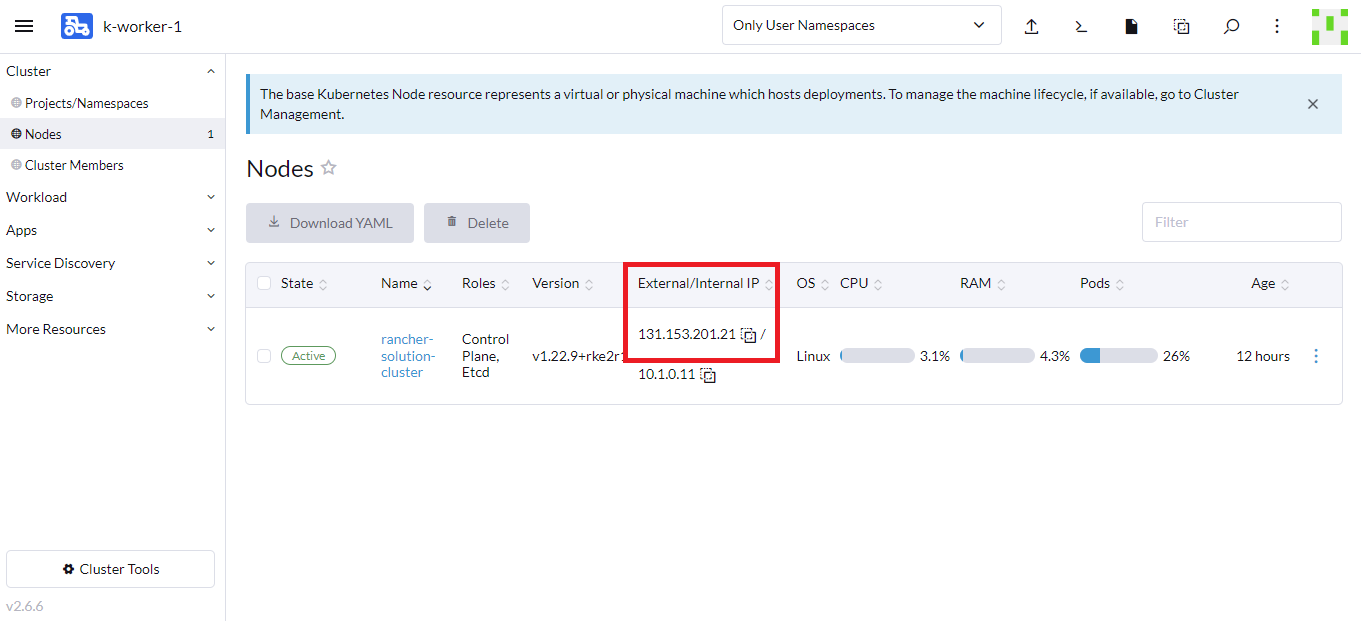
Under the Cluster, click Nodes. Copy the external IP address of the your worker node.
-
On the left sidebar, click Service Discovery > Services and copy the port number.
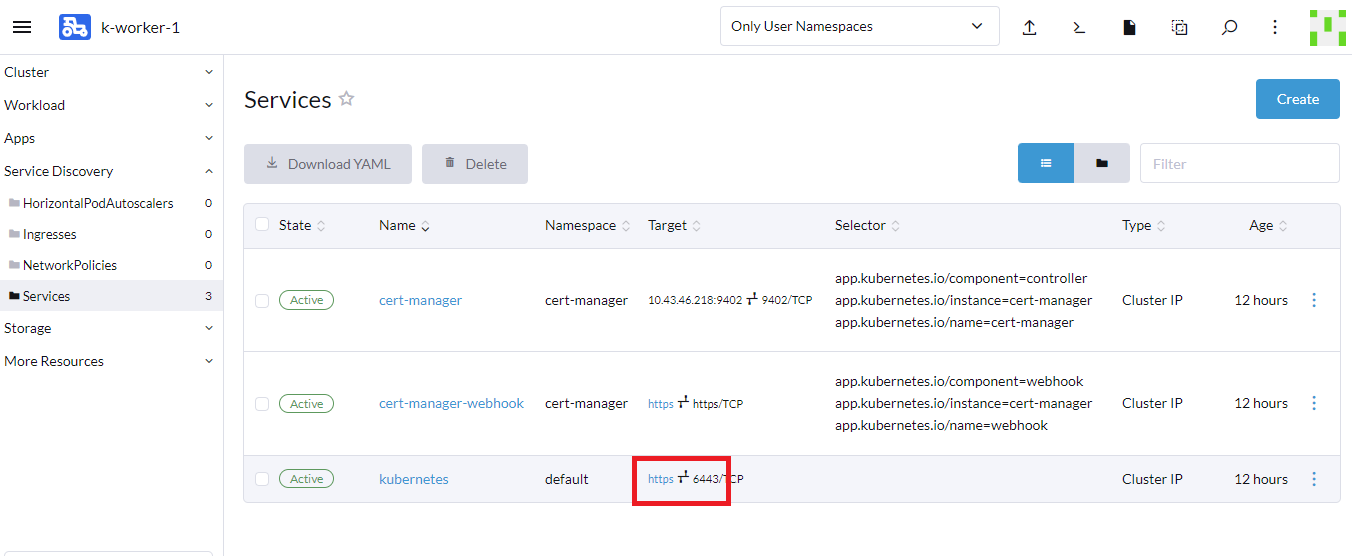
You worker cluster endpoint is in the format https://externalnode-ip:<port>. For example, https://1353.201.21:6443.
Register Clusters in Manual Mode
To register a worker cluster:
-
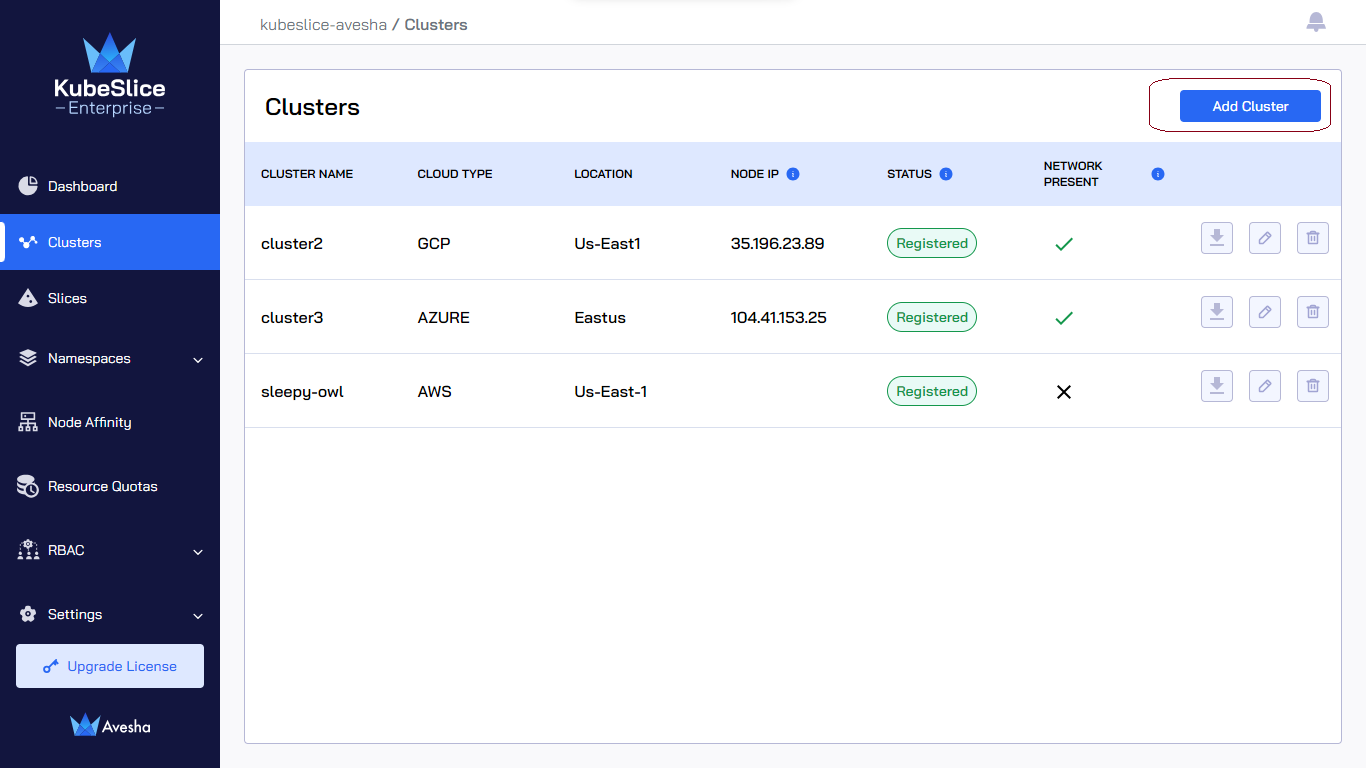
Go to Clusters on the left sidebar.
-
On the Clusters page, click Add Cluster to register a cluster.
-
Under Register Cluster, select the Manual mode.
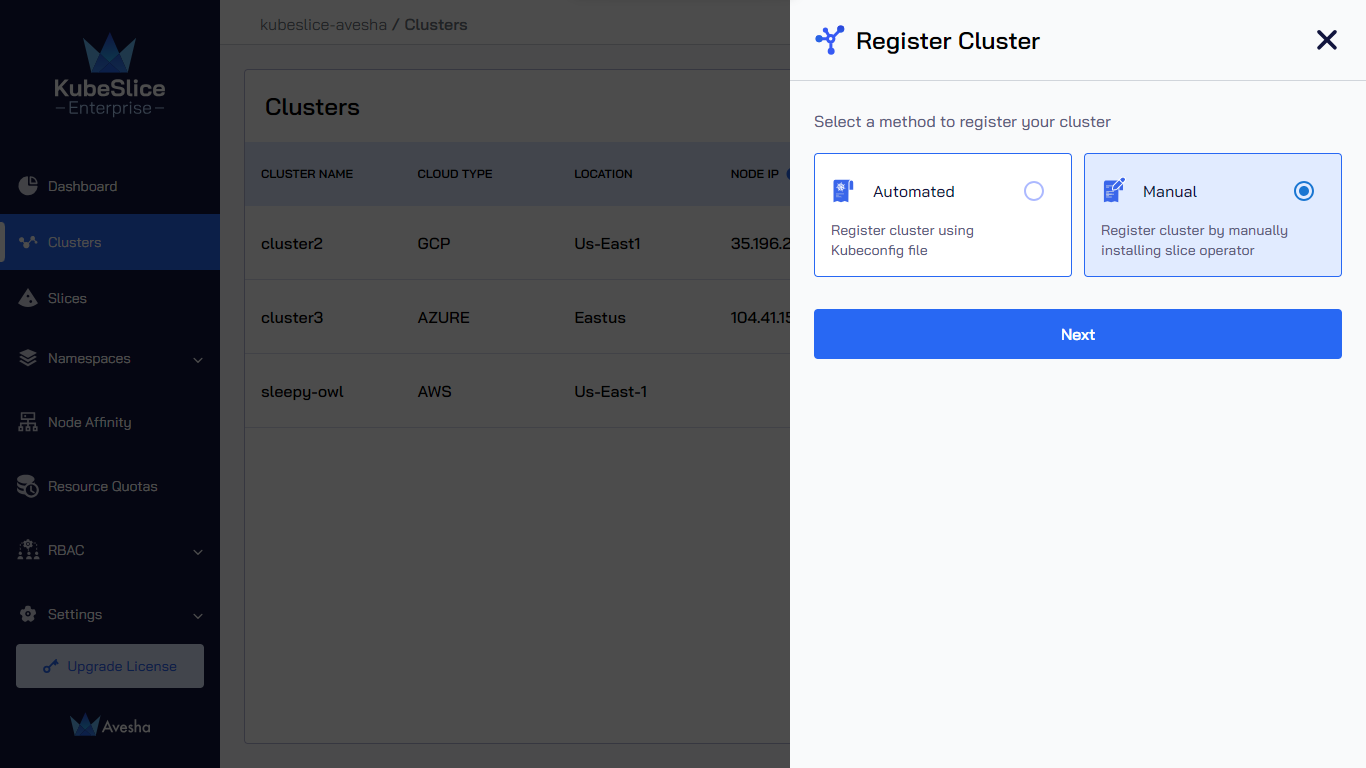
-
Click Next to add the cluster details.
-
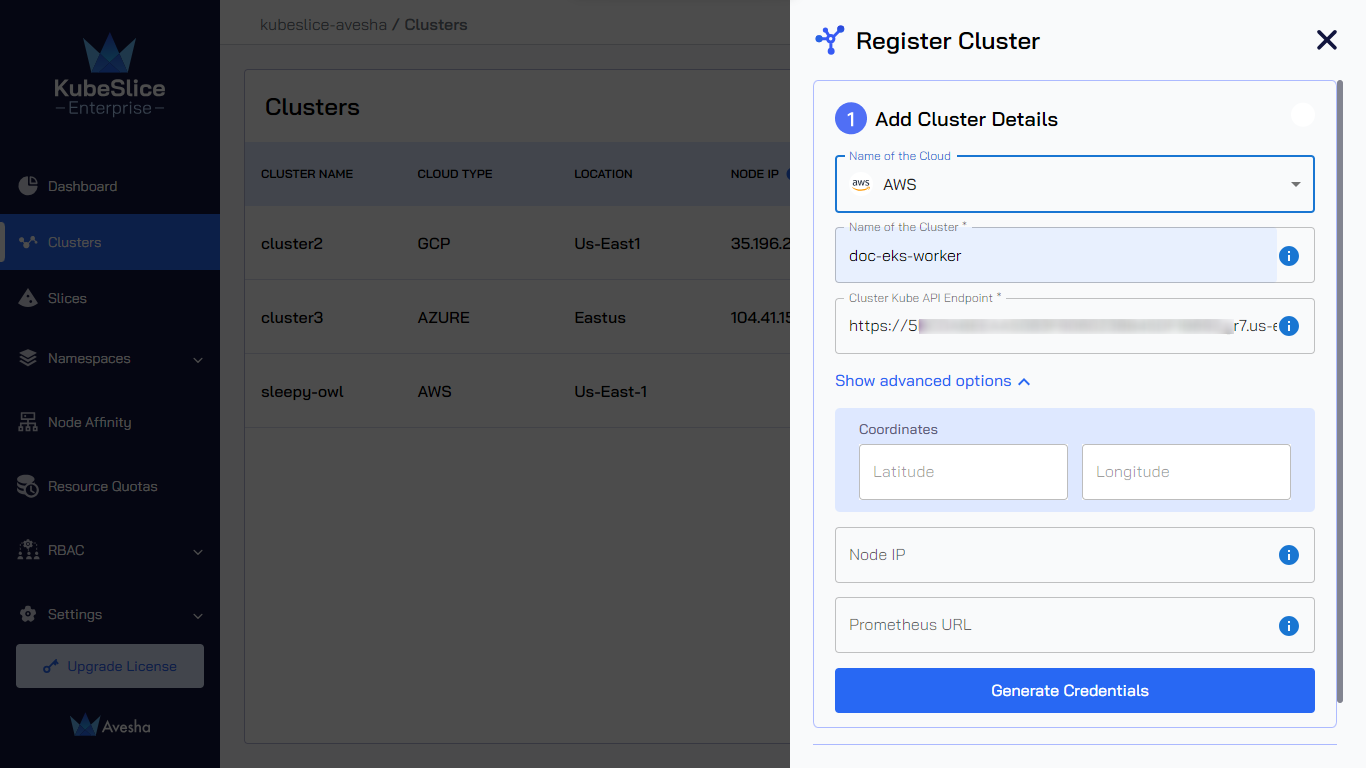
In the Add Cluster Details section, enter the following information:
-
Select the cloud from the Name of the Cloud drop-down list. The saved value is immutable.
-
Enter a name for the worker cluster in the Name of the cluster text box. The saved value is immutable.
-
Enter the control plane's
kube-apiserverendpoint of the cluster in the Cluster Kube API Endpoint text box. To get the cluster endpoint, see Get the Cluster Endpoint.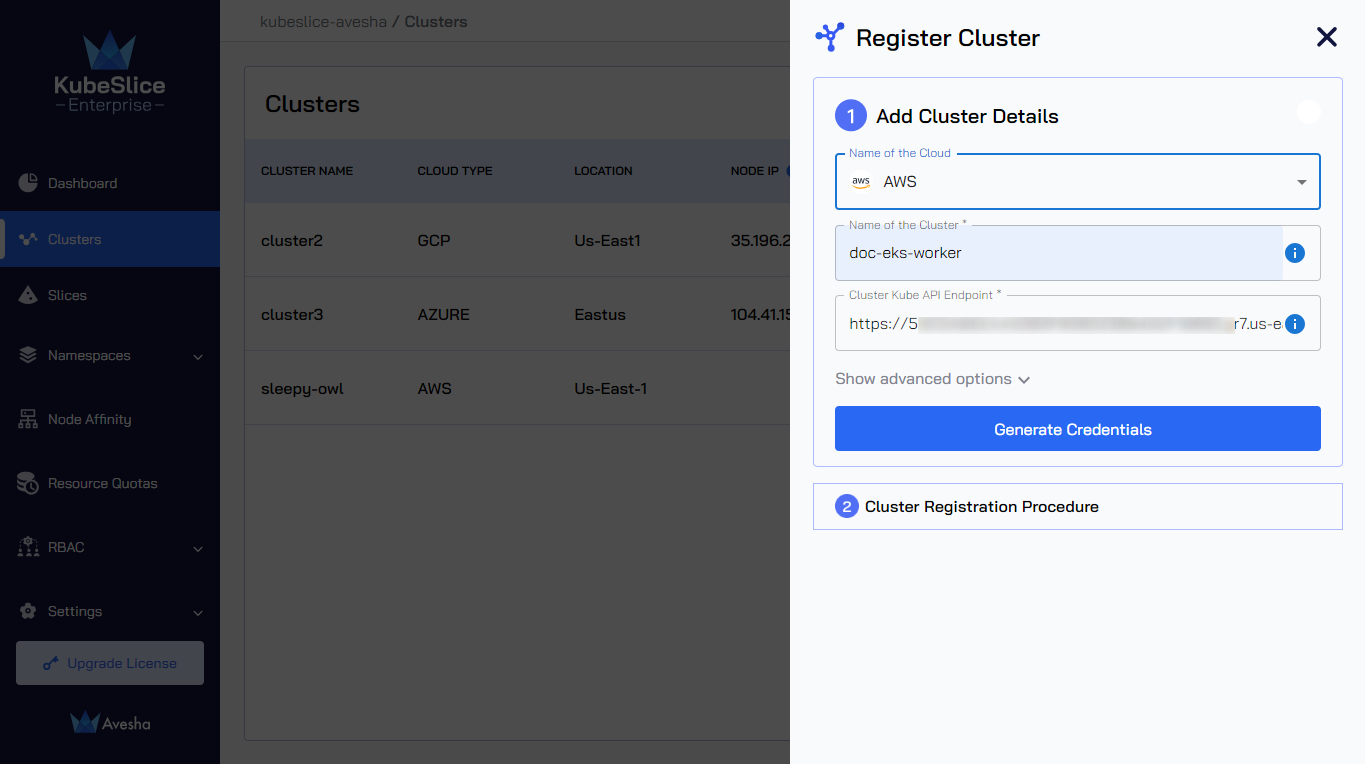
infoYou can skip Step 6 and proceed to Step 7 to generate the values file.
-
-
(Optional) Click Show advanced options and enter the following information:
-
KubeSlice detects the Node IP for nodes labeled
kubeslice.io/node-type=gateway. You can leave it blank. You can enter a specific Node IP during cluster registration, but make sure KubeSlice has access to it.noteWe currently support IPv4 and IPv6 for node IP addresses.
-
Enter the URL of Prometheus that is installed on your cluster in the Prometheus URL text box.
-
-
Click Generate Credentials to generate the values file. The values file is downloaded automatically. Save the file for later use.
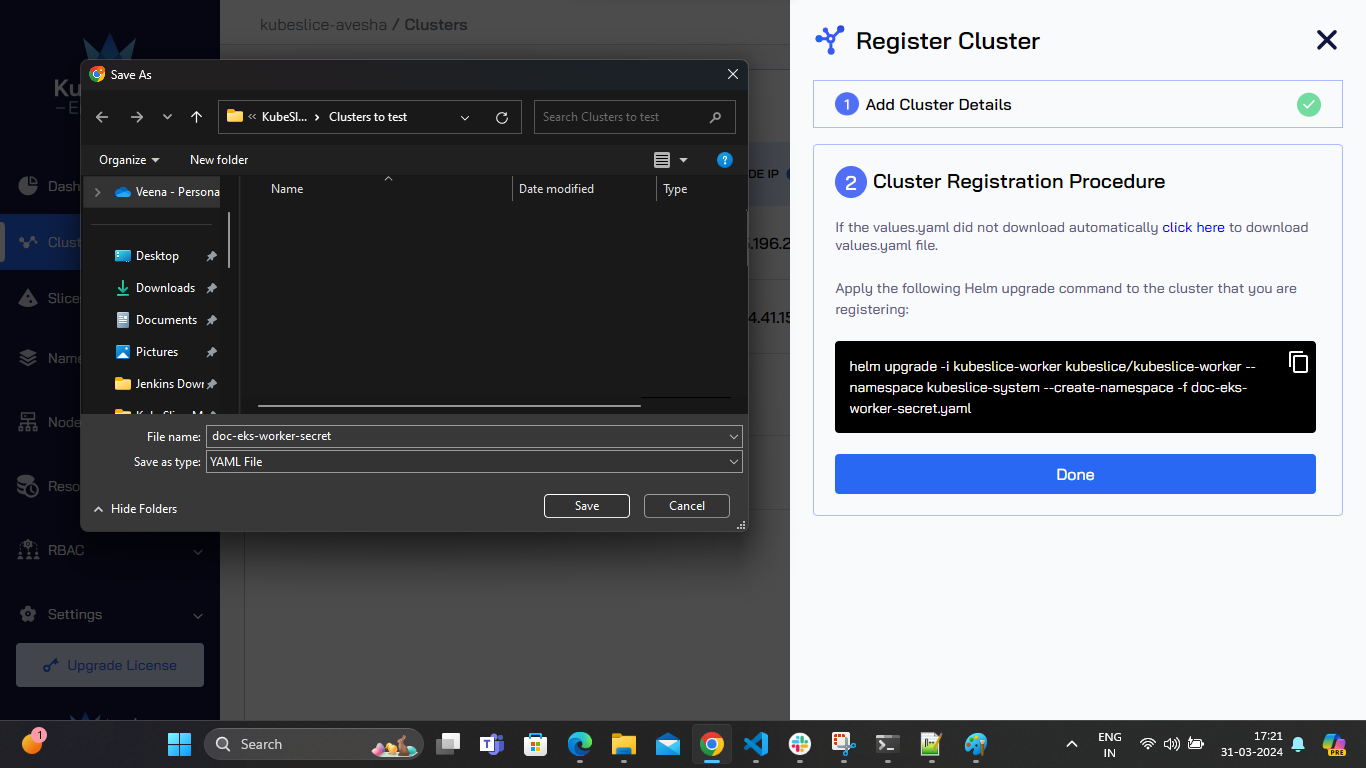
The values file contains the worker secrets from the controller cluster, and the file is created with the cluster name that you entered in step 5.
-
(Optional) In the Cluster Registration Procedure section, click the download link if the values file does not download automatically.
-
Click Done.
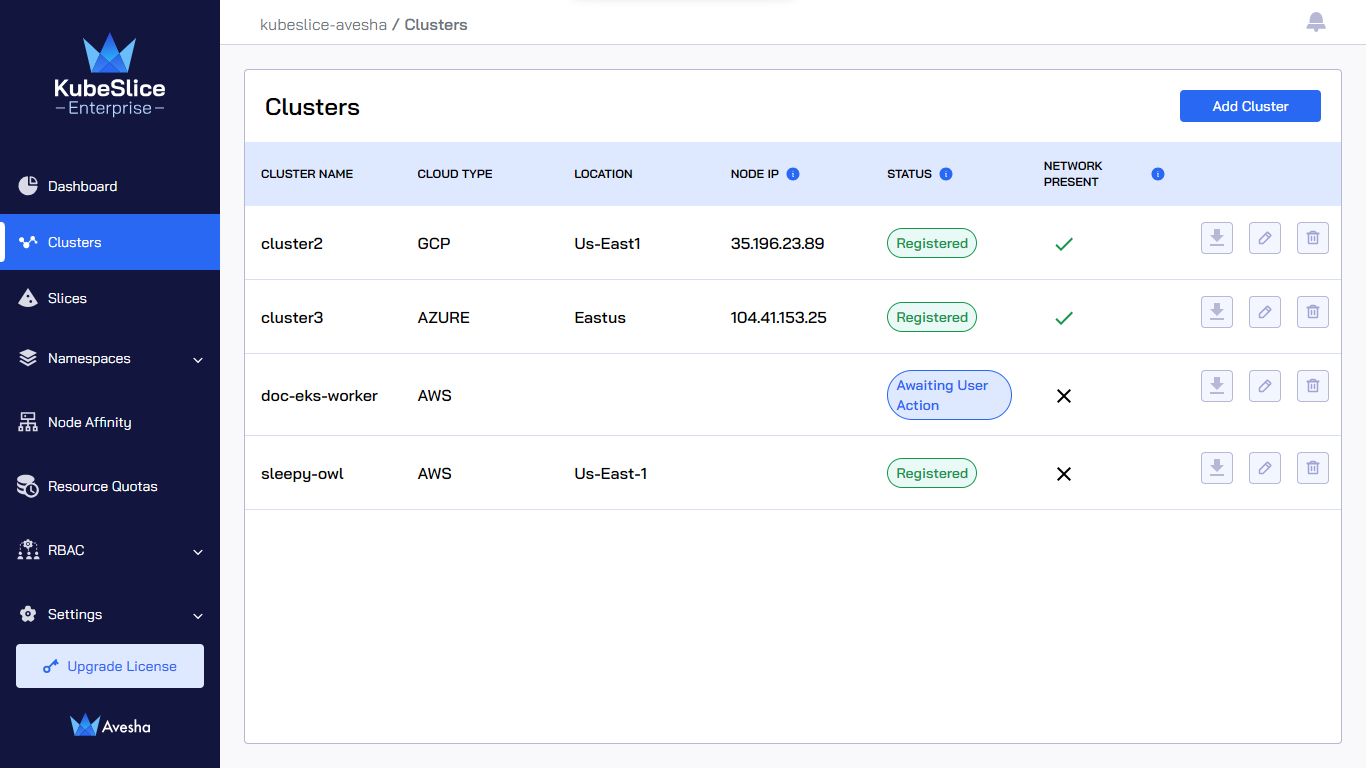
The worker cluster's status on the Register Clusters page will be Awaiting User Action until the Slice Operator is
installed on it. The status changes to Registered after you install the Slice Operator
on the worker cluster, which shows that the cluster has been successfully registered.
Install the Slice Operator
The Slice Operator, also known as Worker operator is a Kubernetes Operator component that manages the life-cycle of the KubeSlice related Custom Resource Definition (CRDs).
To install the Slice Operator:
-
Log in to the Rancher UI.
-
On the Rancher home page and under Clusters, select the worker cluster where you deploy the Slice Operator.
-
On the left sidebar, click Apps > Charts.
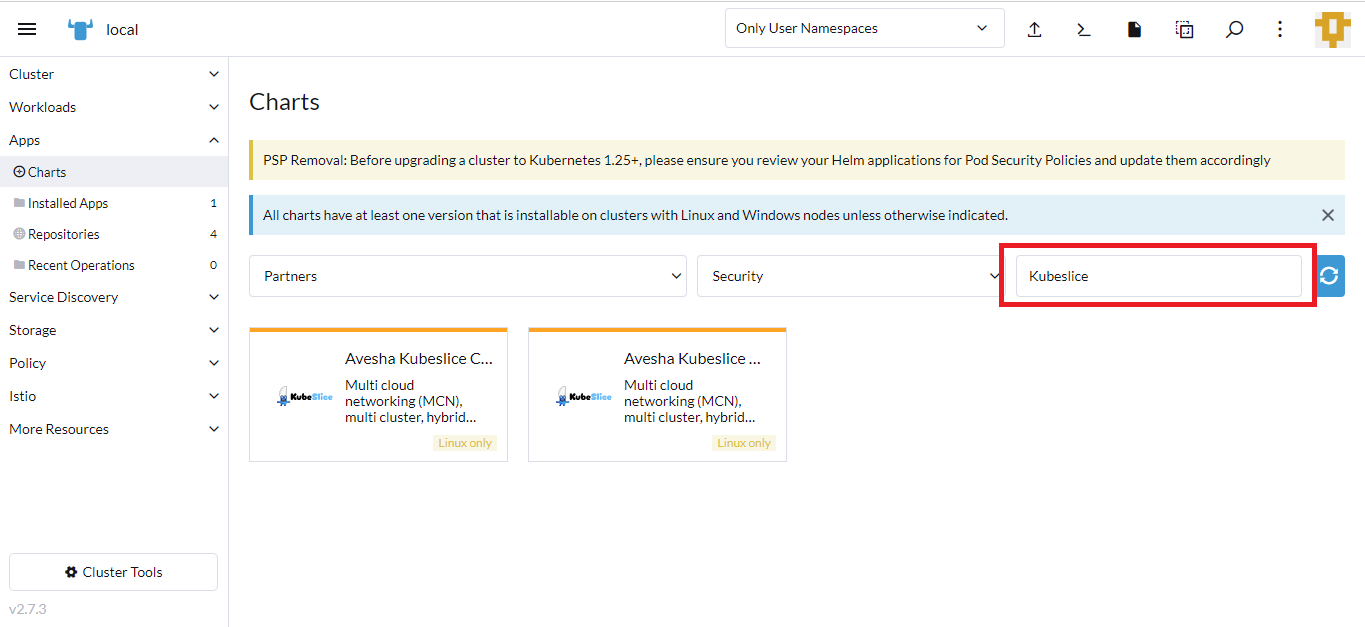
-
On the Charts page, enter kubeslice in the search box. The Kubeslice charts are displayed.
-
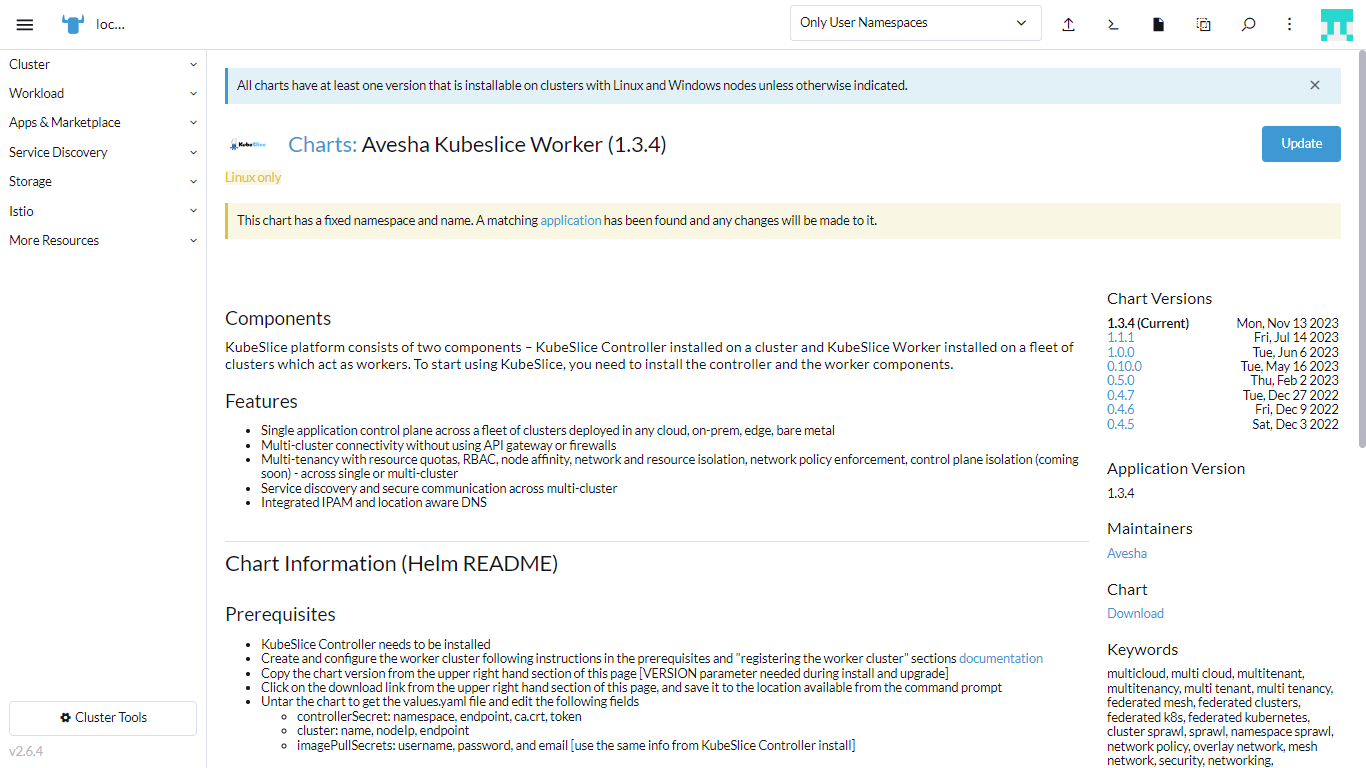
Click the Kubeslice Worker chart.
-
On the Charts:KubeSlice Worker page, click Install.
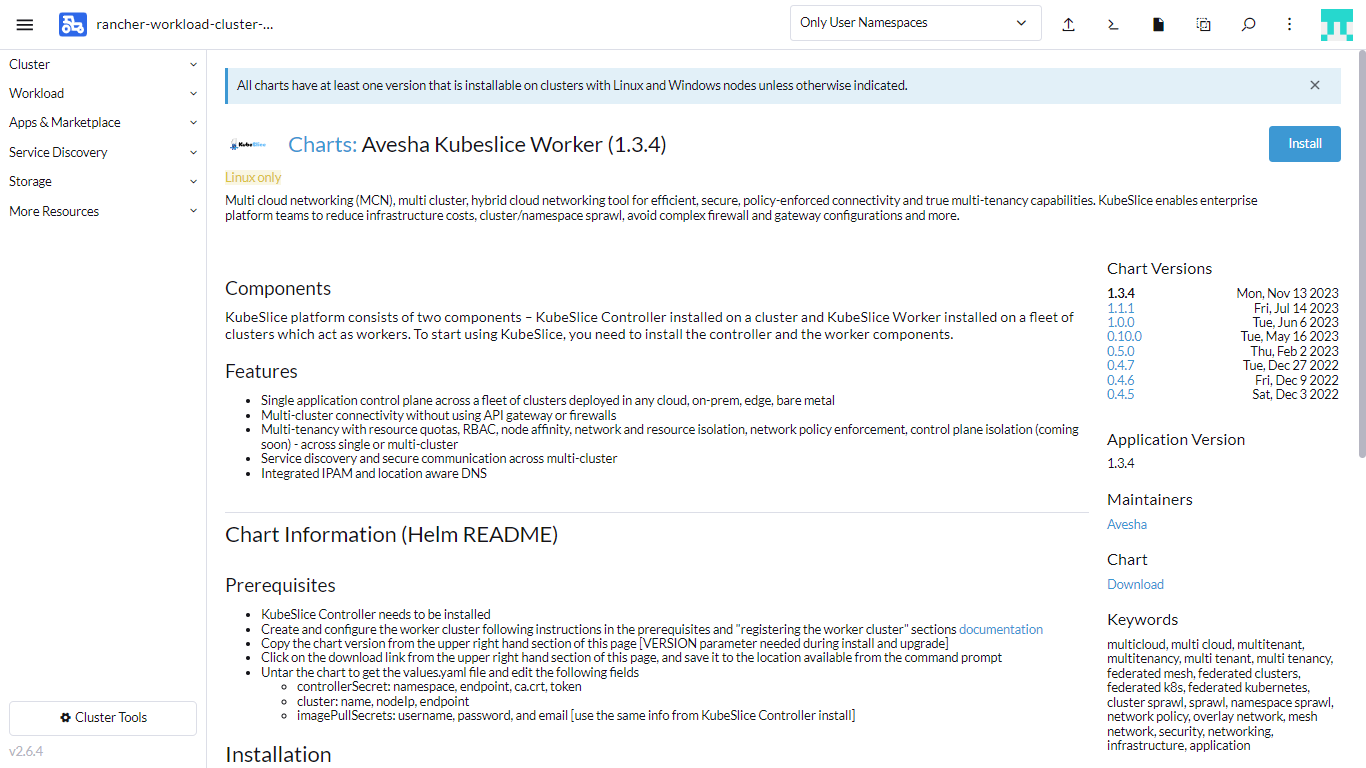
-
On the Install:Step1 page, under Install into Project, select None.

-
Click Next.
-
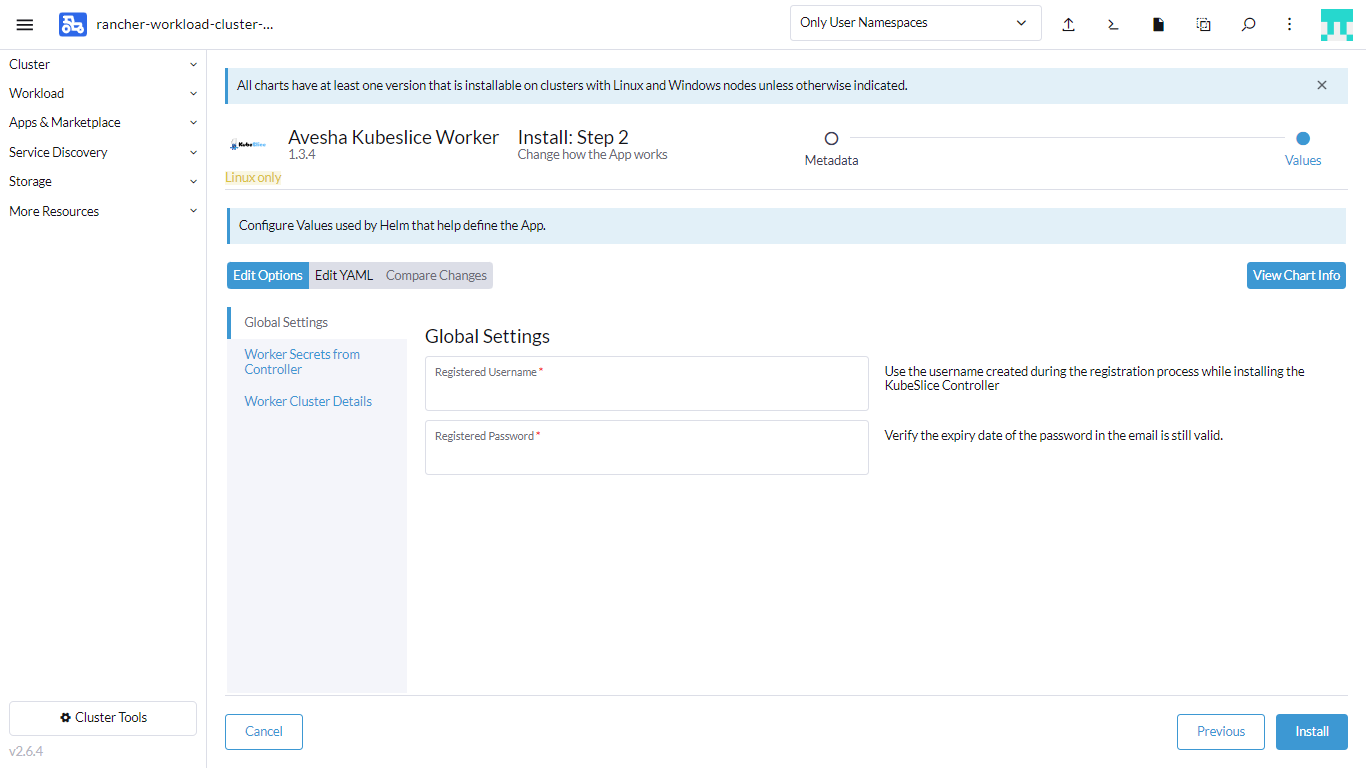
On the Install Step2 page, enter the credentials you received through email, the worker secrets you get from the controller cluster, and the worker cluster details.
-
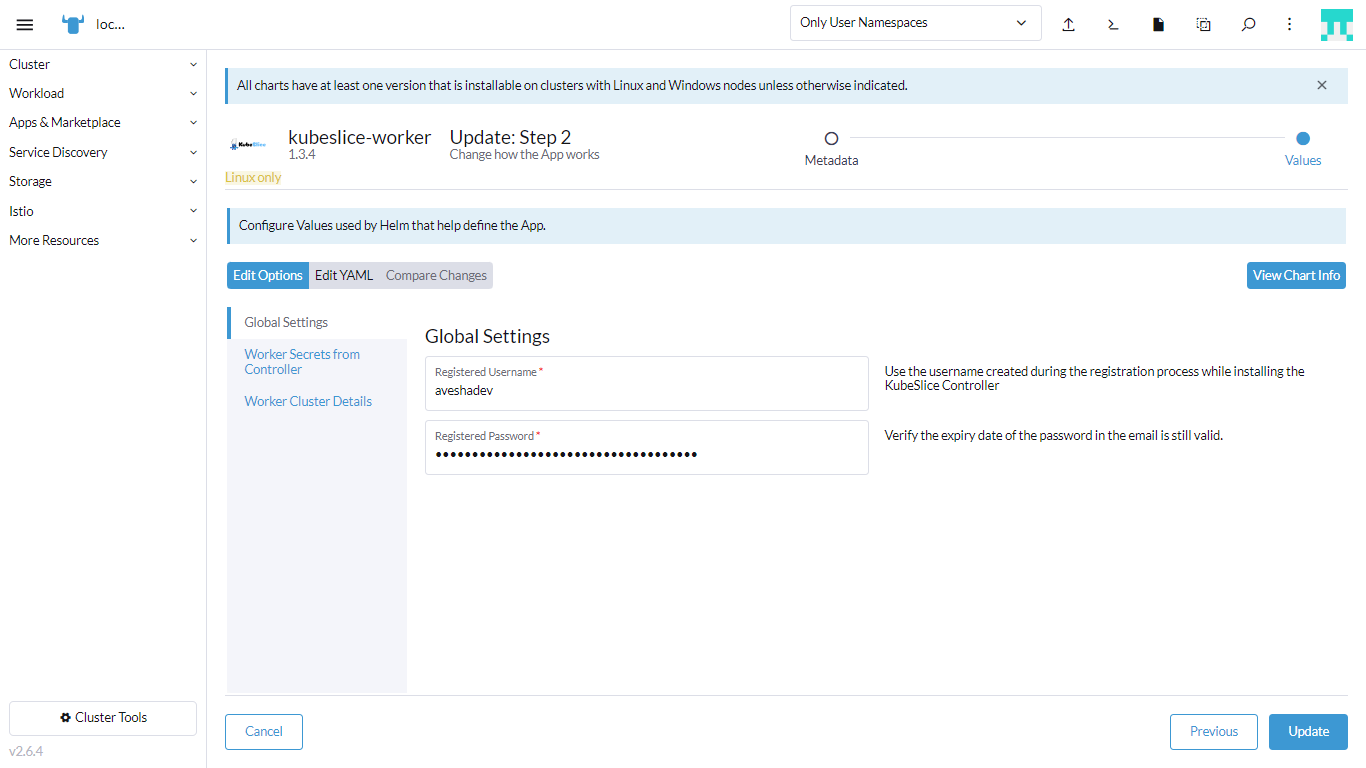
Click the Global Settings tab, and enter these details:
infoUse the username created during the registration process while installing the KubeSlice Controller.
- For Registered username, enter the username you have received in the email.
- For Registered password, enter the password you received in the email.
-
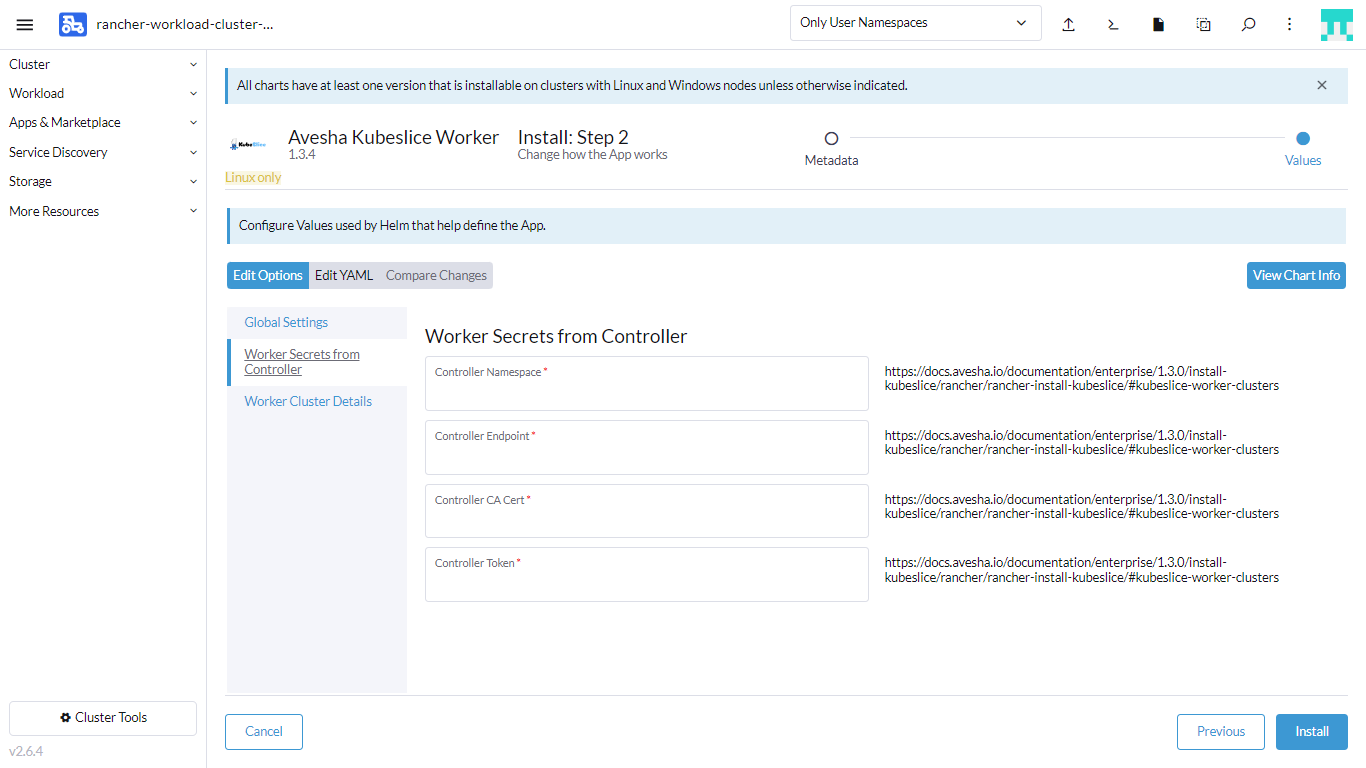
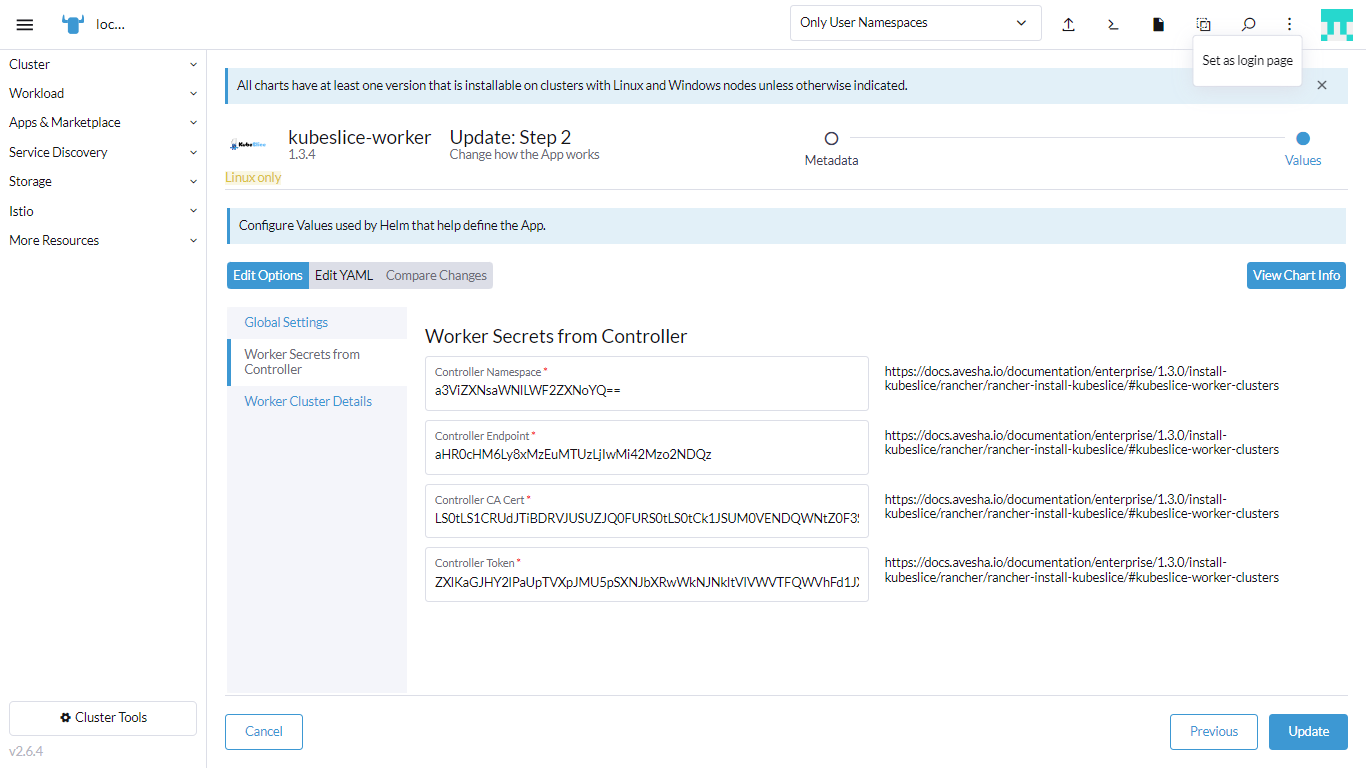
Click the Worker Secrets from Controller tab, and enter these details:
infoYou must enter the worker secrets from the values file you downloaded in step 7 of Register Worker Clusters in Manual Mode steps.
- For Namespace, enter the encoded namespace you get from the secrets of the registered cluster.
- For Endpoint, enter the encoded endpoint you get from the secrets of the registered cluster.
- For Ca cert, enter the encoded ca.cert you get from the secrets of the registered cluster.
- For Token, enter the encoded token you get from the secrets of the registered cluster.
-
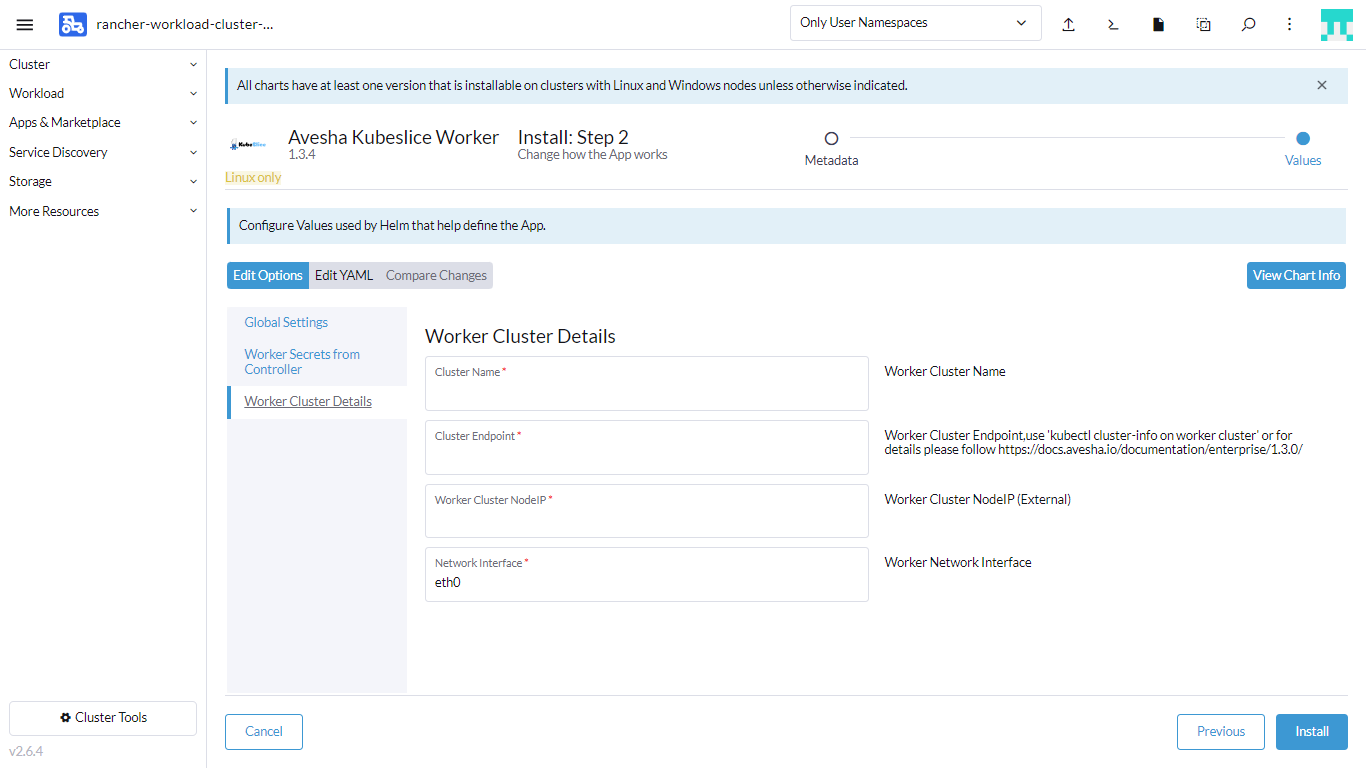
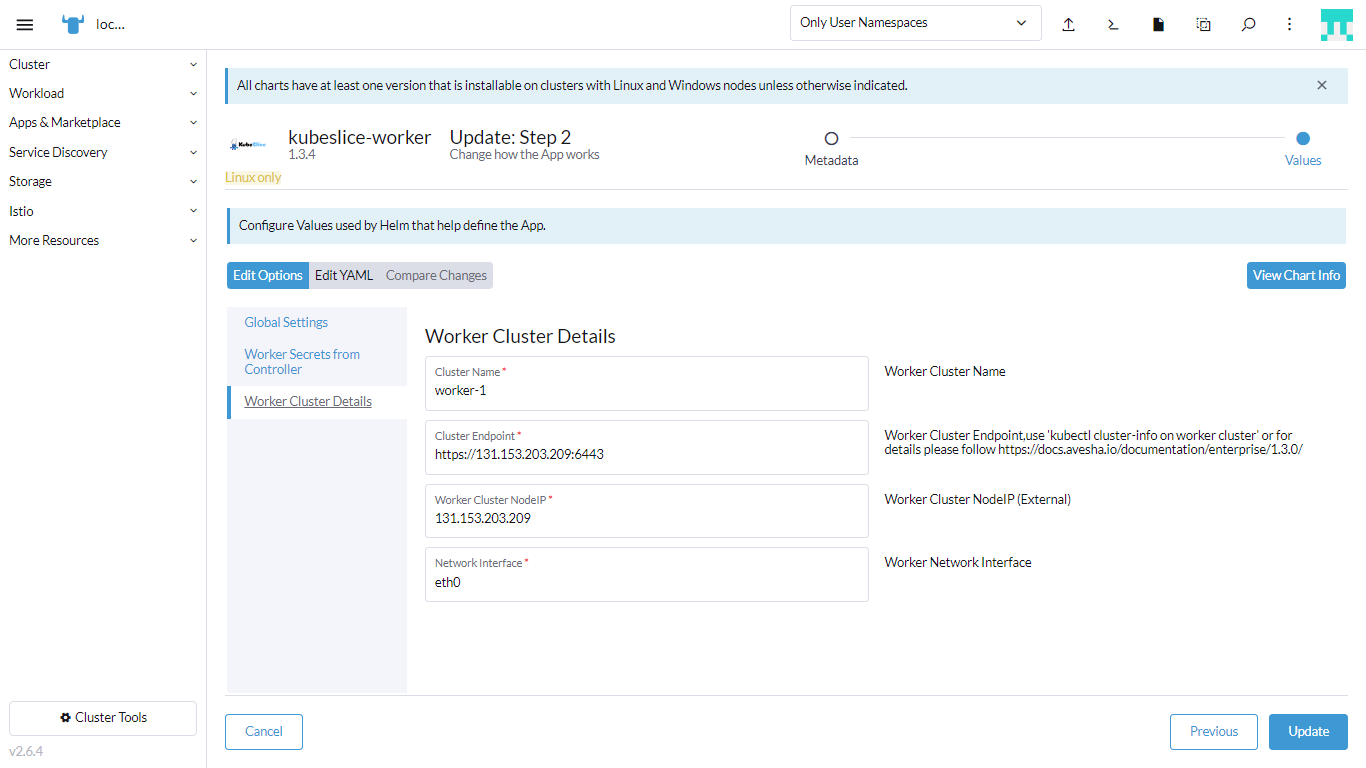
Click the Worker Cluster Details tab, and enter these details:
- For Cluster Name, enter the name of the worker cluster.
- For Cluster Endpoint, enter the endpoint of the worker cluster. To get the cluster endpoint, see Get the Cluster Endpoint.
- For Worker Cluster NodeIP, enter the external IP address of the worker cluster.
- For Network Interface, enter the name of the worker network interface you get
by running this command on the gateway nodes:
ip route get 8.8.8.8 | awk '{ print $5 }'.
-
Click Install.
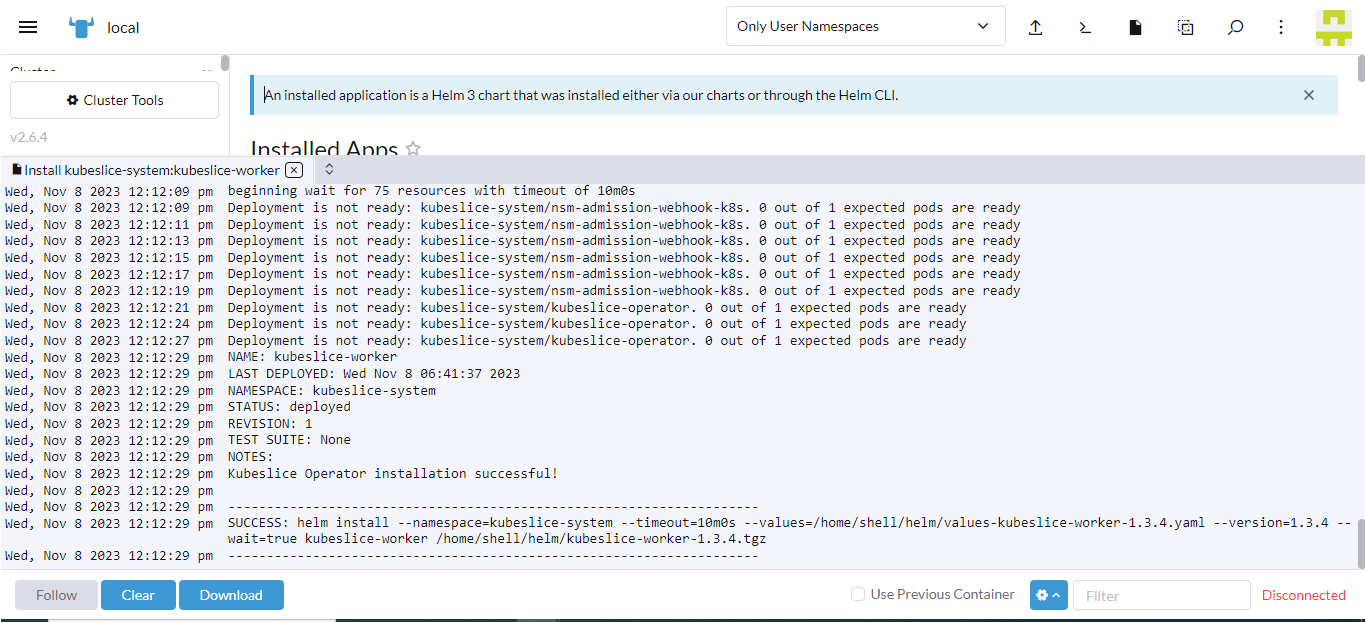
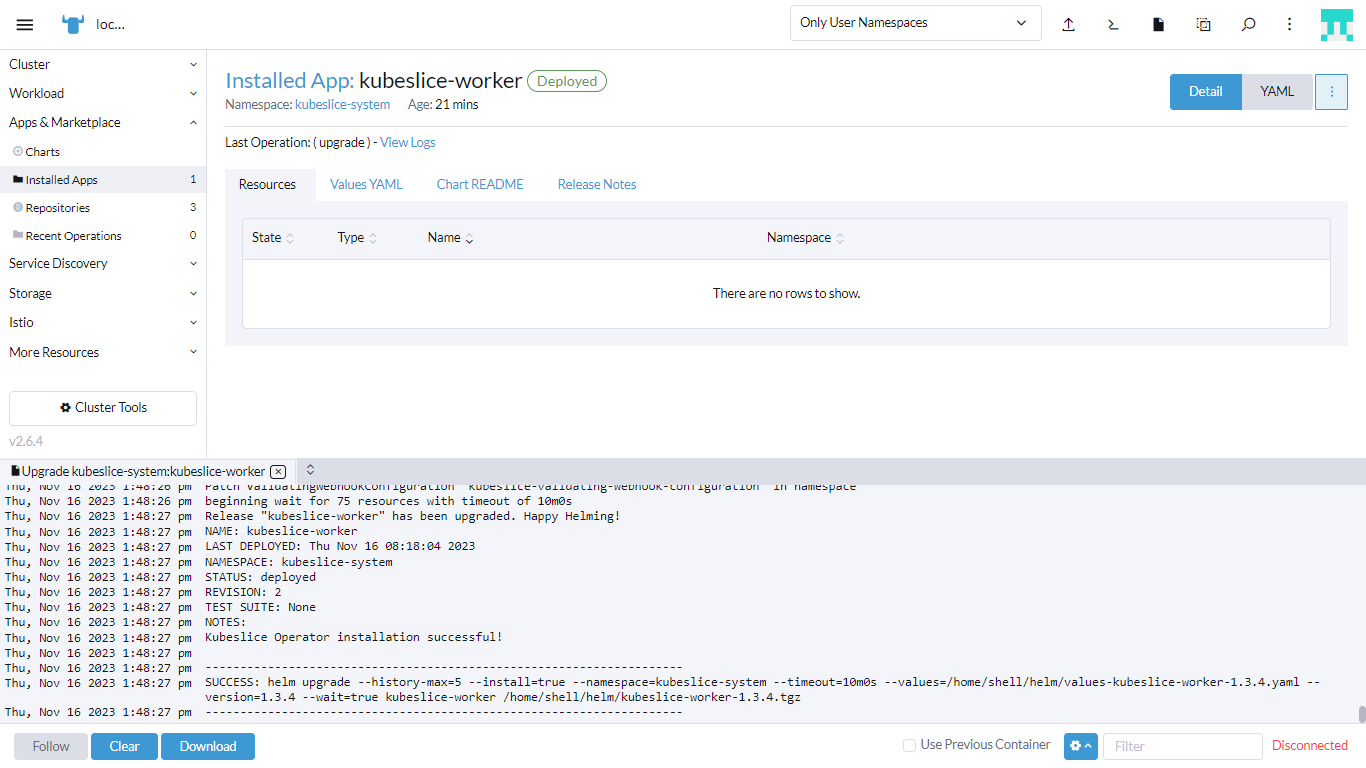
The following figure illustrates the successful installation of the Slice Operator.
Validate the Installation of the Slice Operator
To validate the Slice Operator installation on the worker cluster, check the pods status that belong
to the kubeslice-system namespace using the following command:
kubectl get pods -n kubeslice-system
Example Output
NAME                                         READY   STATUS      RESTARTS   AGE
forwarder-kernel-94c8q                       1/1     Running     0          8h
kubeslice-dns-679966fd4c-4ppdb               1/1     Running     0          8h
kubeslice-netop-plz52                        1/1     Running     0          8h
kubeslice-operator-77fc84cb54-9j2jm          2/2     Running     0          4h36m
nsm-admission-webhook-k8s-864c87f5d4-cqlxn   1/1     Running     0          8h
nsm-install-crds-lbvrx                       0/1     Completed   0          2m35s
nsmgr-zqzzg                                  2/2     Running     0          8h
registry-k8s-84f468f675-g9hzg                1/1     Running     0          8h
spire-install-clusterid-cr-488p6             0/1     Completed   0          2m21s
spire-install-crds-dcm75                     0/1     Completed   0          2m28s
You have successfully installed the Slice Operator (also known as Worker Operator) from the Rancher UI.
The following command does not retrieve the information related to KubeSlice due to a conflict in preexisting CRDs on Rancher-managed clusters:
kubectl get clusters -n <project-name>
The KubeSlice CRD for clusters.controller.kubeslice.io and the Rancher CRD for clusters.provisioning.cattle.io
both attempt to install a handler for the short form of the command, kubectl get clusters.
To access the KubeSlice version of that command on a Rancher-managed cluster, use the following full form of the command:
kubectl get clusters.controller.kubeslice.io -n <project-name>
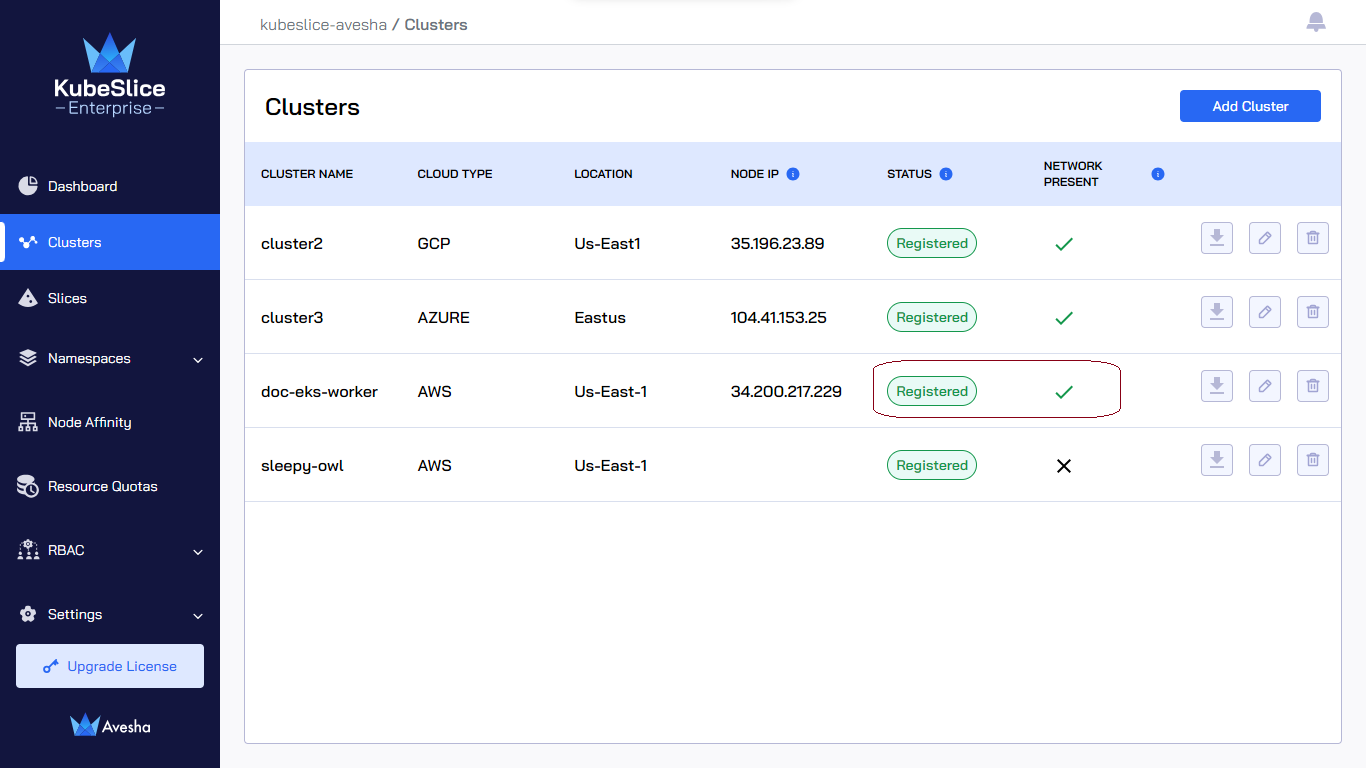
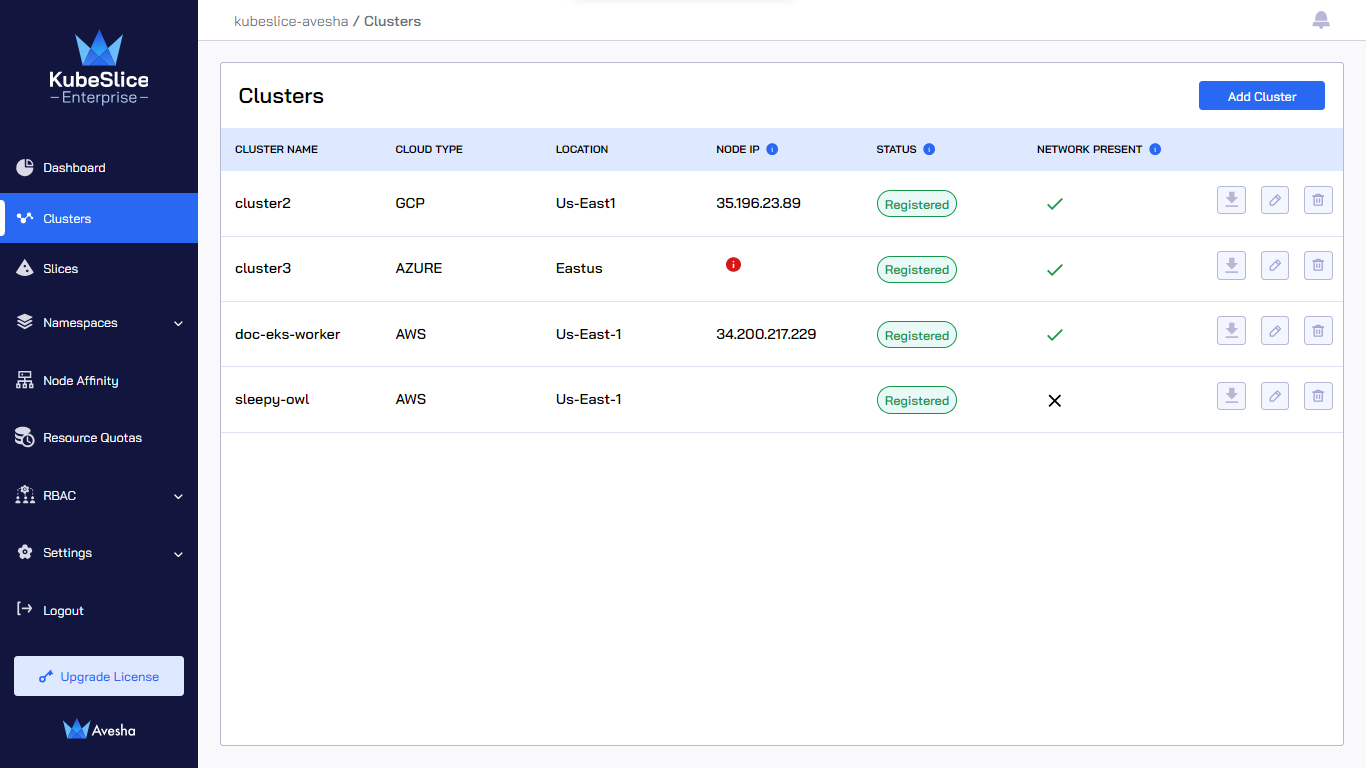
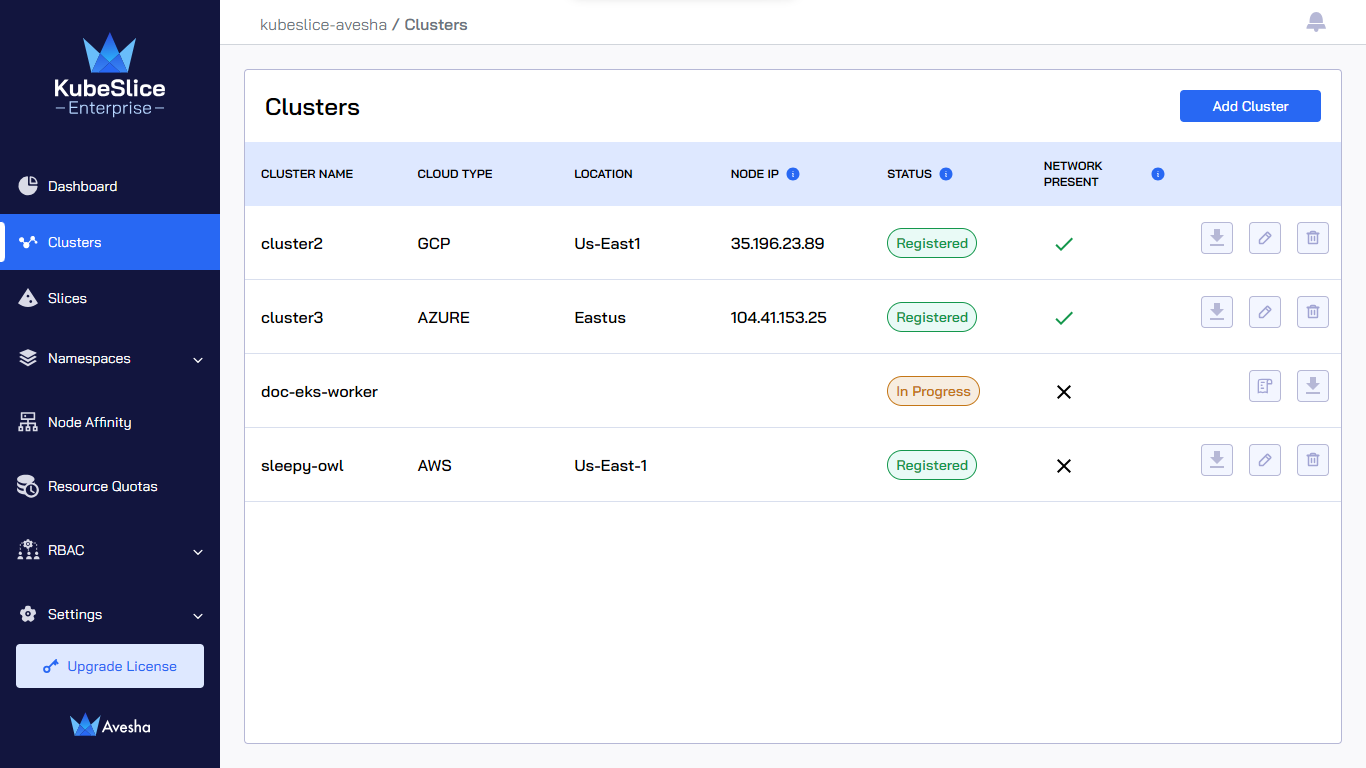
The following figure illustrates that the cluster is registered with the controller. The status changes to Registered after all the Slice Operator components are up and running.
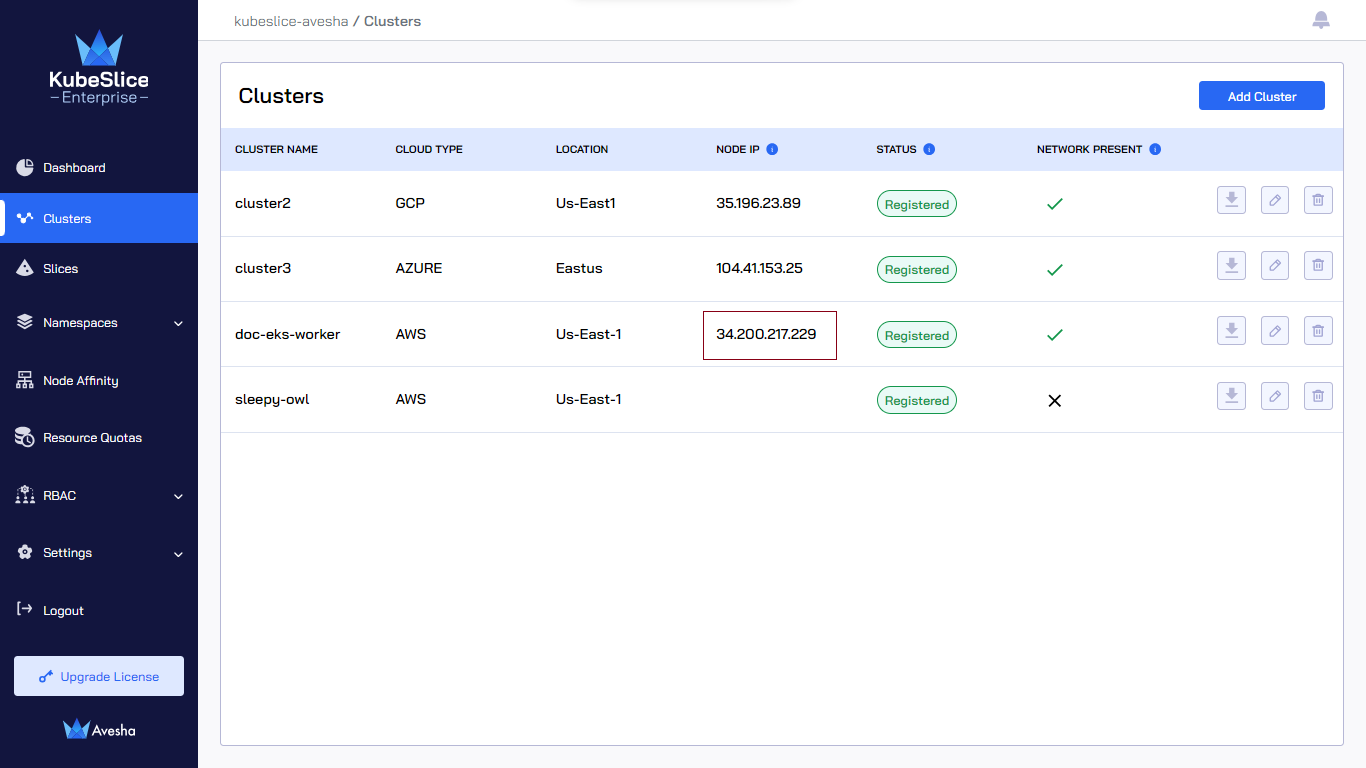
After you register a cluster with the KubeSlice Controller, the Node IP detected for that cluster appears on the
Clusters page. The following figure illustrates that KubeSlice has detected the Node IP 35.221.55.231
for the cluster worker1.
If the Node IP is not detected during cluster registration, the Clusters page displays an error icon for that cluster. The following figure illustrates that Kubeslice could not detect a Node IP for the cluster jupiter. You can update the correct a Node IP by editing a cluster.
Register Clusters in Automated Mode
You can register a new worker cluster with the controller using the kubeconfig file of the cluster. KubeSlice installs the Slice Operator on the cluster automatically during registration.
Currently, registering Rancher clusters in automated mode is not supported. It is recommended to register Rancher clusters manually.
- You can edit or modify the
worker-chart-optionsparameters in the ConfigMap file located in the kubeslice-controller namespace in the controller cluster for a customized worker installation. - The worker cluster can contain only one Slice Operator installed on it.
To register a cluster:
-
Go to Clusters on the left sidebar.
-
On the Clusters page, click Add Cluster to register a cluster.
-
Under Register Cluster, select the Automated mode and click Next.
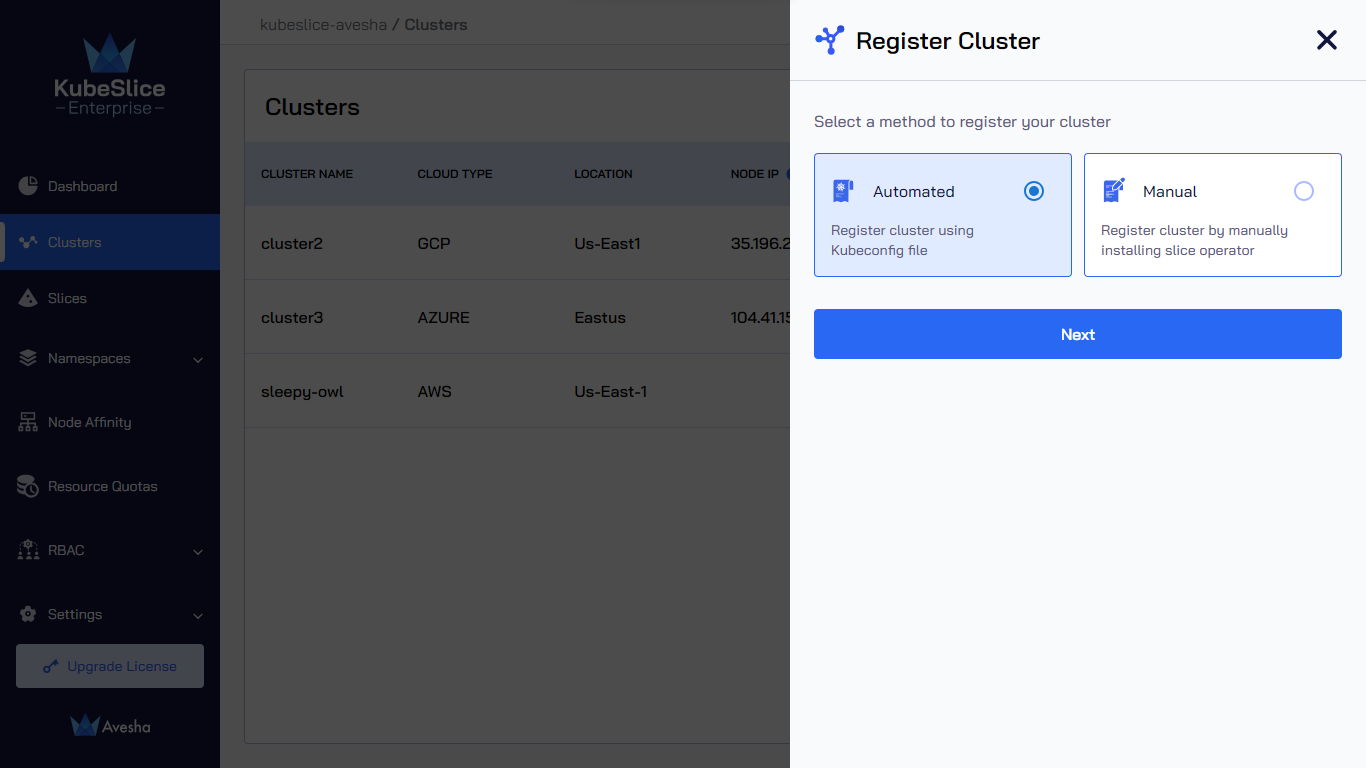
-
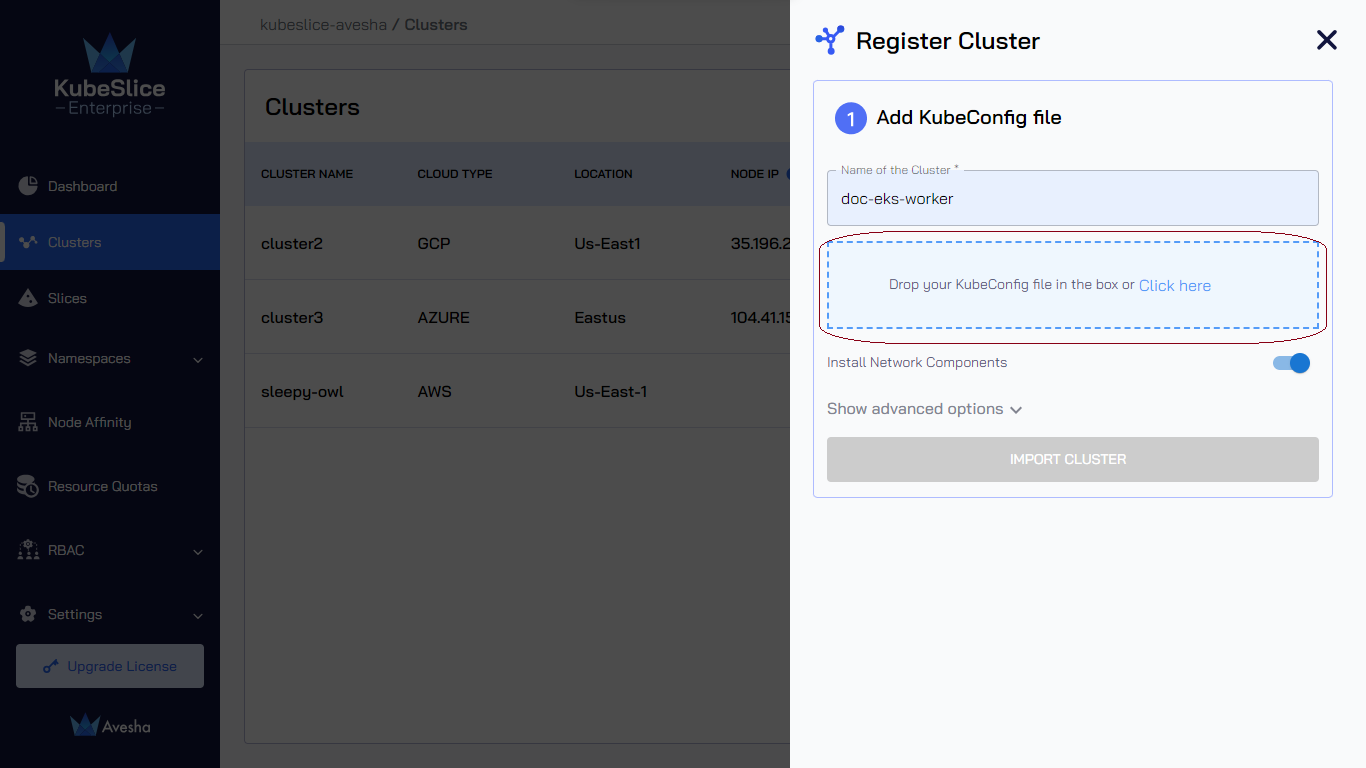
In the Add KubeConfig file section, enter the following information:
-
Enter the name of the cluster in the Name of the Cluster text box.
-
Drag and drop the kubeconfig file or Click here to upload the kubeconfile file.
-
-
(Optional) Click Show advanced options and enter the following information:
-
KubeSlice detects the Node IP for nodes labeled
kubeslice.io/node-type=gateway. You can leave it blank. You can enter a specific Node IP during cluster registration, but make sure KubeSlice has access to it.noteWe currently support IPv4 and IPv6 for node IP addresses.
-
Enter the URL of Prometheus that is installed on your cluster in the Prometheus URL text box.
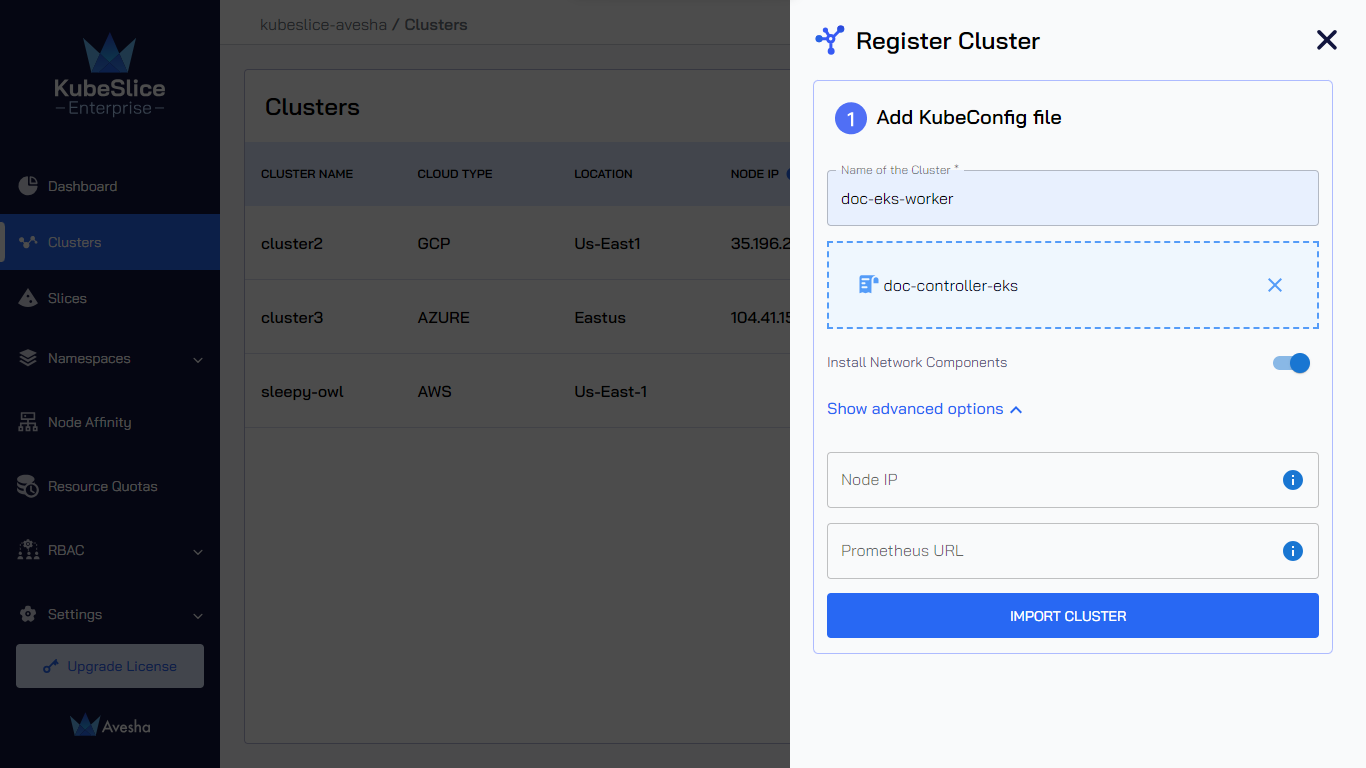
-
-
Click the Import Cluster button to register a cluster.
The following figure illustrates the cluster registration is In progress.
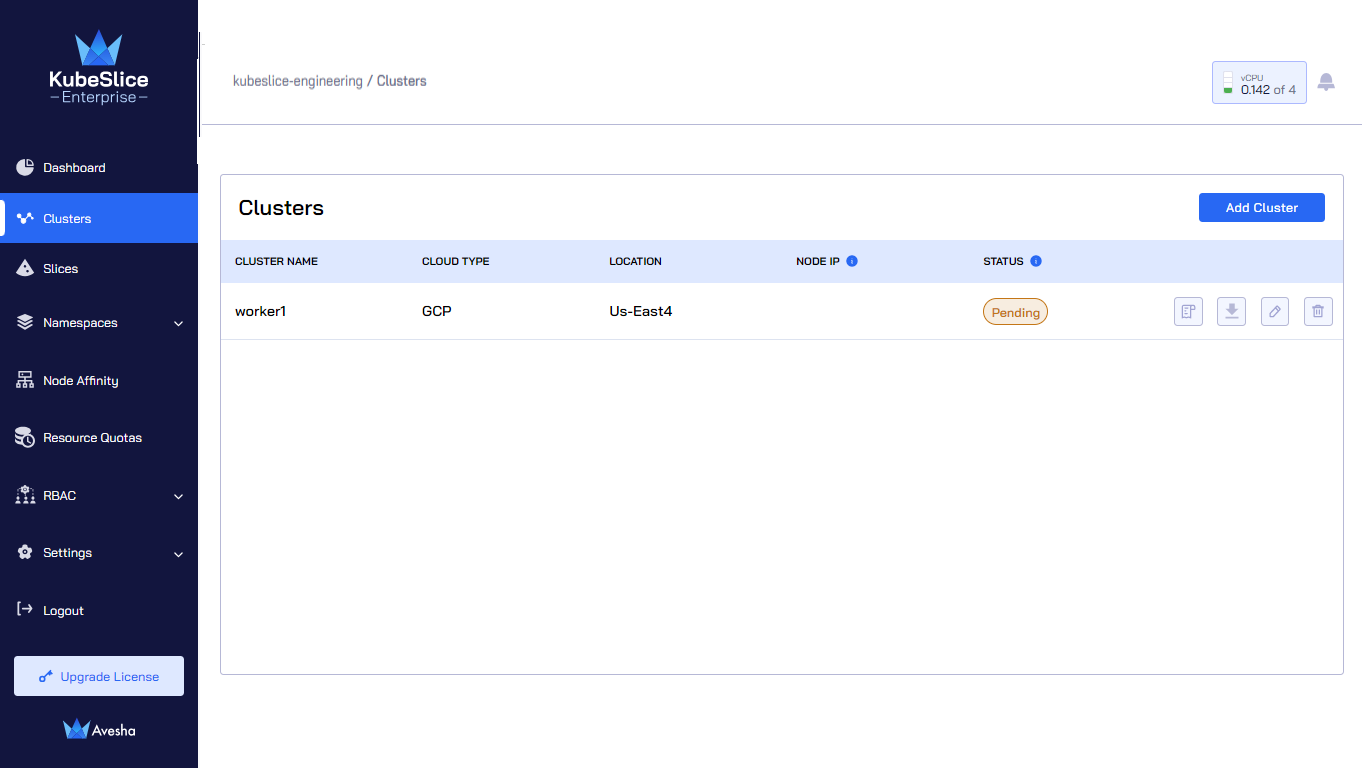
The following figure illustrates that cluster registration is pending. The Pending state signifies the installation process is successful and cluster is waiting for the Slice Operator components to be up and running.
The following figure illustrates that the cluster is registered with the controller. The status changes to Registered after all the Slice Operator components are up and running.

Air-Gapped Installation
You can edit or modify the worker-chart-options parameters in the ConfigMap file located in the kubeslice-controller namespace
in the controller cluster for a customized worker installation.
To edit a ConfigMap file:
-
Switch the context to controller cluster:
kubectx <controller cluster-name> -
Switch to the
kubeslice-controllernamespace. -
Edit the ConfigMap using the following command:
kubectl edit configmap worker-chart-options
The following are the customization options supported:
workerChartOptions:
metricsInsecure: # [Optional] Default is false. Set to true if required to disable TLS for metrics server.
repository: # [Optional] Helm repository URL for worker charts. Default is `https://kubeslice.aveshalabs.io/repository/kubeslice-helm-ent-prod/`
releaseName: # [Optional] Release name of kubeslice-worker. Default is `kubeslice-worker`
chartName: # [Optional] Name of the chart. Default is `kubeslice-worker`
chartVersion: # [Optional] Version of the chart. Default is the latest version
debug: # [Optional] Default is false. Set to true if required to enable debug logs for kubeslice-worker
helmCredentials:
  username: # [Optional]
  password: # [Optional]
imagePullSecrets:
  repository: # [Optional]
  username: # [Optional]
  password: # [Optional]
  email: # [Optional]
Edit a Cluster
To edit a cluster:
To edit a cluster:
-
Go to Clusters on the left sidebar.
-
On the Clusters page, click the edit icon for the cluster to change any configuration.
infoThe names of the cluster and the cloud are immutable.

-
Update the values. You can only edit the Cluster Kube API Endpoint, the Node IP, and the Prometheus URL values.
infoIf you enter the specific Node IP, it takes precedence over any Node IP that KubeSlice detects.
The following figure illustrates that KubeSlice has detected the Node IP
35.221.55.231for the cluster worker1.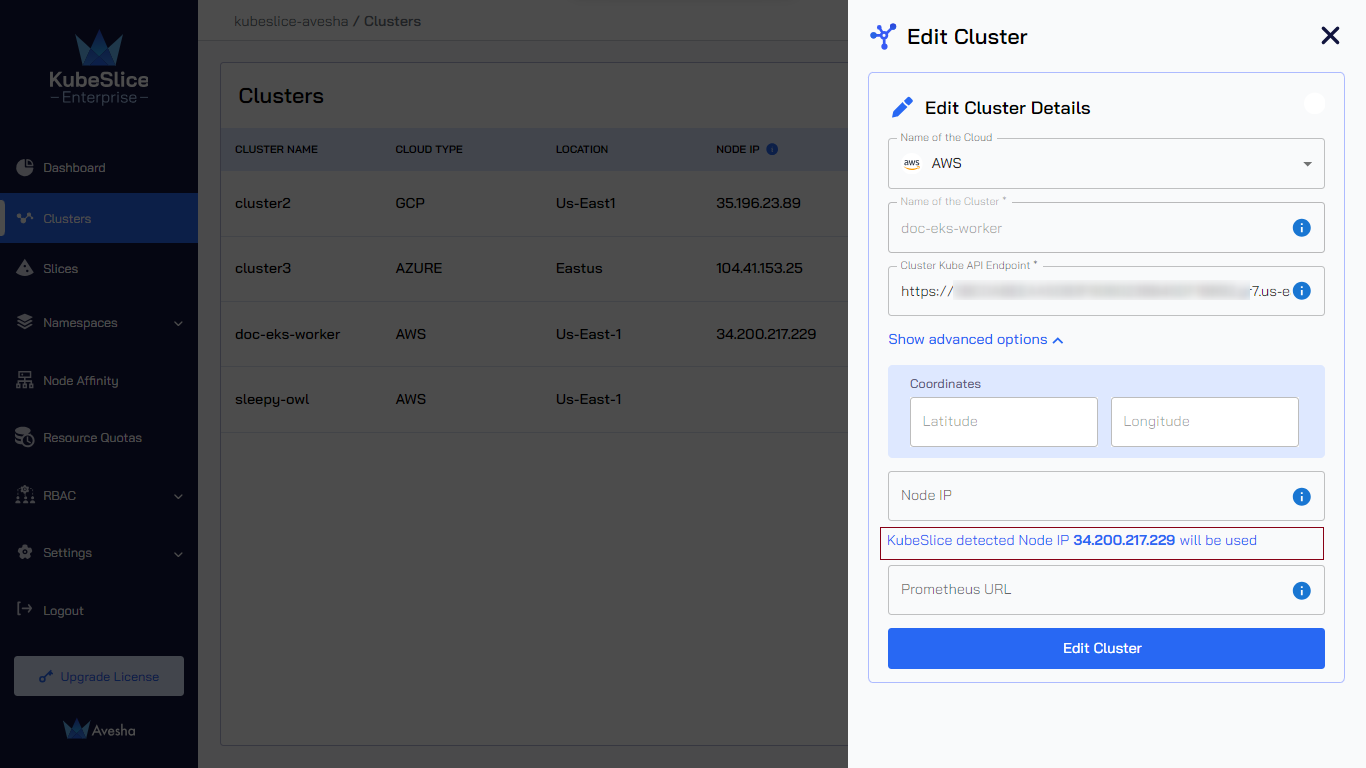
If the value of the Node IP is empty, you see the error
KubeSlice could not detect a Node IP. You must enter one..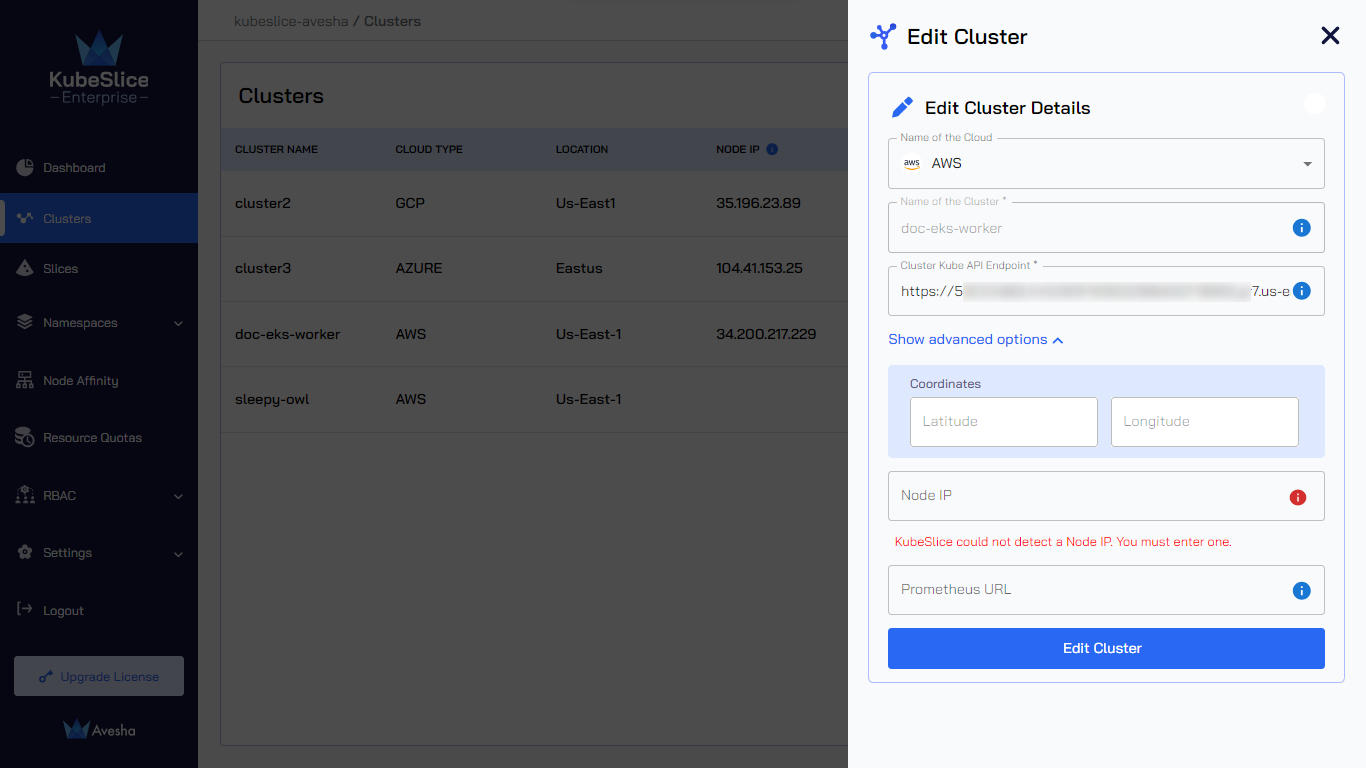
-
Click Edit Cluster to save the settings.
Update the Slice Operator
To update the Slice Operator on the worker cluster:
-
Log in to the Rancher UI.
-
Navigate to the global menu, and select the worker cluster.
-
On the left sidebar, click Apps > Charts.
-
On the Charts page, enter kubeslice in the search box. The KubeSlice charts are displayed.
-
Click the KubeSlice Worker chart.
-
On the Charts:KubeSlice Worker page, click Update.
-
On the Update:Step1 page, select the version from the drop-down menu.
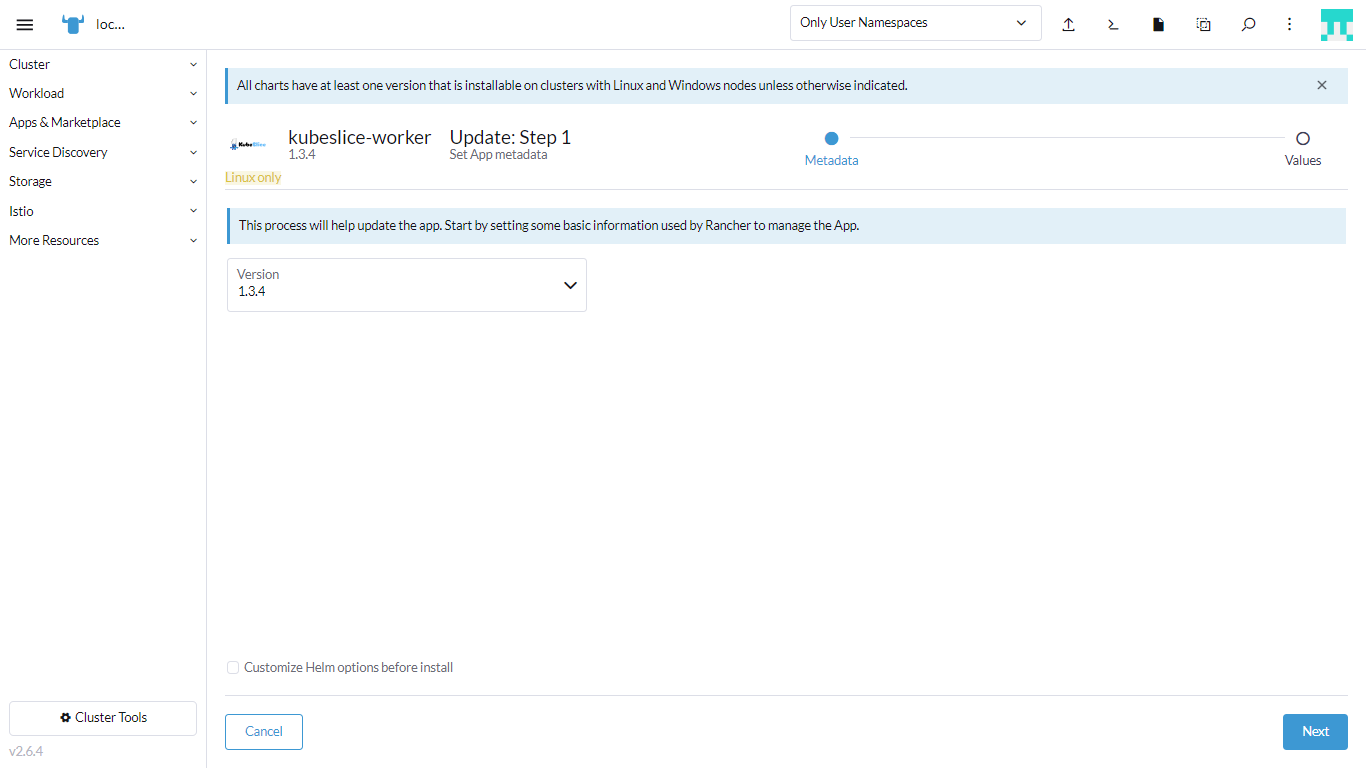
-
Click Next.
-
On the Install Step2 page, enter your credentials you received through email, the worker secret you got from the above step, and the worker cluster details.
-
Click the Global Settings tab, and enter these details:
Use the username created during the registration process while installing the KubeSlice Controller.
- For Registered username, enter the username registered with avesha@kubeslice.io.
- For Registered password, enter the password you received in the email.
-
Click the Worker Secrets from Controller tab, and enter these details:
infoYou must enter the worker secrets from the values file you downloaded in step 7 of Register Worker Clusters in Manual steps.
- For Namespace, enter the encoded namespace you get from the secrets of the registered cluster.
- For Endpoint, enter the encoded endpoint you get from the secrets of the registered cluster.
- For Ca cert, enter the encoded ca.cert you get from the secrets of the registered cluster.
- For Token, enter The encoded token you get from the secrets of the registered cluster.
-
Click the Worker Cluster Details tab, and enter these details:
- For Cluster Name, enter the name of the worker cluster.
- For Cluster Endpoint, enter The endpoint of the worker cluster. To get the cluster endpoint, see Get the Cluster Endpoint.
- For Worker Cluster NodeIP, enter the external IP address of the worker cluster.
- For Network Interface, enter the name of the worker network interface you get
by running this command on the gateway nodes [node on kubeslice worker cluster that have been labeled kubeslice.io/node-type=gateway]:
ip route get 8.8.8.8 | awk '{ print $5 }'.
-
Click Update.
The following figure illustrates the successful update of the Slice Operator.
You have successfully updated the Slice Operator (also known as Worker Operator).