Manage an Inference Endpoint
This topic describes the steps to view, deploy, and delete Inference Endpoints for your slice workspaces.
Across our documentation, we refer to the workspace as the slice workspace. The two terms are used interchangeably.
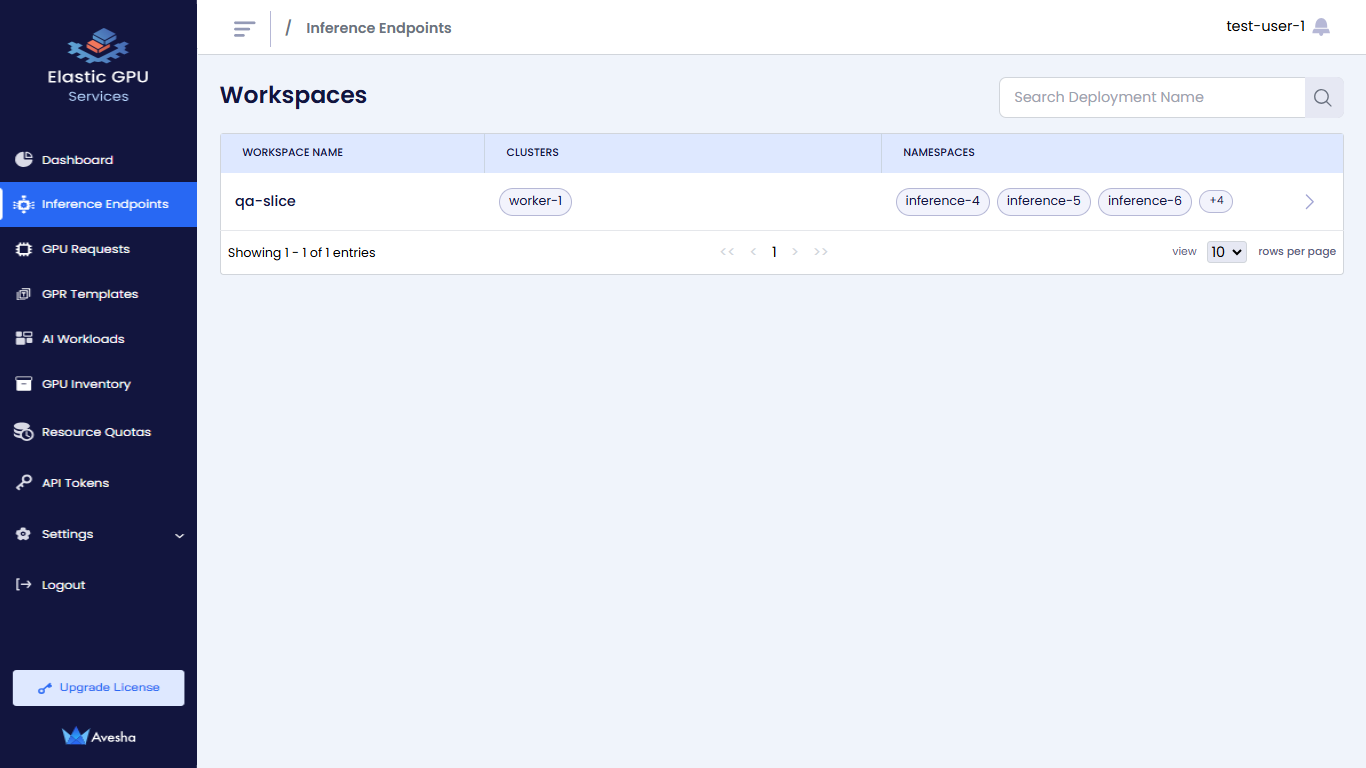
View the Inference Endpoint
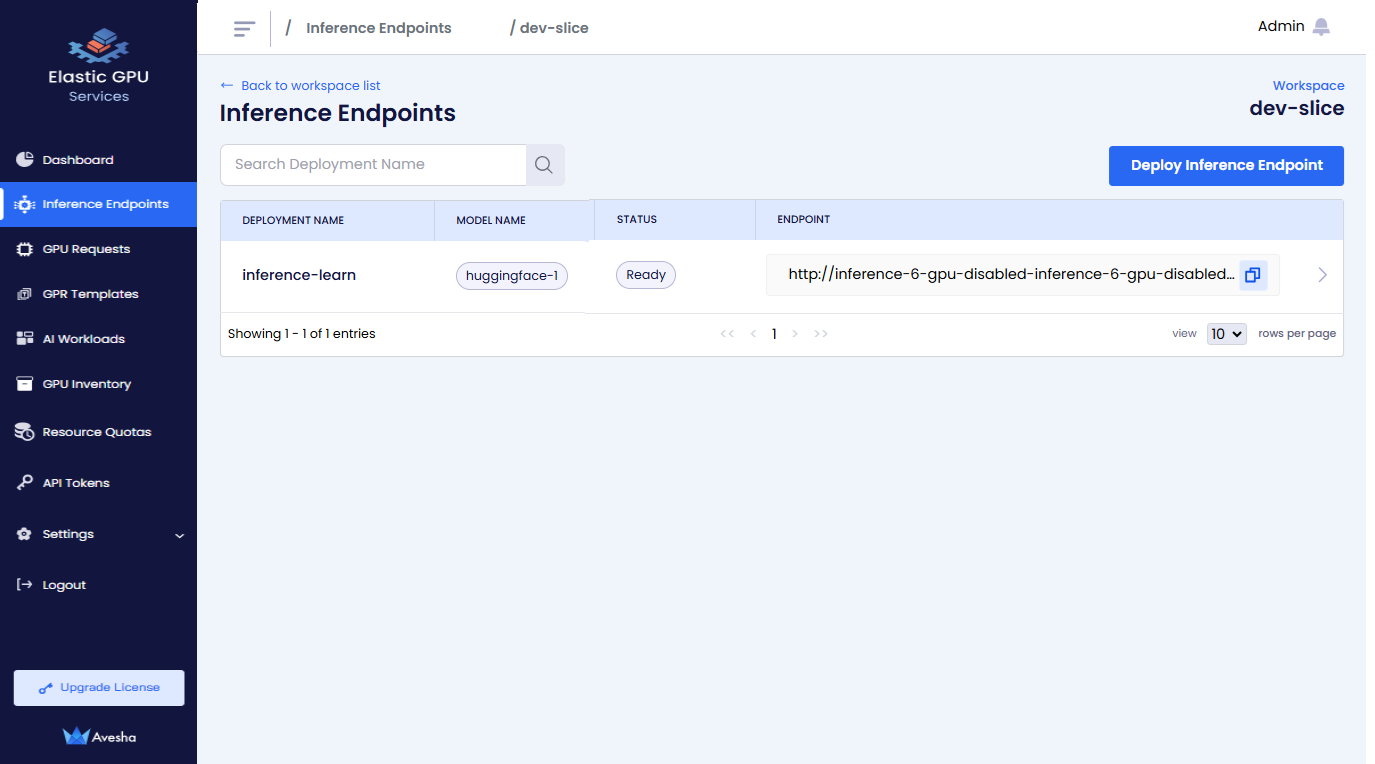
To view the Inference Endpoint:
-
Go to Inference Endpoints on the left sidebar.
-
On the Workspaces page, select the workspace whose Inference Endpoints you want to view.
-
On the Inference Endpoints page, you see a list of Inference Endpoints for that workspace.
The following figure illustrates the deployment for the workspace.

Deploy an Inference Endpoint
Only the admin has the privilege to add namespaces to a workspace. The user (non-admin) with access to a workspace must create the inference endpoint with the namespace name added to a workspace by the admin.
For example, if the admin adds the inference-1-gpu and inference-1-cpu namespaces to a workspace. The non-admin user must create an
inference endpoints with name inference-1-gpu or inference-1-cpu only.
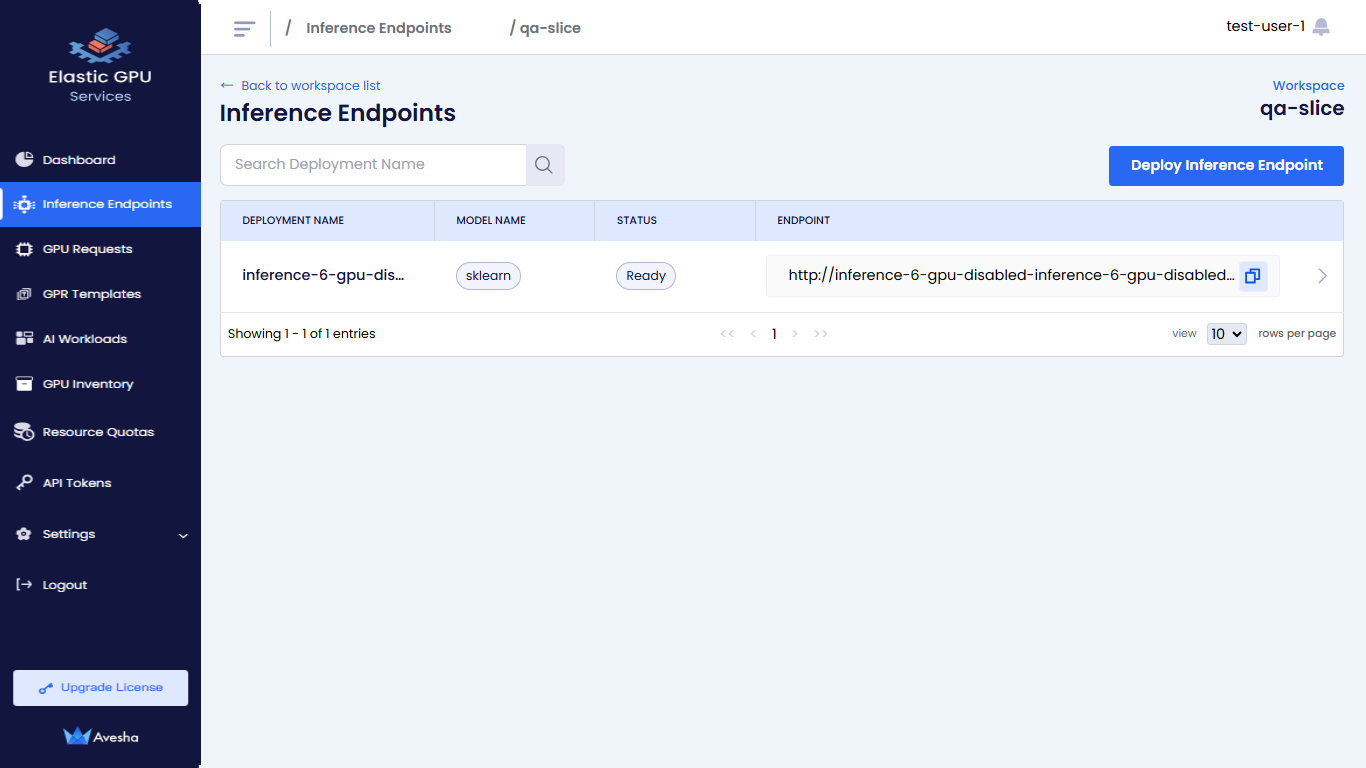
To deploy an Inference Endpoint on your workspace:
-
Go to Inference Endpoint on the left sidebar.
-
On the Workspaces page, go to the workspace on which you want to deploy an Inference Endpoint.
-
On the Inferences Endpoint page, click Deploy Inference Endpoint.
-
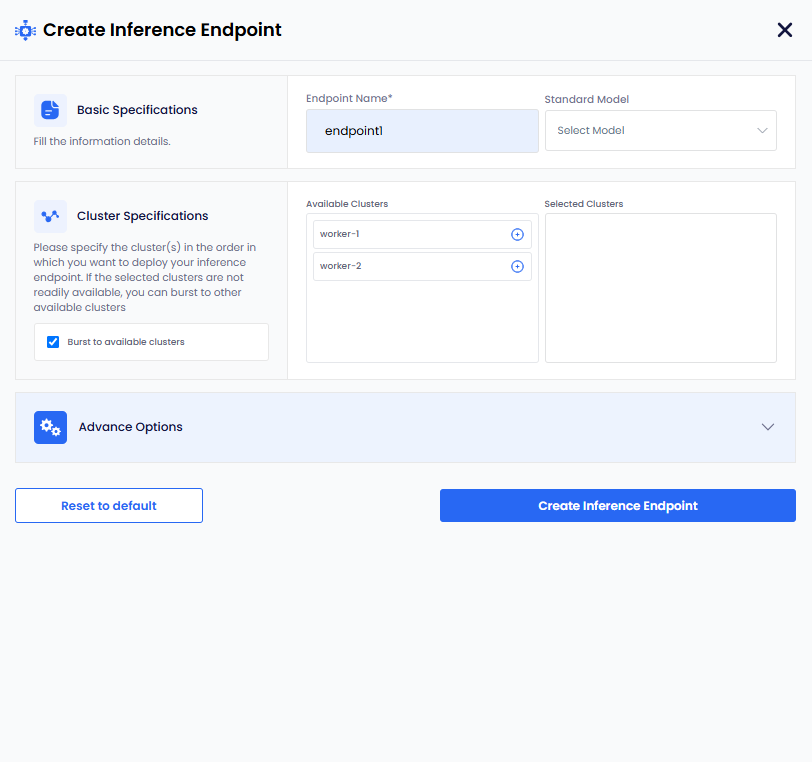
On the Create Inference Endpoint pane, under Basic Specifications:
- Enter a name for the Inference Endpoint in the Endpoint Name text box.
- Select standard model name from the Select Model dropdown menu. To populate the Select Model dropdown menu, with standard model names you must configure the configMap to store the list of standard models.
-
Under Cluster Specifications:
-
(Optional) The checkbox Burst to available clusters is enabled by default. You can uncheck the checkbox to disable bursting. To know more, see Bursting Scenarios.
-
Under Available Clusters, select the clusters in the order on which you want to deploy inference endpoint.
warningIf you try creating an Inference Endpoint with a name without ensuring that a namespace with the same name exists, then you get an error that says
Failed to create namespace.
-
-
Under Advanced Options, enter the specifications for model deployment. Under Model Specifications, enter the following:
noteThe following are standard parameters for most of model deployments. However, if these parameters do not meet your model requirements, then select the Specify your own model configuration checkbox and enter your own model configuration.
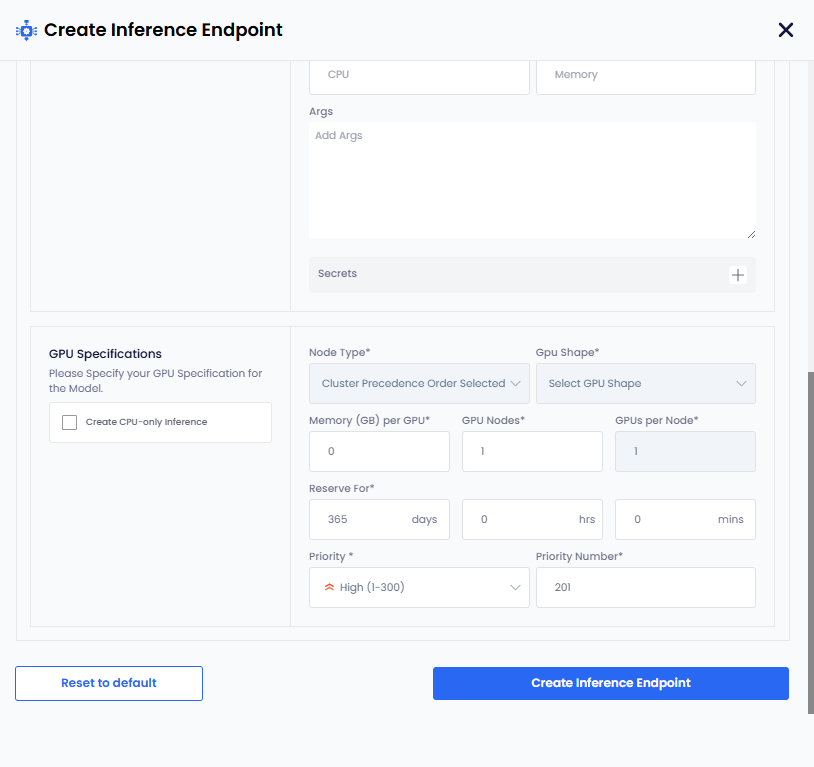
- Enter a name in the Model Format Name text box.
- Add the storage URI in the Storage URI text box.
- Add the CPU value in the CPU text box.
- Add the Memory value in the Memory text box.
- Add the arguments in the Args text box.
- To add secret key-value pair, click the plus sign against Secret and add them.
Own Model Configuration
To add your own model configuration:
-
Select the Specify your own model configuration checkbox.
-
On the terminal screen, enter your model configuration YAML file from KServe. For more information, see KServe.
-
Under GPU Specifications, enter the following:
infoSelect the Create CPU-only Inference checkbox for CPU only specification for a model.
-
Select node type from the Node Type drop-down list. After you select node type:
- The GPU Shape and Memory per GPU values are auto populated. These values are immutable.
- The GPU Nodes, GPUs Per Node have the default values. Edit these values as per your requirements.
- The Reserve For have
365days by default. The duration is indays\hours\minsformat. Edit the days as per your requirements. The number of days must be less that 365. - The Priority and Priority Number have default values. Edit the values as per your requirements.
-
Click the Create Inference Endpoint button. The status goes to Pending before it changes to Ready.
-
Delete an Inference Endpoint
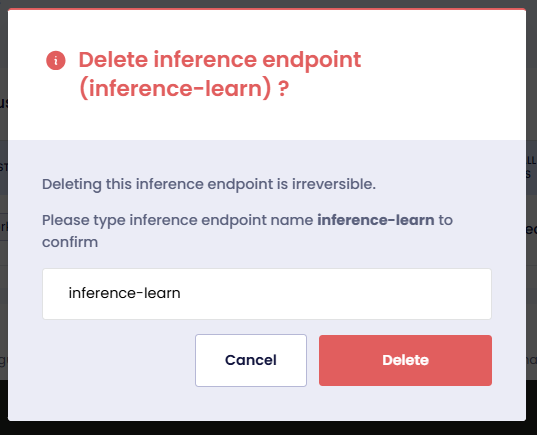
To delete an Inference Endpoint:
-
On the Workspaces page, select a workspace for which you want to delete an Inference Endpoint.
-
On the Inference Endpoint page, select the deployment name or click the right arrow next to the Inference Endpoint.
-
click the Delete button.
-
Enter the name of the Inference Endpoint in the text box and click Delete.
Configure the ConfigMap for Selecting Standard Models
To ensure the model selection dropdown is populated correctly, follow these steps:
-
Create the ConfigMap in the project namespace. For example,
kubeslice-aveshais the project namespace. -
To identify the ConfigMap as a standard inference model specification, the label
egs.kubeslice.io/type: model-specsmust be added to the ConfigMap metadata. -
The data section of the ConfigMap must contain the key
model-specs.yaml. This key holds the specification of the model in YAML format.The following are the three example ConfigMaps:
Example 1: llama3-8b with Custom InferenceService and GPU Specifications
apiVersion: v1
kind: ConfigMap
metadata:
  name: llama3-8b
  namespace: kubeslice-avesha
  labels:
    egs.kubeslice.io/type: model-specs
data:
  model-specs.yaml: |
    specsType: "CUSTOM"
    rawModelSpecs: |
      kind: InferenceService
      metadata:
        name: huggingface-llama3
      spec:
        predictor:
          model:
            modelFormat:
              name: huggingface
            args:
              - --model_name=llama3
              - --model_id=meta-llama/meta-llama-3-8b-instruct
            resources:
              limits:
                cpu: "6"
                memory: 24Gi
                nvidia.com/gpu: "1"
              requests:
                cpu: "6"
                memory: 24Gi
                nvidia.com/gpu: "1"
            env:
              - name: HF_TOKEN
                valueFrom:
                  secretKeyRef:
                    name: hf-secret
                    key: HF_TOKEN
                    optional: false
    gpuSpecs:
      memory: 24
      totalNodes: 1
      gpusPerNode: 1
Example 2: sklearn-iris with GPU specifications
apiVersion: v1
kind: ConfigMap
metadata:
  name: sklearn-iris
  namespace: kubeslice-avesha
  labels:
    egs.kubeslice.io/type: model-specs
data:
  model-specs.yaml: |
    specsType: "STANDARD"
    modelSpecs:
      modelFormat: "sklearn"
      storageUri: "gs://kfserving-examples/models/sklearn/1.0/model"
      args:
        - --model_name=sklearn-iris
        - --model_id=sklearn/iris
      secrets:
        SK_LEARN_TOKEN: xxx-yyyy-zzz
      cpu: "1"
      memory: "2Gi"
    gpuSpecs:
      memory: 6
      totalNodes: 1
      gpusPerNode: 1
Example 3: sklearn without GPU
apiVersion: v1
kind: ConfigMap
metadata:
  name: sklearn-iris-cpu
  namespace: kubeslice-avesha
  labels:
    egs.kubeslice.io/type: model-specs
data:
  model-specs.yaml: |
    specsType: "STANDARD"
    modelSpecs:
      modelFormat: "sklearn"
storageUri: "gs://kfserving-examples/models/sklearn/1.0/model -
Use the following command to apply the ConfigMap:
kubectl apply -f example-model-configmap.yaml -
Use the following command to verify if the ConfigMap is created correctly:
kubectl get configmap -n kubeslice-avesha -l egs.kubeslice.io/type=model-specsThis command lists all ConfigMaps with the required label in the specified namespace. If your ConfigMap appears, it is correctly configured for use in the model selection dropdown.
Bursting Scenarios
-
When Burst to Available Clusters option is enabled and if no worker clusters are selected, the workload is assigned to the cluster with sufficient inventory and the shortest wait time.
-
When Burst to Available Clusters option is disabled:
- At least one cluster must be selected to process the workload.
- For a single selected cluster, the user must specify both the GPU Node type.
- For multiple selected clusters, the workload is assigned to the cluster with sufficient inventory and the shortest wait time among the selected options.