How To Deploy an Inference Endpoint
This tutorial provides a step-by-step guide for deploying models using inference endpoints through the Elastic GPU Service (EGS) Portal. It also covers alternative methods using the EGS Python SDK or REST APIs.
Introduction
Inference endpoints are a powerful feature for deploying and managing pre-trained AI models as scalable, managed services. These endpoints enable organizations to leverage AI models for generating predictions or processing data in real time, facilitating seamless integration into various applications and workflows.
By hosting models as inference endpoints, you can:
- Eliminate the need for manual model deployment and infrastructure management.
- Ensure consistent performance and availability through robust backend systems.
Prerequisites
Before you begin, ensure the following:
-
Register with Avesha
Obtain credentials to access the enterprise Helm repository and configure it on your local system. For detailed instructions, see EGS Registration. -
Install the CLI Tool
Download and set up the Command Line Interface (CLI) tool required for installing EGS. For more details, see Command Line Tools. -
Install EGS using on of these methods:
-
Access Tokens to access the EGS Portal
- Admin users can log in with an Access Token or IDP Access Token.
- Non-admin users need to request an access token from their administrator.
Step 1: Access the EGS Portal
-
Open your browser and navigate to the EGS Portal URL.
-
Log in using your credentials:
- Admin users: Use an Access Token or IDP Access Token.
- Non-admin users: Enter the access token provided by your administrator.
Step 2: Deploy an Inference Endpoint
To deploy an Inference Endpoint:
-
Go to Inference Endpoint on the left sidebar.
-
On the Workspaces page, go to the workspace on which you want to deploy an Inference Endpoint.
-
On the Inference Endpoints page, click Deploy Inference Endpoint.
-
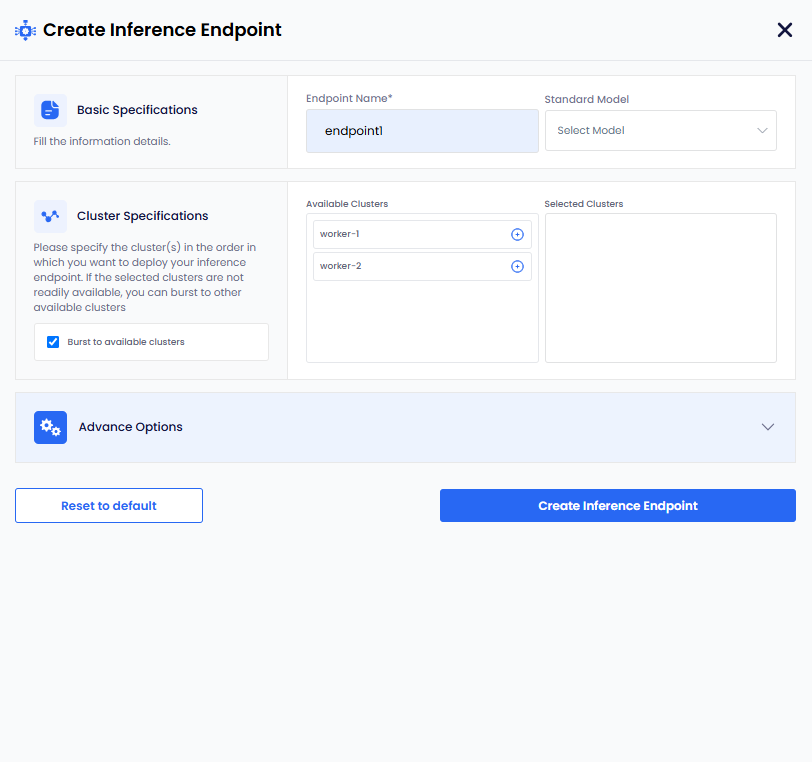
On the Create Inference Endpoint pane, under Basic Specifications:
-
Enter a name for the Inference Endpoint in the Endpoint Name text box.
-
Select standard model name from the Select Model dropdown menu. To populate the Select Model dropdown menu, with standard model names, you must configure the configMap to store the list of standard models.
-
-
Under Cluster Specifications:
-
(Optional) The checkbox Burst to available clusters is enabled by default. You can clear the checkbox to disable bursting.
-
Under Available Clusters, select the clusters in the order on which you want to deploy an Inference Endpoint.
-
-
Under Advanced Options, for Model Specifications:
infoThe following parameters are standard and work for most models. However, if these parameters do not meet your model requirements, then select the Specify your own model configuration checkbox. To know more, see own model configuration.
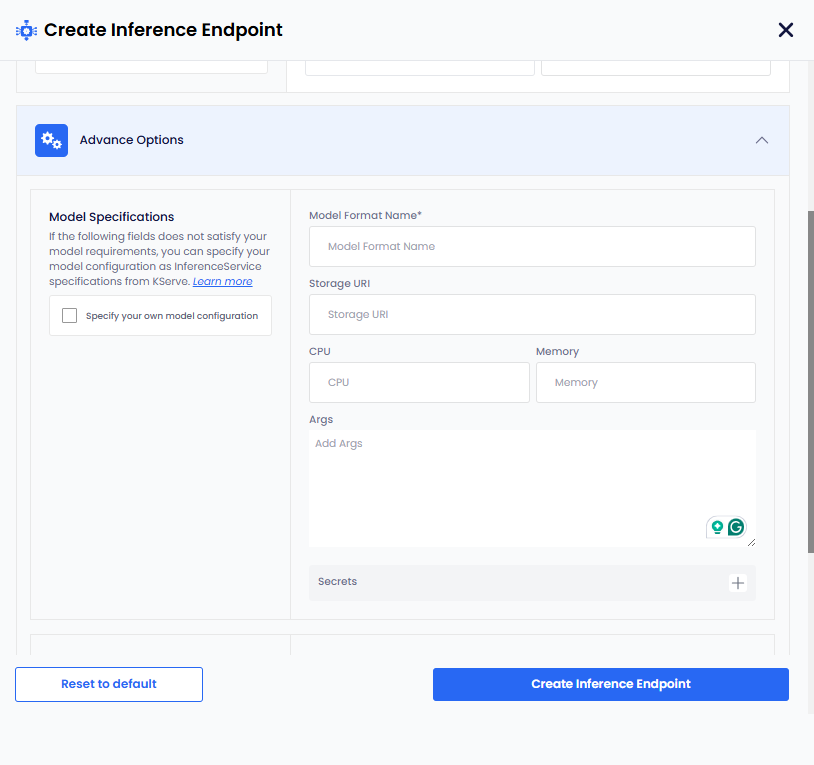
- Enter a name in the Model Format Name text box.
- Add the storage URI in the Storage URI text box.
- Add the CPU value in the CPU text box.
- Add the Memory value in the Memory text box.
- Add the arguments in the Args text box.
- To add secret key-value pair, click the plus sign against Secret and add them.
Own Model Configuration
When the parameters provided under Model Specifications do not meet your model requirements, you can select the Specify your own model configuration checkbox.
To add your own model configuration:
-
Select the Specify your own model configuration checkbox, which provides you a terminal screen.

-
On the terminal screen, specify your model configuration as InferenceService specifications from KServe. For more information, see KServe.
-
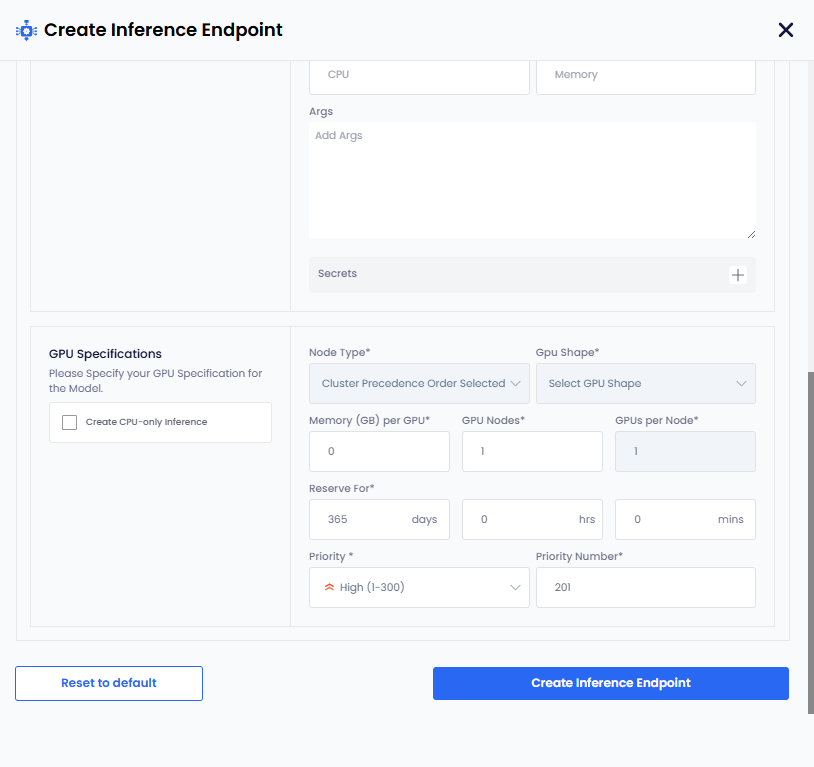
Under GPU Specifications:
infoIf you only want CPU-based inference, then select the Create CPU-only Inference checkbox.
-
Select node type from the Node Type drop-down list.
-
GPU Shape and Memory per GPU get auto populated.
-
The parameters, GPU Nodes and GPUs Per Node have default values. Change them if you want non-default values.
-
The Reserve For duration parameter in
DDHHMMcontains a default value of 365 days.infoThe maximum duration is 365 days. Change the duration to less than 365 days.
-
The Priority parameter has a default value. Select a different priority (low: 1-100, medium: 1-200, high: 1-300) from the dropdown list.
-
Set a different priority number as per the priority set. This parameter also contains a default value as per the default priority.
-
Click the Create Inference Endpoint button. The status goes to Pending before it changes to Ready.
-
Step 3: View Inference Endpoints
After deploying an inference endpoint, you can verify and review its status through the EGS Portal.
To view Inference Endpoints:
-
Go to Inference Endpoints on the left sidebar.
-
On the Workspaces page, click a workspace whose Inference Endpoints you want to view.
-
On the Inference Endpoints page, you see a list of Inference Endpoints for that workspace.
-
Click the
>icon for the Inference Endpoint that you want to view.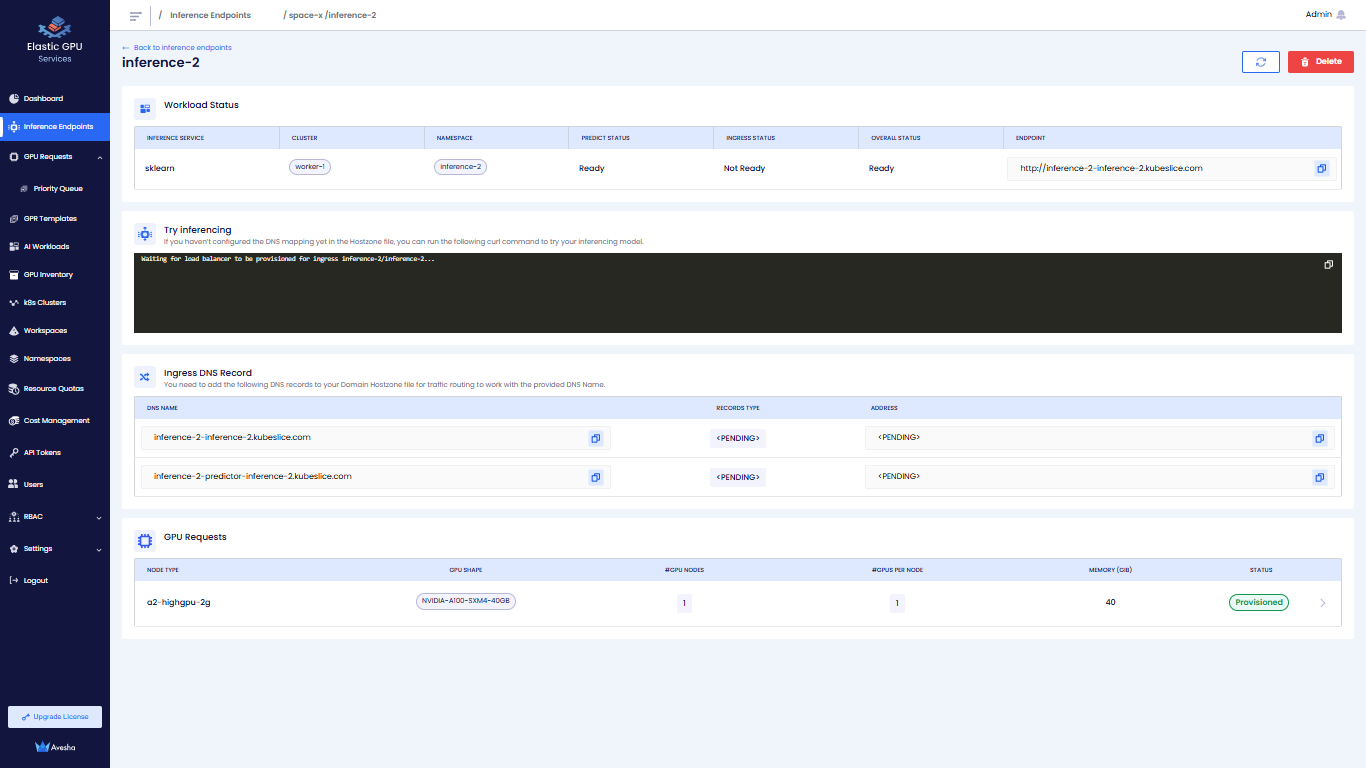
Step 4: Manage and Monitor Endpoints
Delete an Inference Endpoint
To delete an Inference Endpoint:
-
On the Workspaces page, select the workspace that contains the Inference Endpoint you want to delete.
-
On the Inference Endpoint page, select the deployment name or click the right arrow next to the Inference Endpoint.
-
Click the Delete button.
-
Enter the name of the Inference Endpoint in the text box and click Delete.
Monitor Endpoint Performance
- Track metrics like latency, resource utilization, and throughput from the portal.
- View alerts and notifications for potential issues like high resource usage or network delays.
Alternative Methods
Deploy an Inference Endpoint Using the Python SDK
Developers can programmatically deploy inference endpoints using the EGS Python SDK. This method is suitable for integrating deployment into automated workflows or applications.
Deploy an Inference Endpoint Using the REST API
EGS provides RESTful APIs to manage inference endpoints, allowing for integration with various tools and services. For more information, see API documentation.
Best Practices for Deployment
- Resource Management: Allocate adequate GPU, CPU, and memory for optimal model performance.
- Secure Networking: Use Workspaces and apply network policies for isolation and security.