Manage Resource Quotas
This topic describes how to set quotas for limits and requests for CPU, memory, ephemeral storage, and pod count for each application namespace on a workspace (slice workspace).
Across our documentation, we refer to the workspace as the slice workspace. The two terms are used interchangeably.
Overview
Resource quotas enable the cluster admins to enforce limits for CPU, memory, ephemeral storage and number of application pods per namespace on a workspace. It requires setting and monitoring the threshold limit and requests of the resources at the workspace level.
The cluster admin can manage the usage of compute resources on a workspace ensuring that the namespaces get a fair share of the resources. This prevents some namespaces from overusing the resources leaving little or no resources for other namespaces on the same workspace.
Requests and limits are the ways Kubernetes uses to manage resources such as CPU and memory. Requests are what the container is assured to get. Limits ensure that a container is restricted to a particular value. You can also set quotas for requests and limits to manage the local ephemeral storage.
A default limit and request can be configured per container and their purpose is described below:
- Default limit per container: This is used for a container in the namespace that does not have resource limits configured. The default limit per container is set at the namespace level.
- Default request per container: This is used for a container in the namespace that does not have resource requests configured. A default request per container can be set at the workspace quota that applies to all namespaces on the workspace. This default request per container set at the workspace level is overridden when it is set at the namespace level.
Prerequisites
Before you begin, ensure that the following prerequisites are met:
- You have read and write access to the cluster connected to the workspace on which you would set the quotas for limits and requests.
- Namespaces are onboarded onto the workspace.
Set Resource Quotas
Set the resource limits and requests for CPU, ephemeral storage, memory, and the maximum number of pod count per workspace.
-
Go to Resource Quotas on the left sidebar.
-
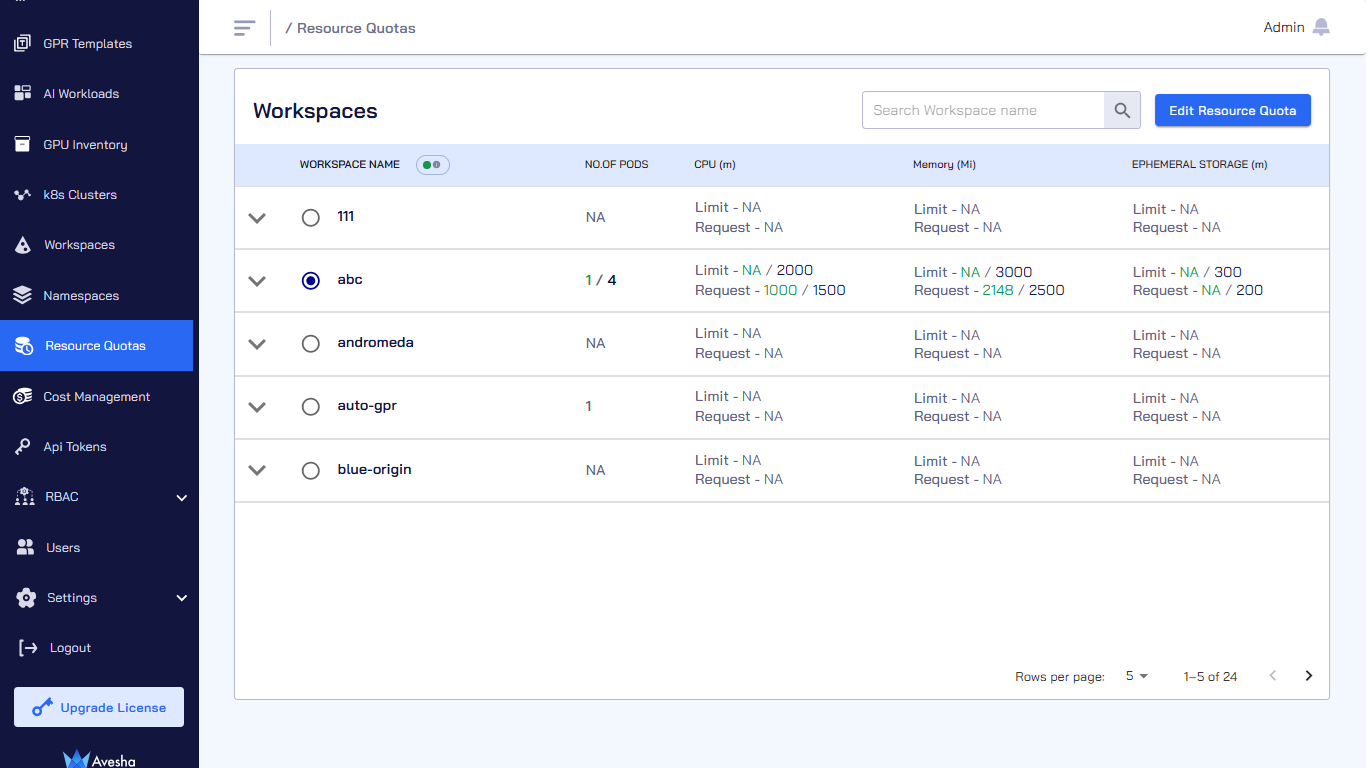
On the Resource Quotas page, the workspaces with namespaces onboarded are listed.
The green mark against a workspace indicates that quotas have been enforced on some of the namespaces on the workspace.
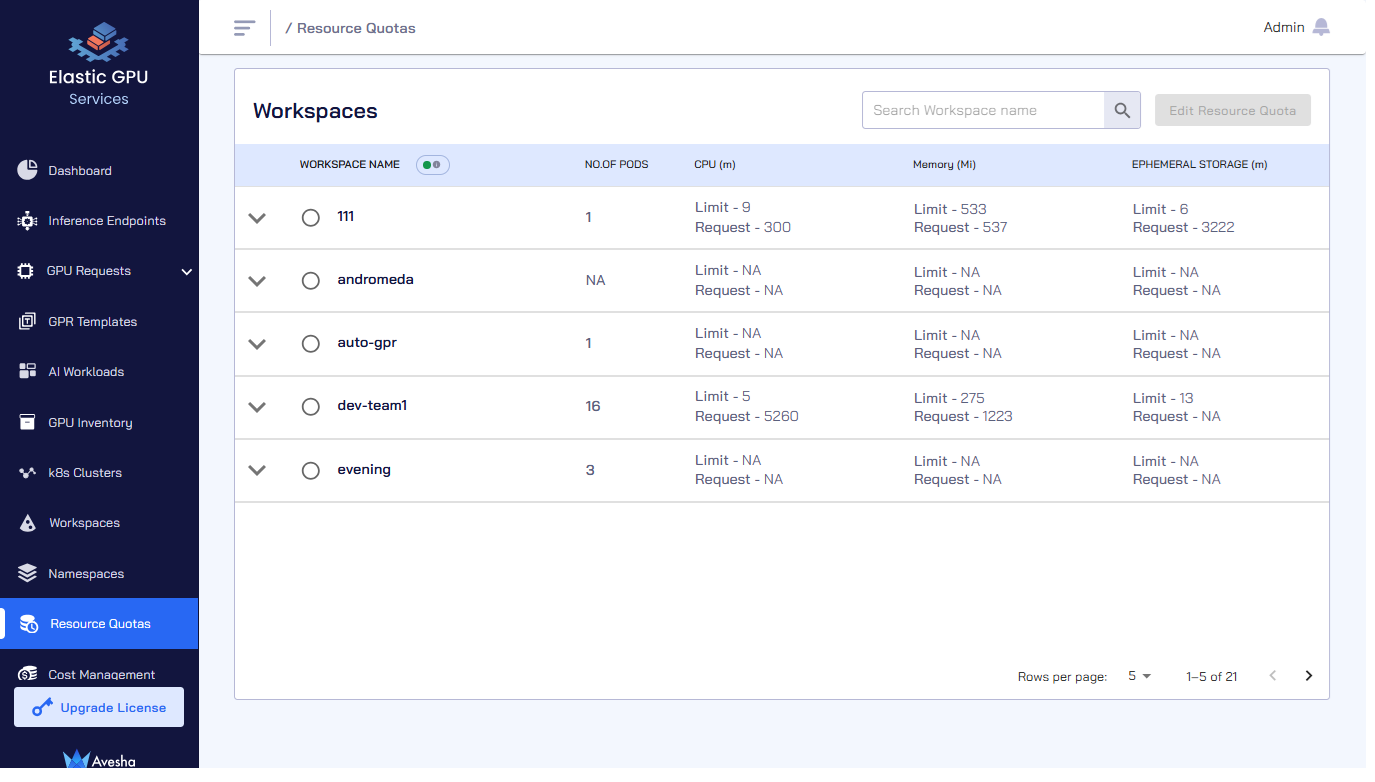
For the workspaces that have quota configured, the corresponding limits and requests are represented. The green mark against a workspace indicates that quotas have been enforced on some of the namespaces on the workspace.
-
(Optional) Check the cluster details for each workspace by expanding its menu.
-
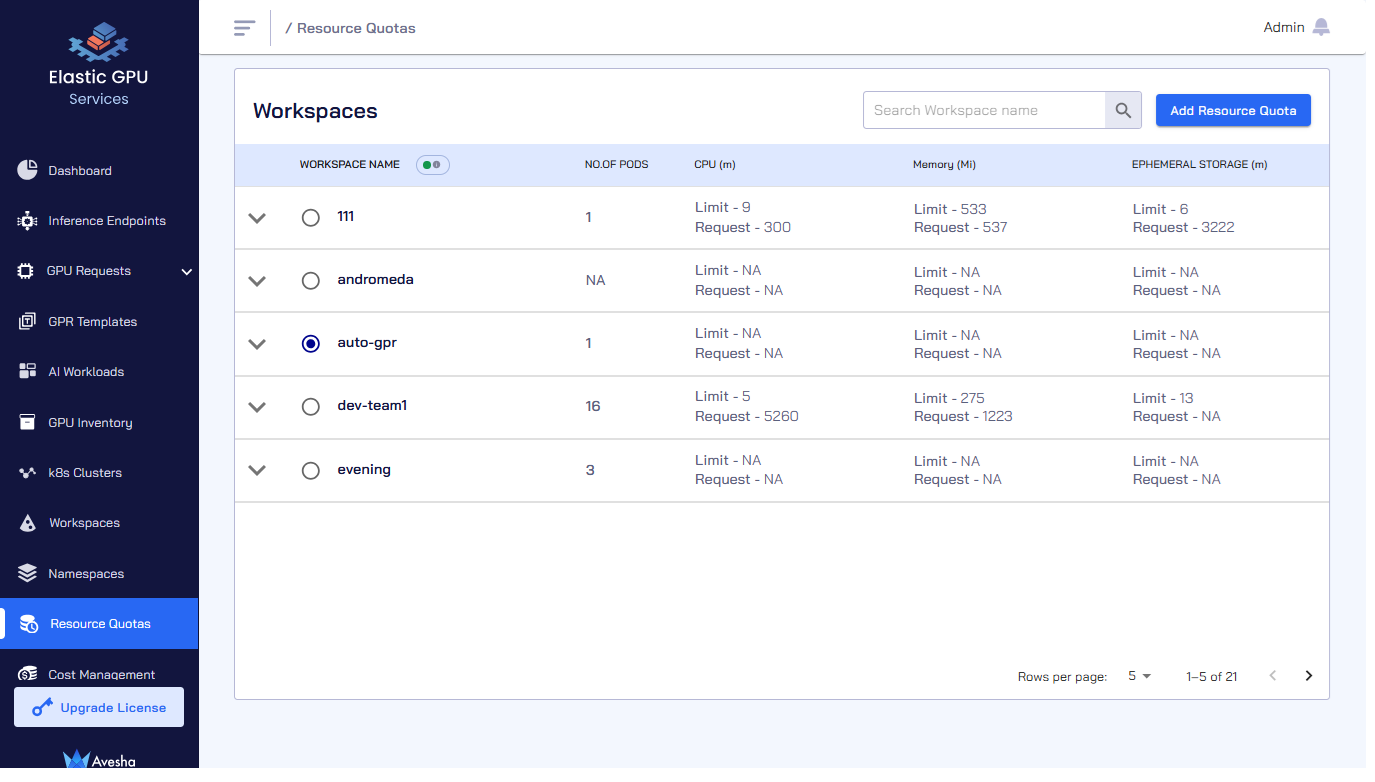
Select the workspace for which you want to configure the limits. The Add Resource Quota button is enabled.
-
Click Add Resource Quota.
-
Configuring resource quota is divided into four steps as described below.
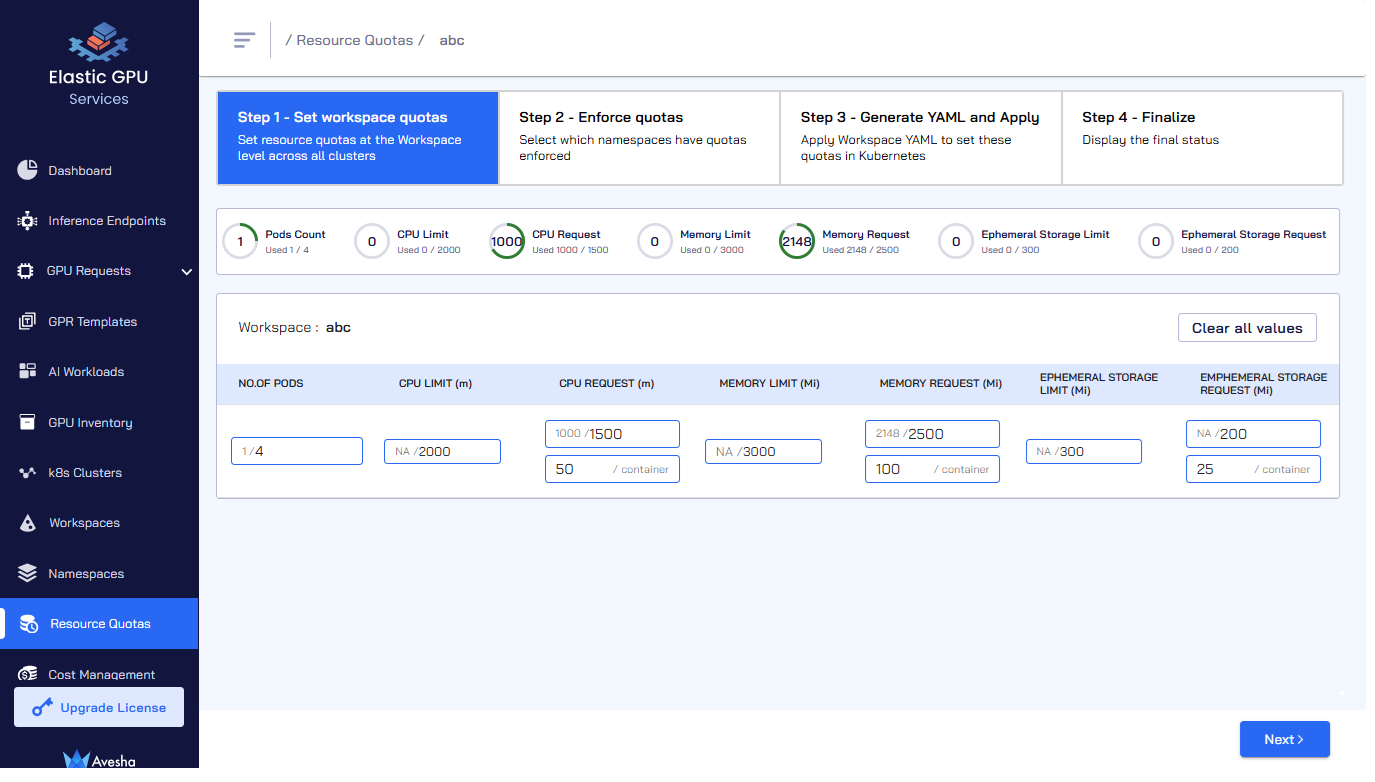
Step 1 - Set Workspace Quotas
The first step is to set the quotas for limits and requests at the workspace level for all worker clusters on a given workspace.
The quotas for limits and requests are only monitored and not enforced at the workspace level. When the usage exceeds a quota, its value is in red.
To set the quotas for limits and requests at the workspace level:
-
On the Resource Quotas page, go to Step 1 - Set workspace quotas tab.
-
On the Step 1 - Set workspaces quotas tab, under the workspce, click the value below No. of Pods.
infoThe usage values are in the numerator for pod count, CPU, memory, and ephemeral storage.
-
In the text box, set the limit for the maximum number of pods that can be on this workspace. While adding the limits, set the value in the denominator of the fraction. This will be the cumulative sum of the pods on all the namespaces on the workspace.
The numerator in the fraction represents the usage. -
Add quota for CPU request if you want to set the CPU requests for all the namespaces on the workspace. If you set CPU requests, you must set the request per container in the text box that is below CPU Requests. Ensure that the quota for request per container is less than or equal to the CPU request that you set.
infoIf you set request for a resource, you must set the corresponding request per container. Ensure that the quotas for requests and request per container for a resource are not more than the corresponding limits.
The request per container for a resource must be less than or equal to the quotas for the corresponding limit and request.
-
Similarly, add quota for the memory and ephemeral storage limits and requests based on the applications that are onboarded onto the workspace.
-
Click Next to go to step 2.
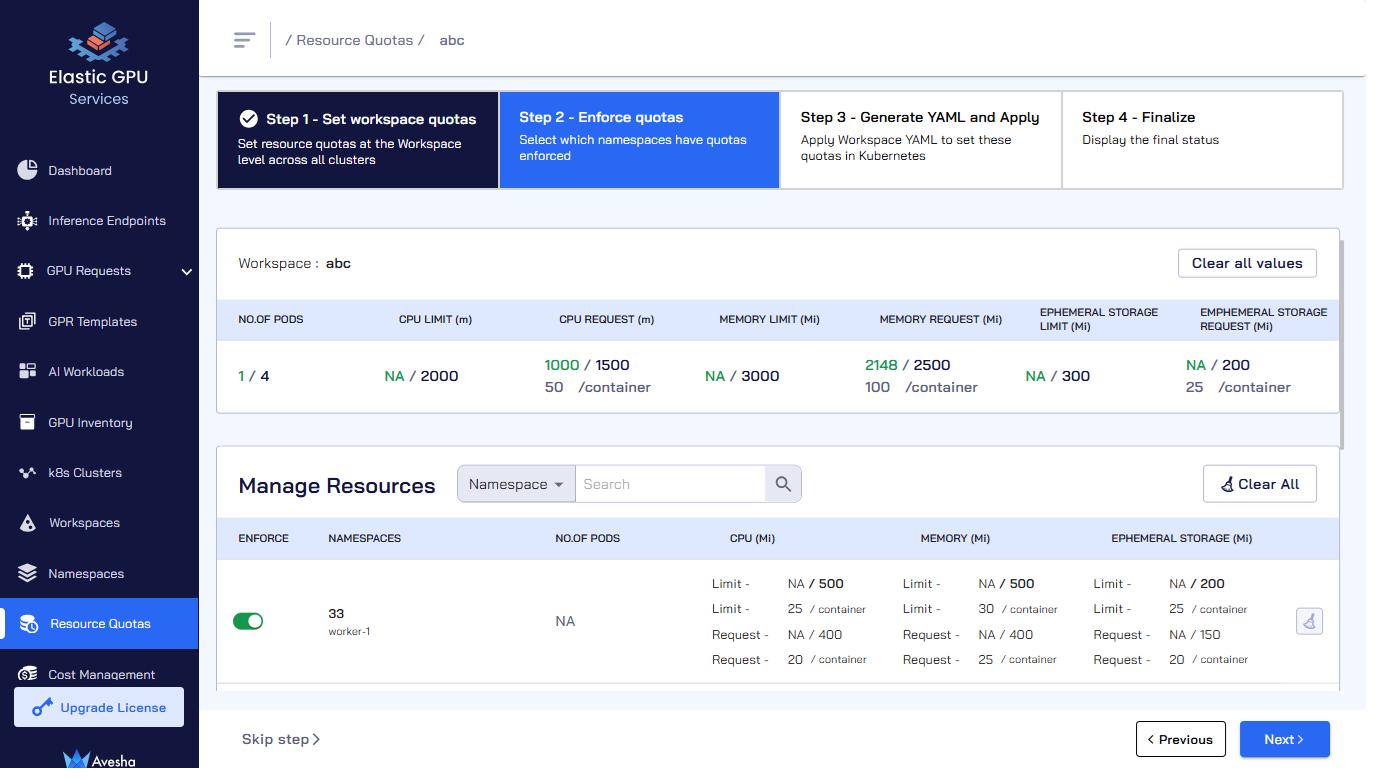
Step 2 - Set Namespace Quotas
The second step is to enforce the limits and requests for one or more namespaces as required.
The quotas that are set are enforced at the namespace level. New pods are not spawned if the quotas reaches the threshold or about to reach the threshold.
To enforce the quotas for limits and requests on a namespace:
-
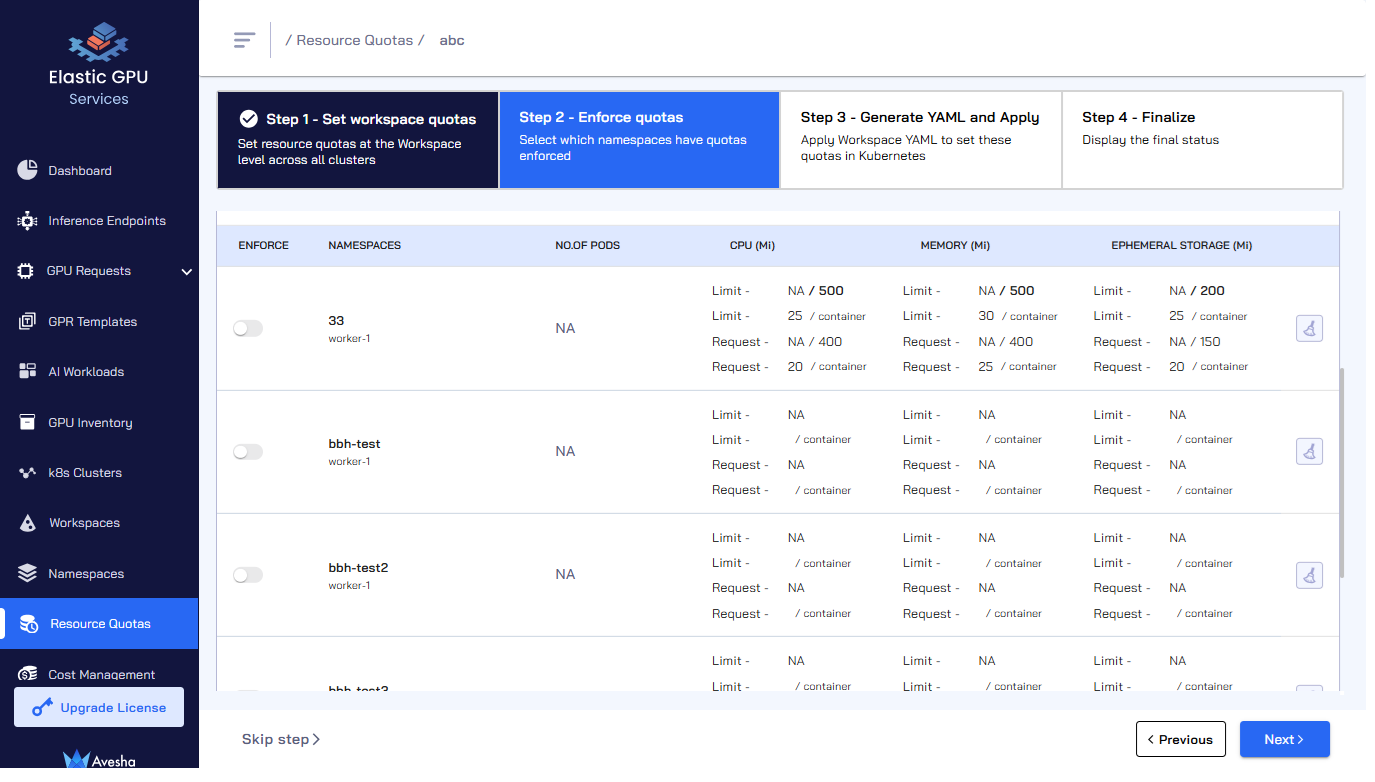
On the Step 2 - Enforce quotas tab, scroll down to Manage Resources that contains the namespaces listed.
-
For the namespace that you want to set quotas for limits and requests, under Enforce, turn on the toggle key. If there are many namespaces on your workspace, use the search field to look for the namespace that you want to enforce quotas.
-
Set the limits and requests for No of Pods, CPU, Memory and Ephemeral Storage.
infoIn this step, if you set the limit for a resource, then you must set the limit per container for the corresponding resource. If you set the request for a namespace, the request per container is required only if the corresponding request per container is not set under the workspace quota.
For a given resource:
- The limits for all namespaces must not exceed the corresponding limit under the workspace quota.
- The requests for all namespaces must not exceed the corresponding request under the workspace quota.
- The limit per container for a namespace must be less than or equal to the corresponding limit for that namespace.
- The request for a namespace is less than or equal to the corresponding limit for that namespace.
- The request per container for a namespace is less than the corresponding request and the limit per container for that namespace.
- The request per container for a namespace overrides the corresponding value set under the workspace quota.
-
Alternatively, you can skip this step if you want to only have quotas for the workspace for monitoring purposes.
-
Click Next to go to the step 3.
Step 3 - Apply YAML
The step 3 is to verify the autogenerated YAML file and apply it to save the configuration.
To apply the YAML file:
-
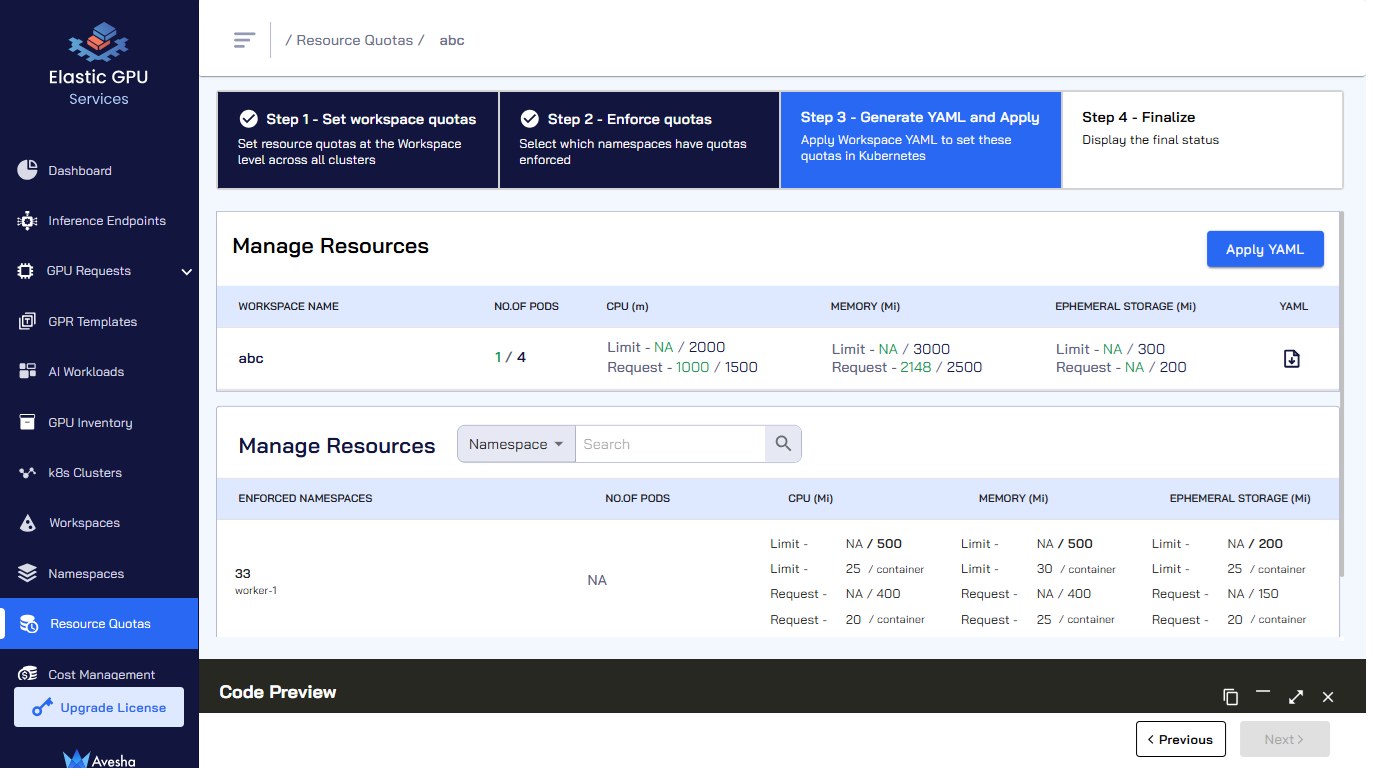
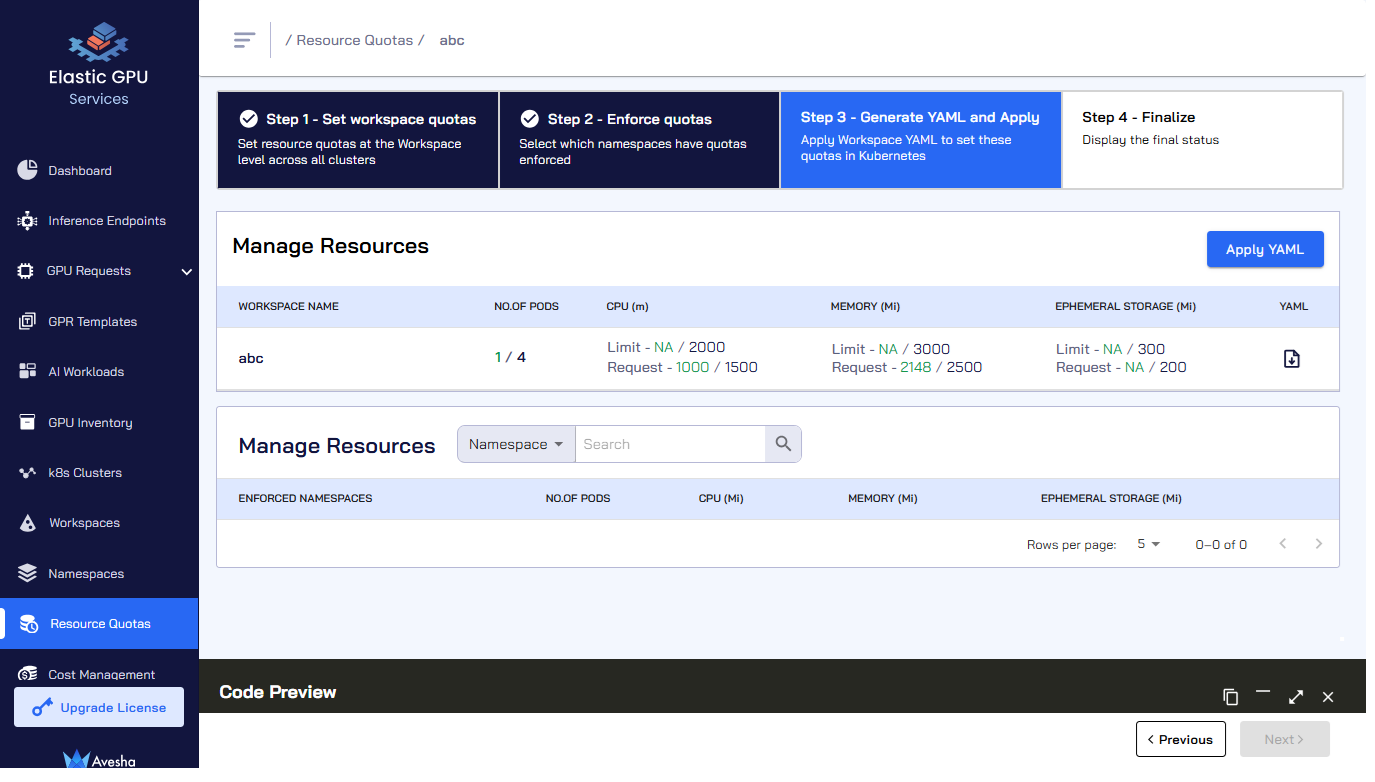
On the Step 3 - Generate YAML and Apply tab, verify the limits and requests that you have set for the workspace and namespaces.
-
(Optional) Download the YAML file by clicking the download button.
-
The Code Preview that is towards the bottom of the page provides a preview of the
SliceResourceQuotaConfigYAML file that you have set in the previous two steps. -
Click the Apply YAML button to save the configuration.
-
Click Next to finalize the changes in the step 4.
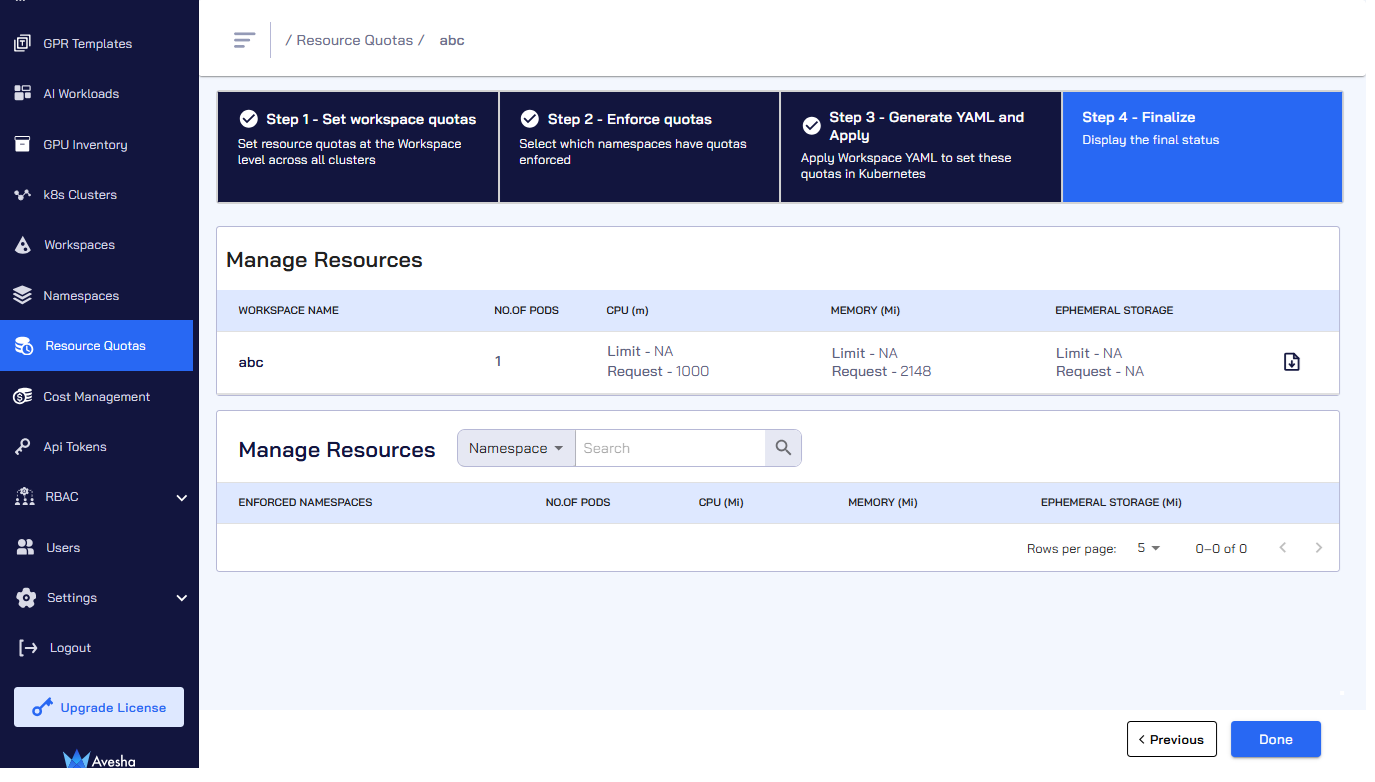
Step 4 - Finalize Resource Quotas
To finalize the quotas for limits and requests that you have configured:
-
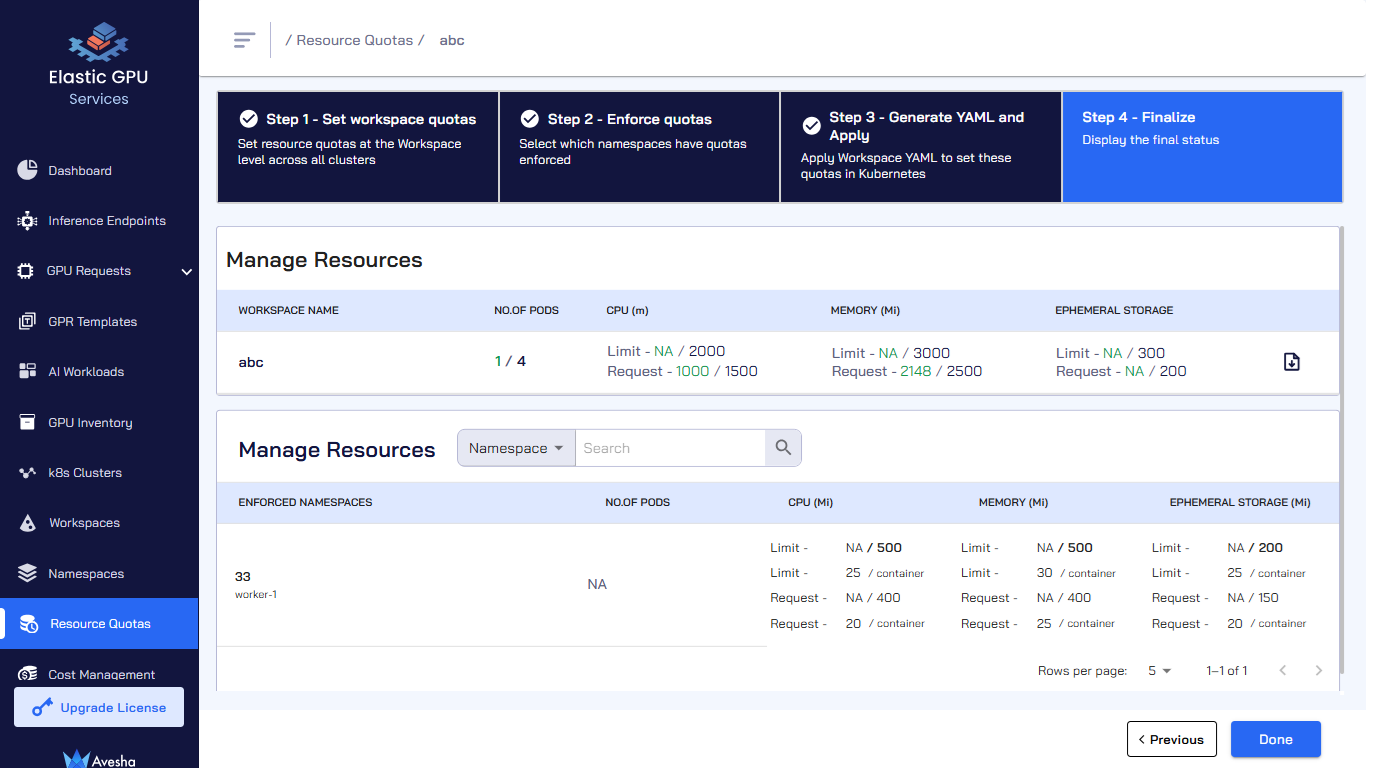
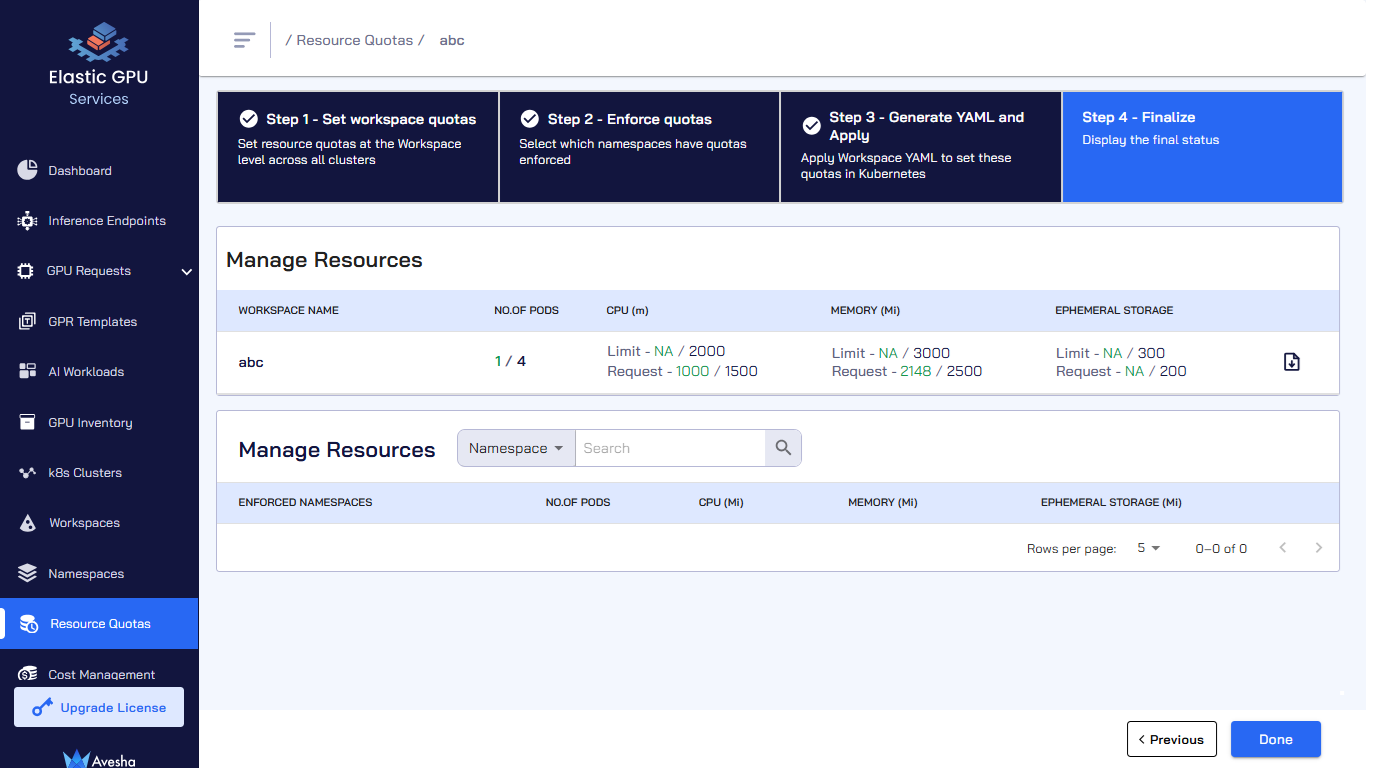
On the Step 4 - Finalize tab, scroll down to verify the workspace and namespace quotas for limits and requests that you have set.
-
(Optional) If you want to make any changes, you can go back to the previous steps to do the changes and apply the YAML again.
-
Click Done to confirm the configuration. The workspace on which you just configured the quotas for limits and requests is listed on the Resource Quotas page.
Edit Resource Quotas
You can edit the quotas for limits and requests for a workspace as per the business and application needs that results in onboarding new namespaces and so on.
To edit the quota limits and requests for a workspace:
-
Go to Resource Quotas on the left sidebar.
-
On the Resource Quotas page, select the workspace for which you want to edit the quotas for limits and requests.
-
Click the Edit Resource Quota button.
-
On the *Resource Quotas page, start editing with the first step that is editing the workspace quotas. Editing the quotas for limits and requests involves the same four steps, which you had performed when you set them.
Step 1 - Edit Workspace Quotas
To edit the workspace quotas for limits and requests:
- On the Step 1 - Set workspace quotas tab, edit the pod count (only limit), CPU, and memory limits and requests.
- Click Next.
Step 2 - Edit Namespace Quotas
To edit the namespace quotas for limits and requests:
-
On the Step 2 - Enforce quotas tab, edit the existing quotas for limits and requests for the enforced namespaces.
infoIn this step, if you set the limit for a resource, then you must set the limit per container for the corresponding resource. If you set the request for a namespace, the request per container is required if the corresponding request per container is not set under the workspace quota.
For a given resource:
- The limits for all namespaces must not exceed the corresponding limits under the workspace quota.
- The requests for all namespaces must not exceed the corresponding requests under the workspace quota.
- The limit per container for a namespace must be less than or equal to the corresponding limit for that namespace.
- The request for a namespace is less than or equal to the corresponding limit for that namespace.
- The request per container for a namespace is less than the corresponding request and the limit per container for that namespace.
- The request per container for a namespace overrides the corresponding value set under the workspace quota.
-
(Optional) Set the pod count, CPU, and memory quotas for limits and requests for namespaces that are newly added, or that were skipped earlier.
-
After you are done with editing the quotas for limits and requests, click Next to go to step 3.
Step 3 - Apply YAML
Verify the autogenerated YAML file and apply it to save the configuration.
To apply the YAML file:
- On the Step 3 - Generate YAML and Apply tab, under Code Preview, verify the autogenerated file. You can also download the YAML file by clicking the download button.
- Click Apply YAML to save the configuration.
- Click Next to go to step 4.
Step 4 - Finalize Resource Quotas
Finalize and confirm the edited quotas for limits and requests.
To finalize the edited quotas for limits and requests:
- On the Step 4 - Finalize tab, scroll down to verify the workspace and namespace limits and requests that you have set.
- (Optional) If you want to make any changes, you can go back to the previous steps to do the changes and apply the YAML file again.
- Click Done to confirm the updated configuration. The workspace on which you just updated quotas for limits and requests, is listed on the Resource Quotas page.
Delete Namespace Quotas
-
Go to Resource Quotas on the left sidebar.
-
On the Resource Quotas page, select the workspace that contains the namespaces for which you want to delete quotas for limits and requests.
-
Click the Edit Resource Quota button.
-
On the Step 1 - Set workspace quotas tab, click Next.
-
On the Step 2 - Enforce quotas tab, scroll down to Resource Quotas below the workspace quota details.
-
Under Resource Quotas, click Clear against the namespace that you want to remove quotas from.
-
The system warns you that by turning off the toggle key, the quotas enforced on the namespace will be turned off.
-
Similarly, click the Clear button or turn off the enforced quota for other namespaces on the workspace as required.
-
After removing the quotas for limits and requests, click Next to apply the YAML file.
-
On the Step 3 - Generate YAML and Apply tab, verify the new autogenerated YAML file. You can also download the YAML file by clicking the download button.
-
Click Apply YAML to save the configuration.
-
Click Next to finalize the changes.
-
On the Step 4 - Finalize tab, verify the namespace for which you had deleted the quotas for limits and requests.
-
Click Done to confirm the changes.
Delete Workspace Quotas
-
Go to Resource Quotas on the left sidebar.
-
On the Resource Quotas page, select the workspace for which you want to delete the quotas for limits and requests.
-
Click the Edit Resource Quota button.
-
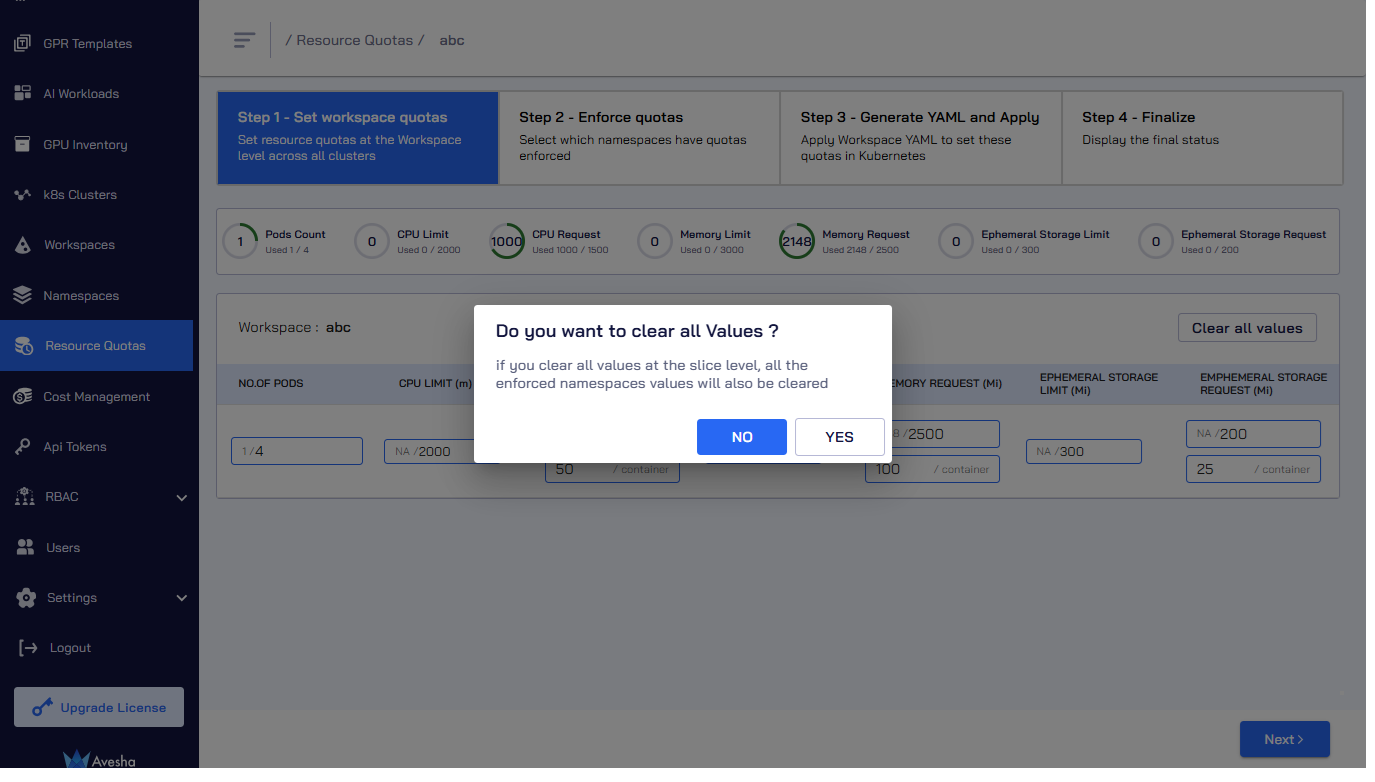
On the Step 1 - Set workspace quotas tab, click Clear all values that is toward the top-right corner of the workspace quota details.
-
The system warns you that all the quotas set on the workspace will be removed. Confirm that you want to delete.
-
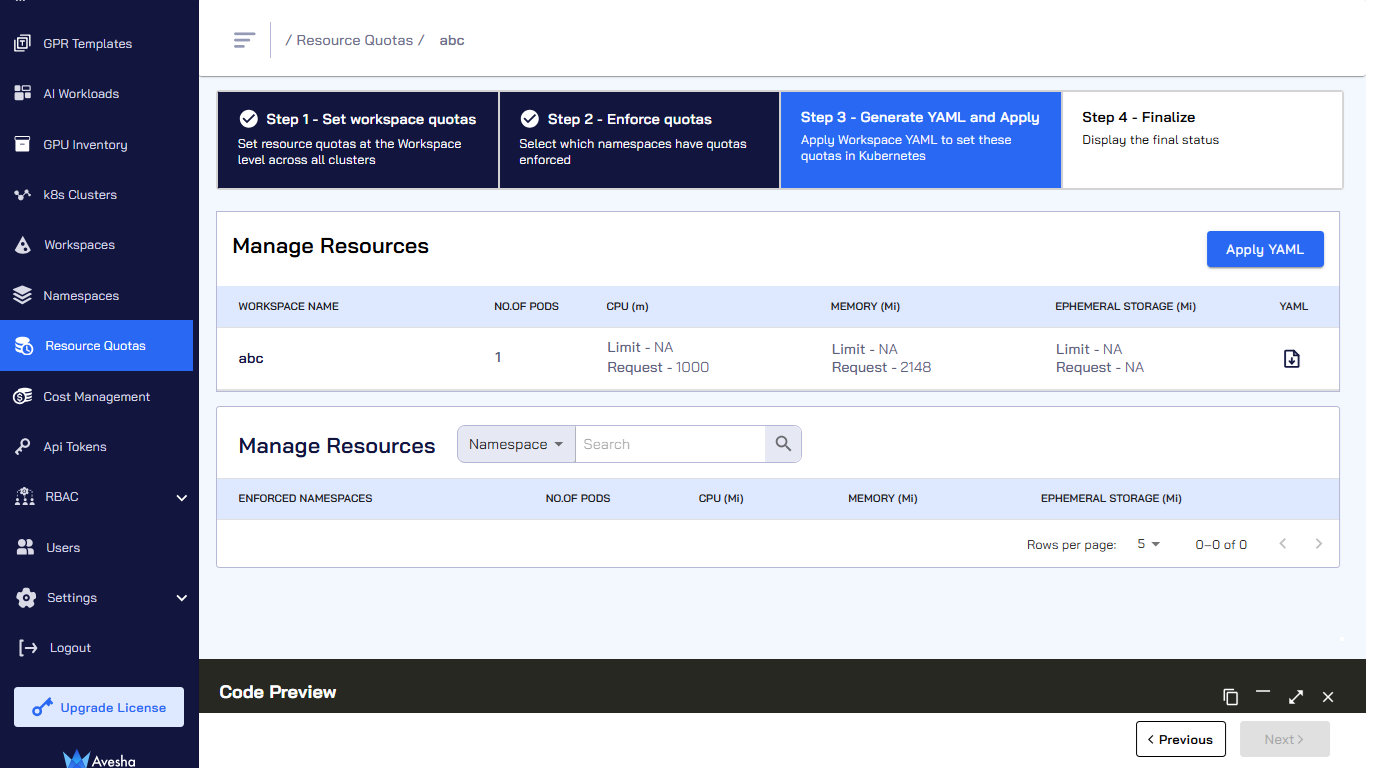
Confirming deletion takes you to Step 3 - Apply YAML.
-
Click Apply YAML to apply the workspace quotas deletion.
-
Click Next to finalize the deletion.
-
On the Step 4 - Finalize tab, click Done.
-
The quotas for limits and requests set for the workspace are deleted, and you are redirected to the Manage Resources page.
The workspace for which you just removed the quotas for limits and requests is listed.